fierox
Freakzoid
- Joined
- Oct 6, 2013
- Messages
- 85
- Reaction score
- 4
Hello all,
I started on the osw forum and was asked to post here aswell.
Perhaps its of some help to other people planning to do the same and you guys might have some tips for me aswell")
Just recently fell into the the whole custom thing, i didnt know this was so big!
I've been playing with 3D for a while and really wanted to try and 3D print something for some time.
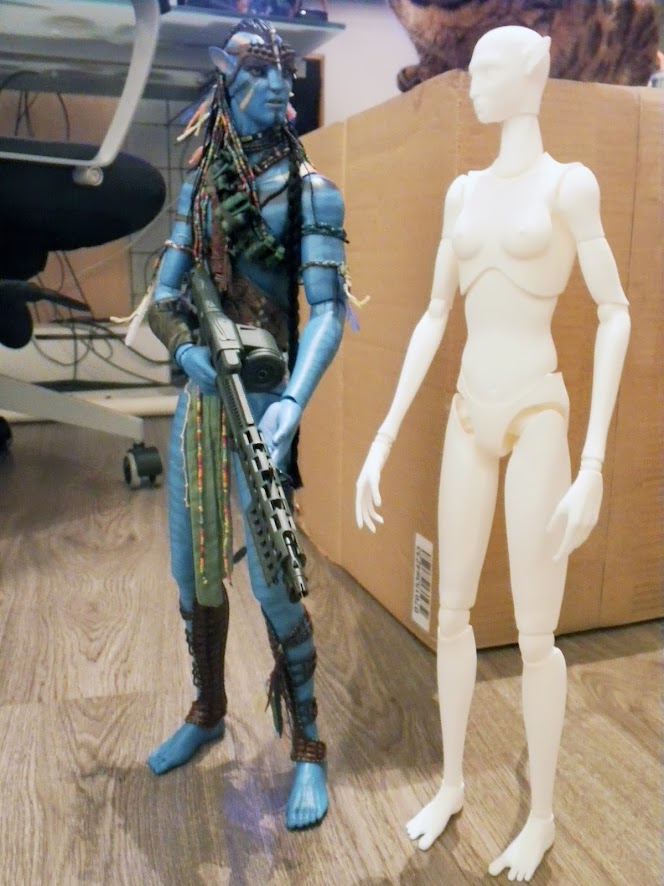
When i received my Jake Sully figure from Hot Toys he really needed some company so i thought why not try to build my own figure to accompany him.
I had stumbled on a 3D printing service called Shapeways earlier and took the specs from their site as my reference.
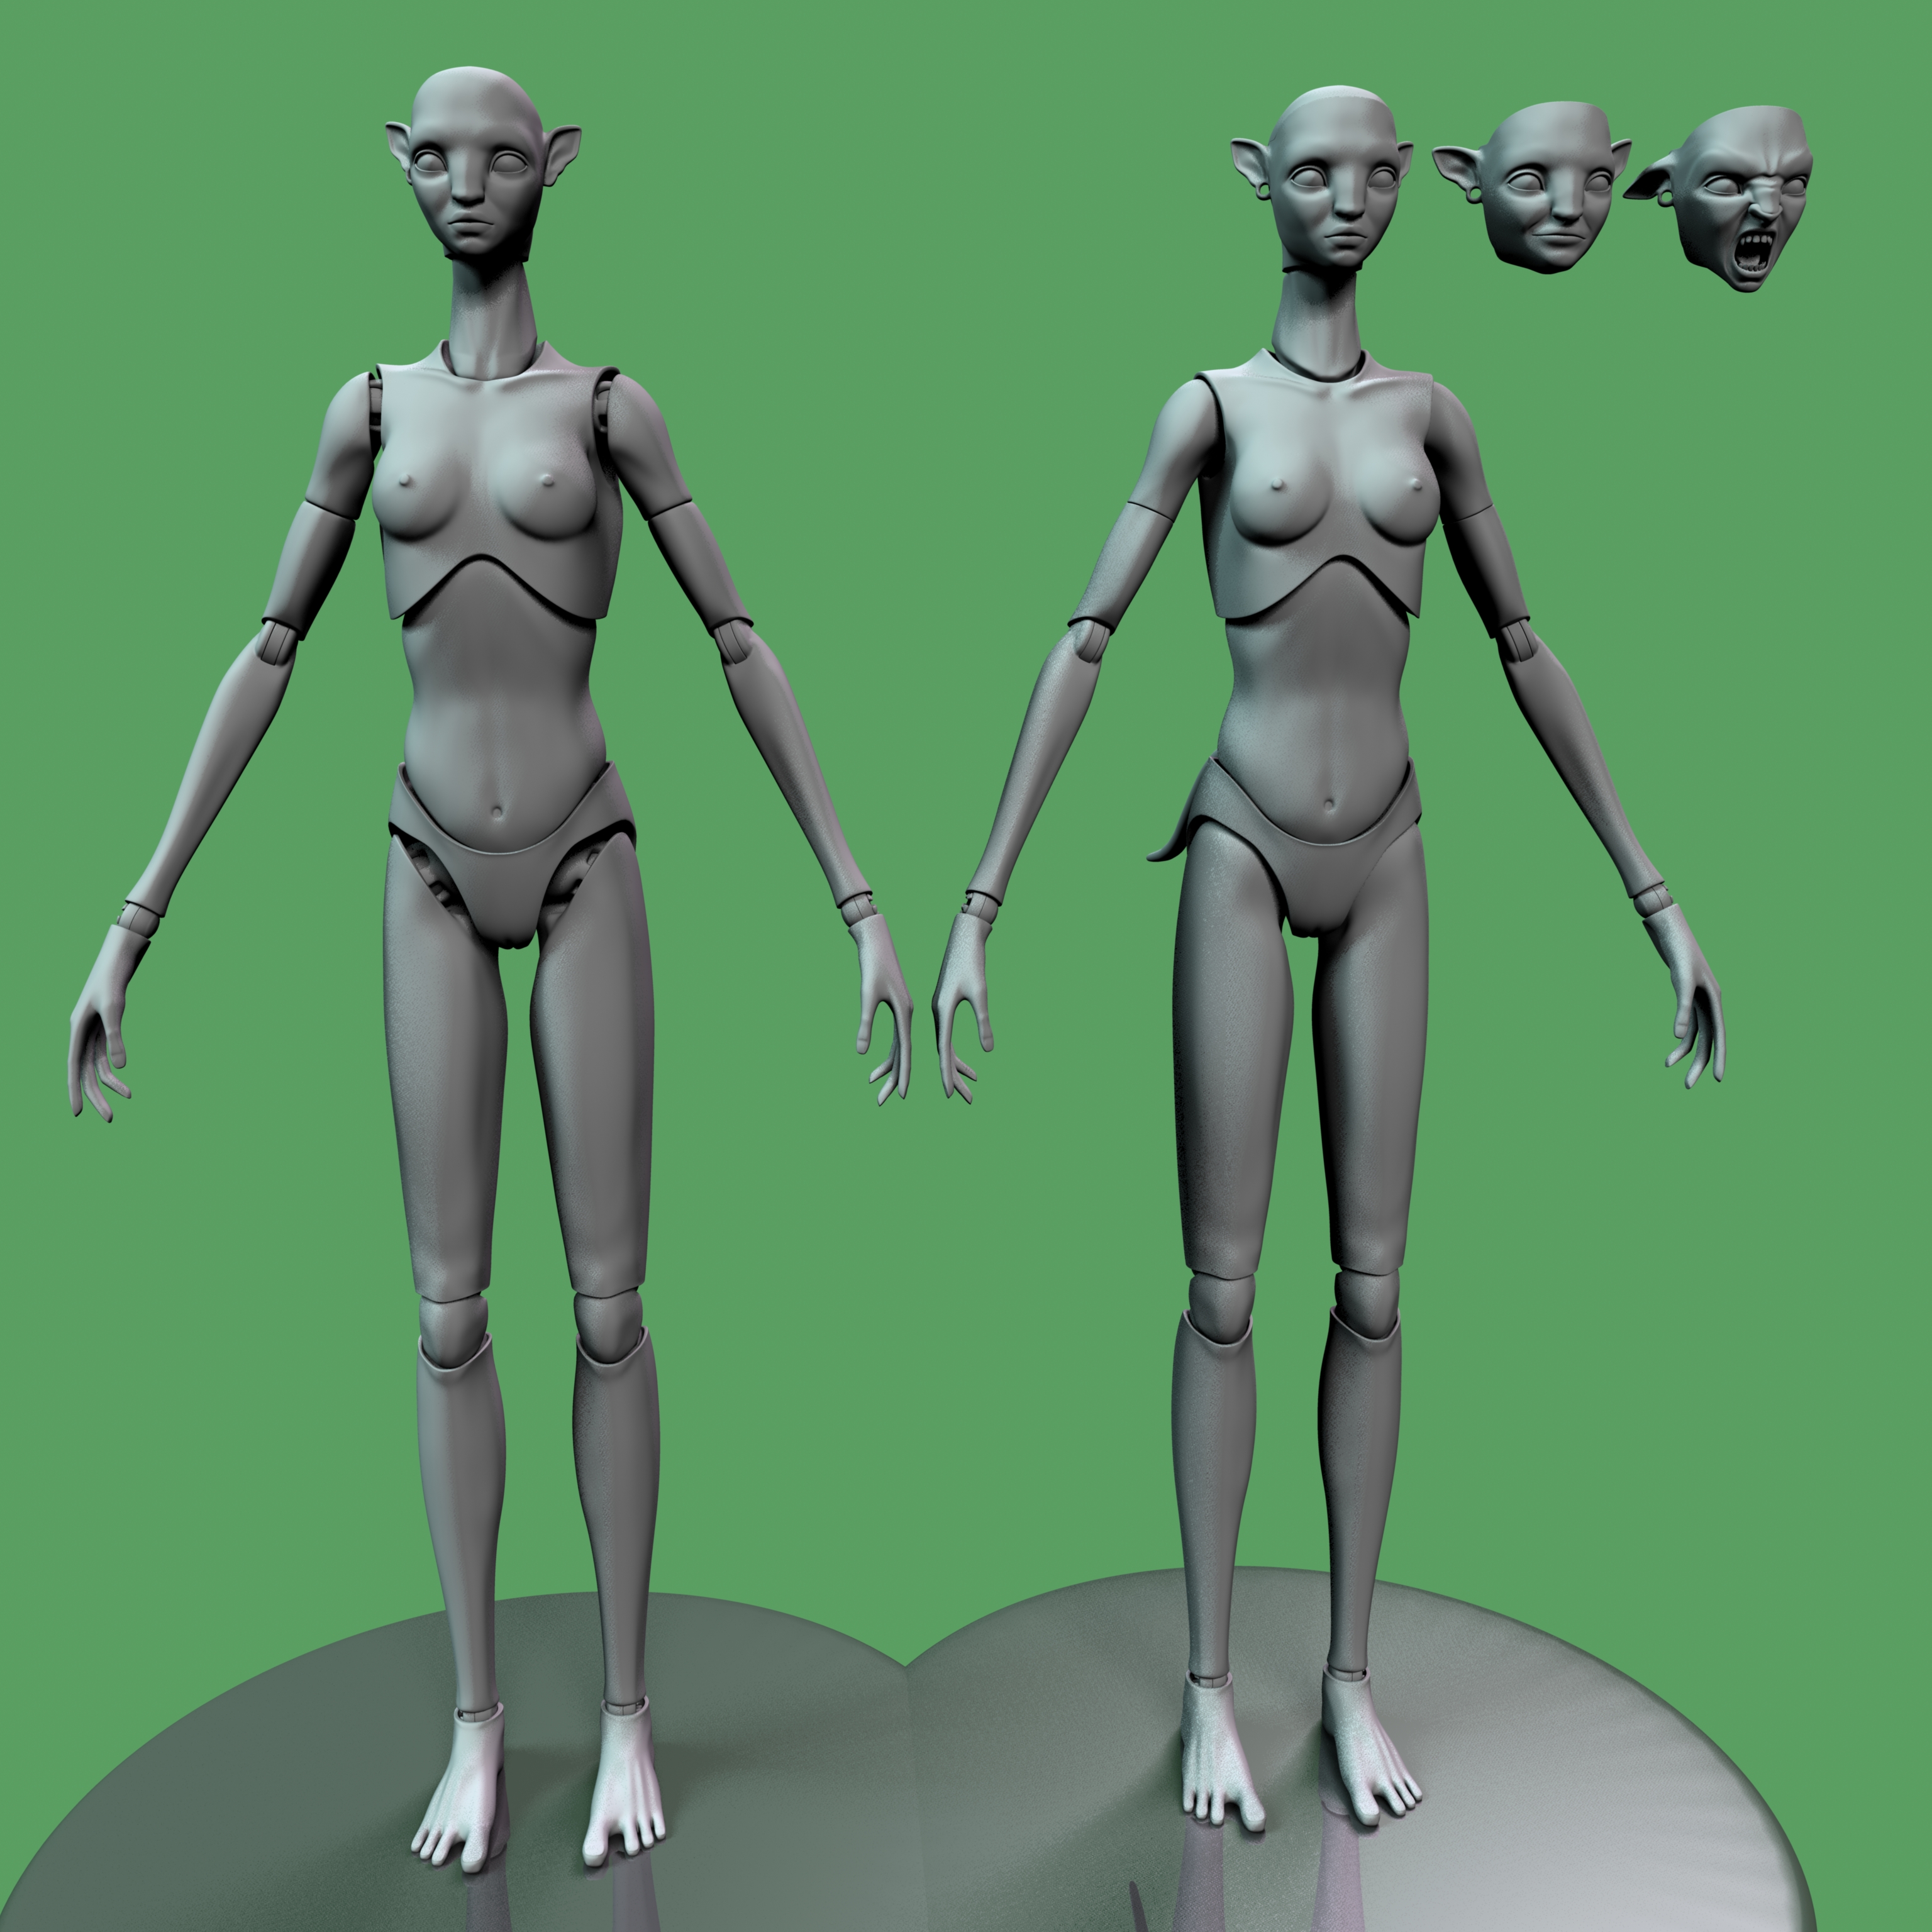
My goal was to build a figure that would fit next to the Jake figure and have as much articulation i could achieve without ruining the form with gaps and visable joints.
For Shapeways i figured the best material to be the standard or frosted version.
The standard has a minimum thickness of about 0.7 mm. When parts get thinner the model gets refused because they cant print it.
Also larger areas should be made a little thicker to prevent warping.
A good part of the price of your print is based on the amount of material used. So to keep cost down every bit of the figure where its possible should be made hollow.
There also has to be an escape hole so they can get the powder out of the hollowed out part.
My figure is 43/44 cm high and 3D printing aint cheap, especially for an entire figure.
As 3D printing goes Shapeways is pretty affordable tho, for my figure it was the cheapest i could find but do check the details and look at similair printing services, there are quite a few around.
Now i also have to mention that this "affordable" printing also comes at the cost of detail.
There are also printing services that use more advanced printers and although at a higher cost they can print alot higher detail.
Especially for small bits their technique would be the best place to start. As i understood it they use a technique called "perfactory".
Oh and here its based on surface area so models should not be hollowed out!
first design of the figure:
Now onto the figure..
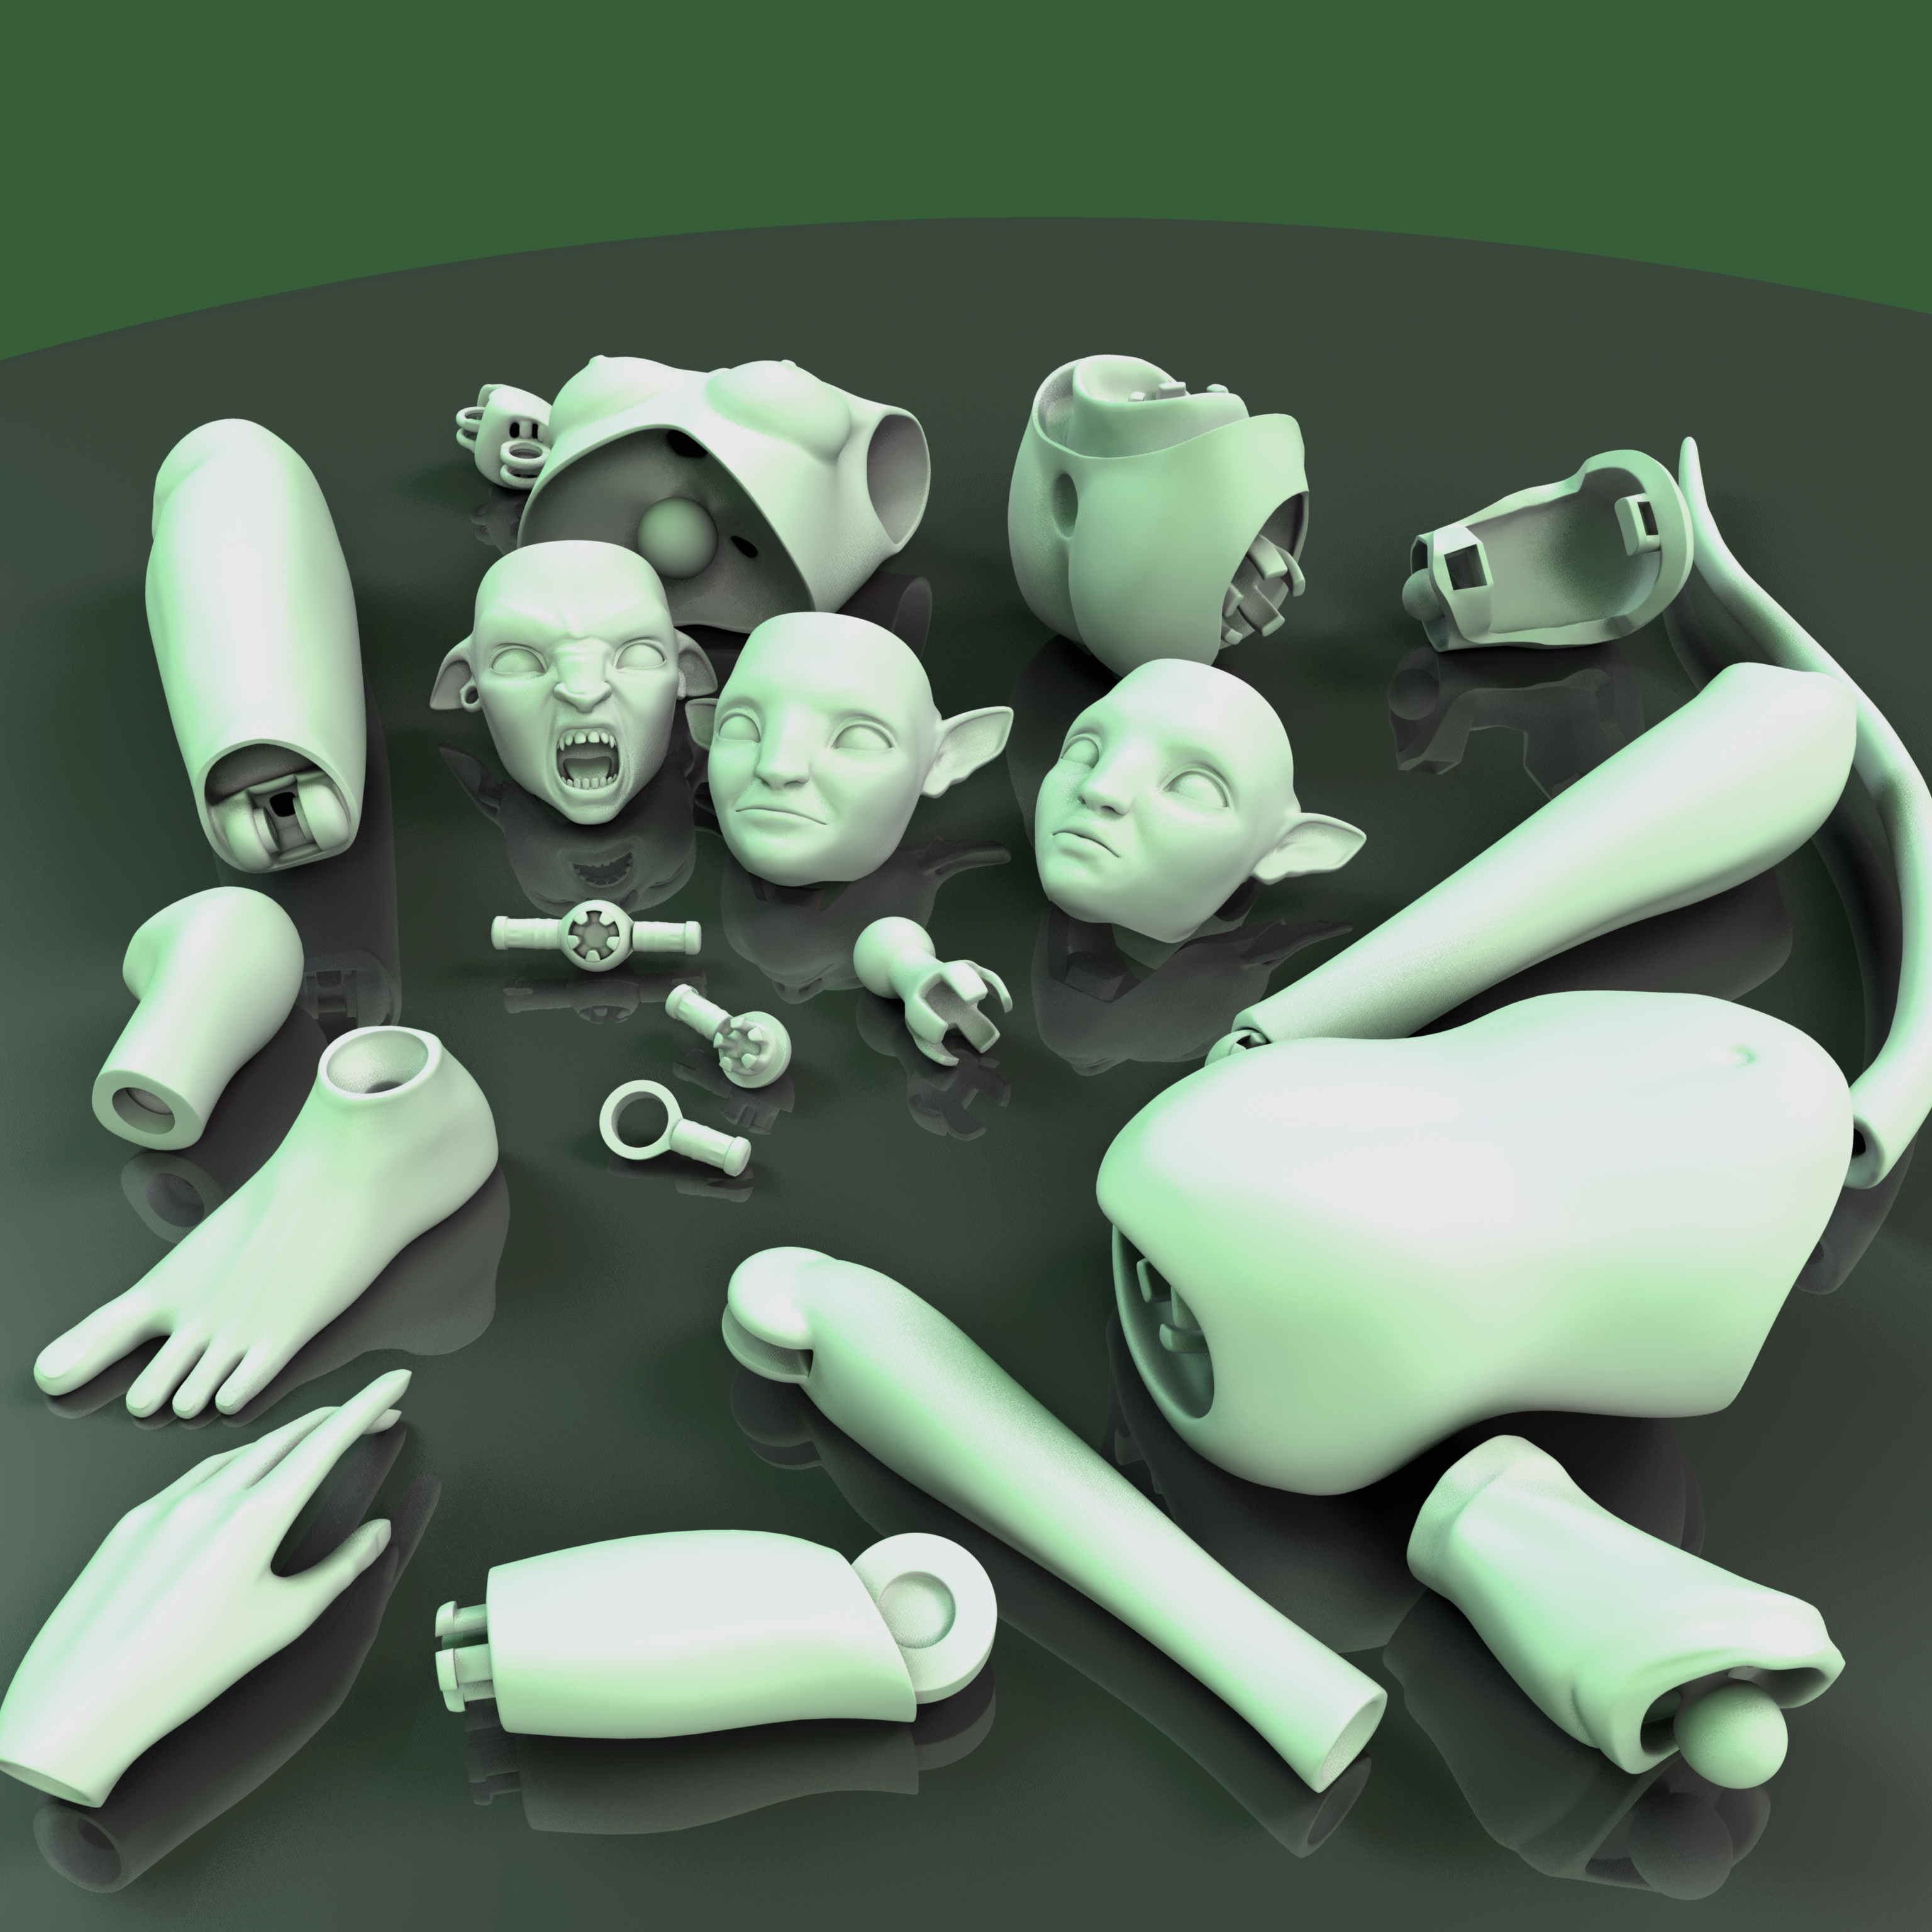
First i made the figure with the printing specs in mind. Though of where i wanted the joints and broke it into pieces.
Then i started designing joints and soon found out that this was actually the hardest part of the figure!
The joints i made basically work using friction and flexing so the difference between working joints, loose or not fitting parts is very close.
Pretty sure i still havent cracked it completely, if i ever do another figure i'll try to build it around more complicated joints but thats for another time.
Various joints,
model:
and printed:
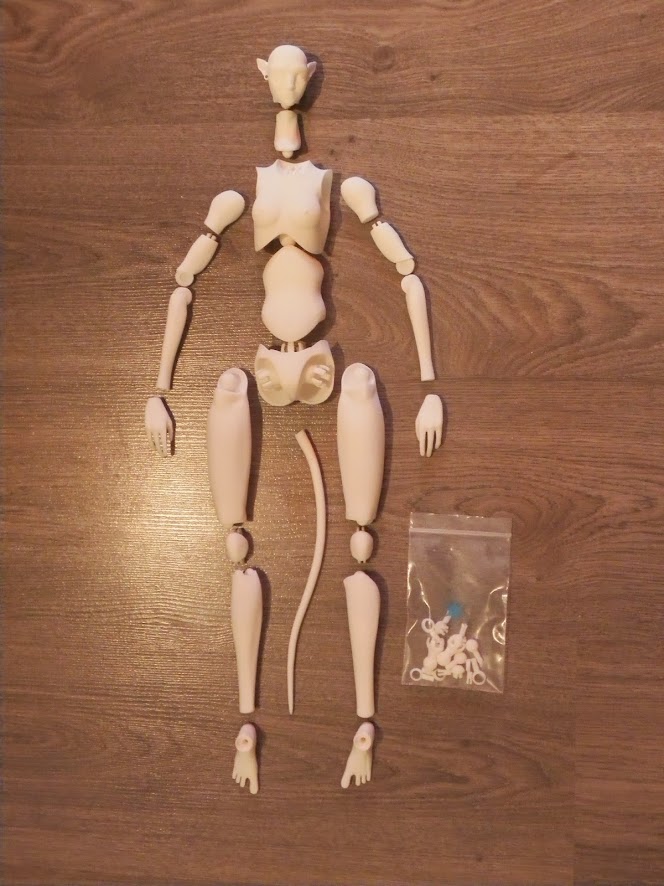
When all the parts where done i took the figure apart and made an order to get it printed, a few weeks later the figure arrived.
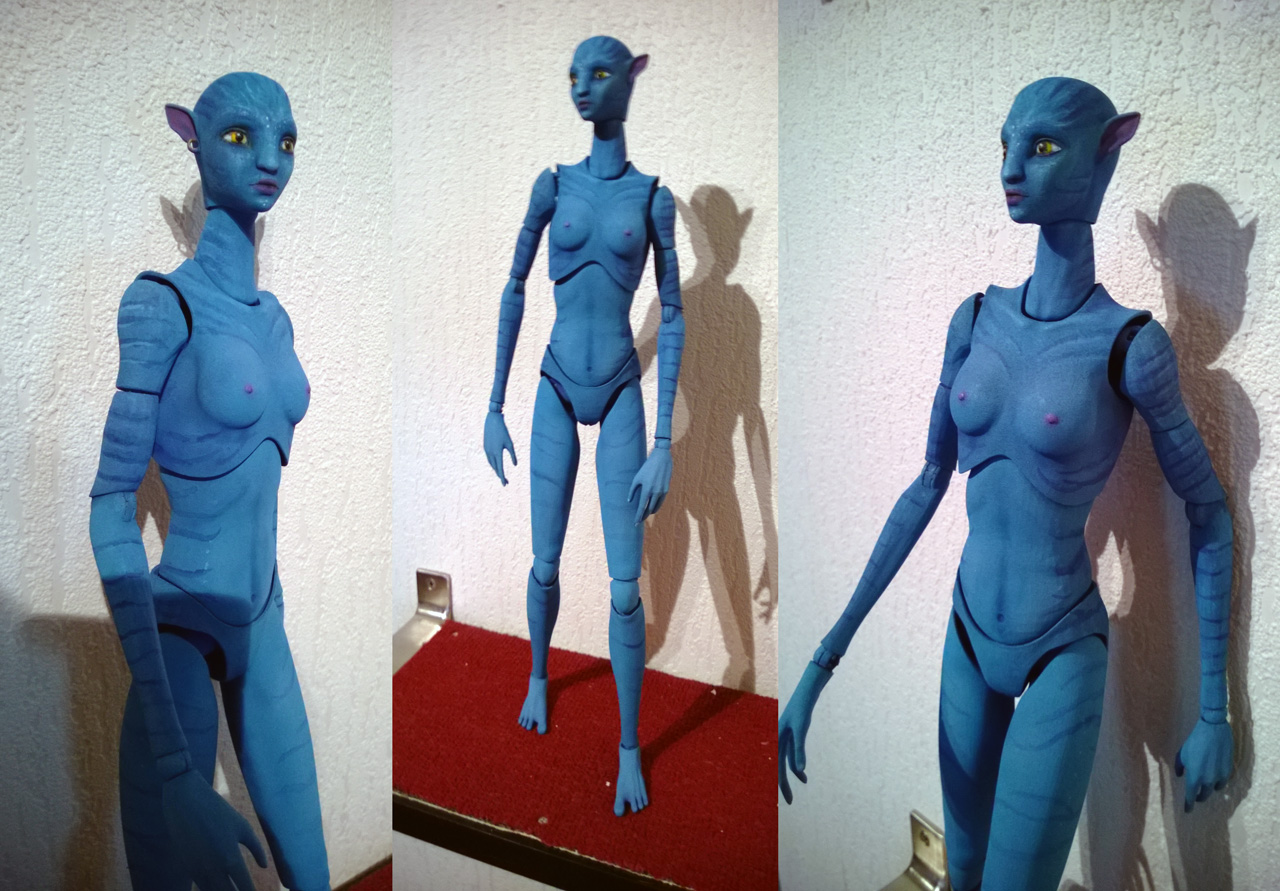
At the time i knew i was probably going todo another print so i used cloth dye to give the figure a blue base color but at this time it might also be the right moment to make a mold of your figure and continue with that.
parts:
assembled next to Jake:
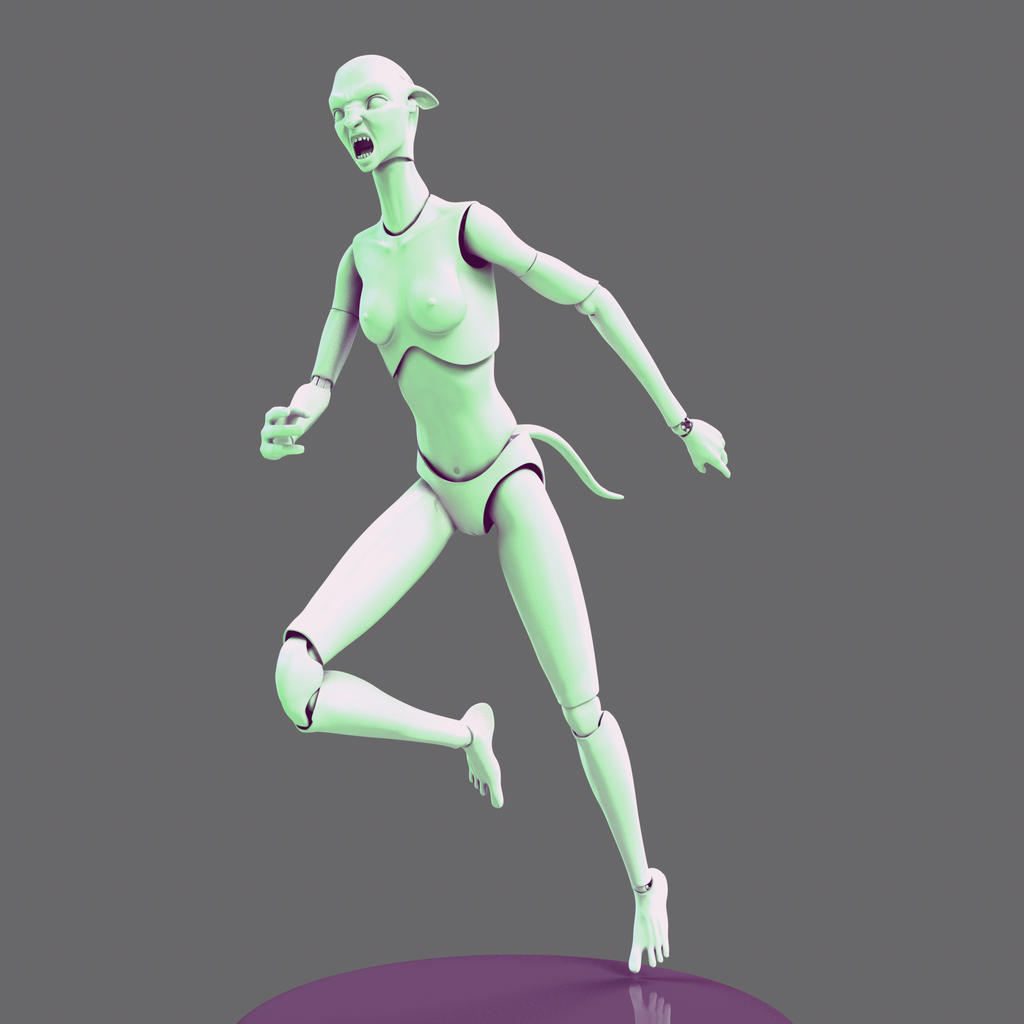
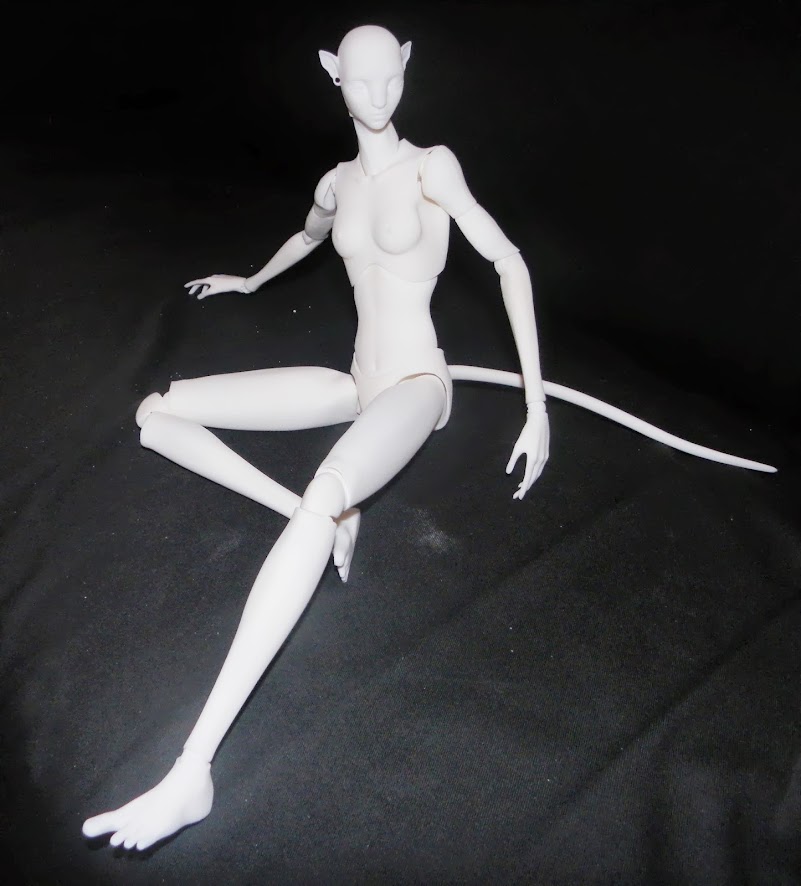
Posing:
Either way the material i picked for printing has a rough surface and is very porous so not too good for painting.
Still it was fun to see the figure come to live with a bit of paint (a local painter did the paint).
I started on the osw forum and was asked to post here aswell.
Perhaps its of some help to other people planning to do the same and you guys might have some tips for me aswell
Just recently fell into the the whole custom thing, i didnt know this was so big!
I've been playing with 3D for a while and really wanted to try and 3D print something for some time.
When i received my Jake Sully figure from Hot Toys he really needed some company so i thought why not try to build my own figure to accompany him.
I had stumbled on a 3D printing service called Shapeways earlier and took the specs from their site as my reference.
My goal was to build a figure that would fit next to the Jake figure and have as much articulation i could achieve without ruining the form with gaps and visable joints.
For Shapeways i figured the best material to be the standard or frosted version.
The standard has a minimum thickness of about 0.7 mm. When parts get thinner the model gets refused because they cant print it.
Also larger areas should be made a little thicker to prevent warping.
A good part of the price of your print is based on the amount of material used. So to keep cost down every bit of the figure where its possible should be made hollow.
There also has to be an escape hole so they can get the powder out of the hollowed out part.
My figure is 43/44 cm high and 3D printing aint cheap, especially for an entire figure.
As 3D printing goes Shapeways is pretty affordable tho, for my figure it was the cheapest i could find but do check the details and look at similair printing services, there are quite a few around.
Now i also have to mention that this "affordable" printing also comes at the cost of detail.
There are also printing services that use more advanced printers and although at a higher cost they can print alot higher detail.
Especially for small bits their technique would be the best place to start. As i understood it they use a technique called "perfactory".
Oh and here its based on surface area so models should not be hollowed out!
first design of the figure:
Now onto the figure..
First i made the figure with the printing specs in mind. Though of where i wanted the joints and broke it into pieces.
Then i started designing joints and soon found out that this was actually the hardest part of the figure!
The joints i made basically work using friction and flexing so the difference between working joints, loose or not fitting parts is very close.
Pretty sure i still havent cracked it completely, if i ever do another figure i'll try to build it around more complicated joints but thats for another time.
Various joints,
model:
and printed:
When all the parts where done i took the figure apart and made an order to get it printed, a few weeks later the figure arrived.
At the time i knew i was probably going todo another print so i used cloth dye to give the figure a blue base color but at this time it might also be the right moment to make a mold of your figure and continue with that.
parts:
assembled next to Jake:
Posing:
Either way the material i picked for printing has a rough surface and is very porous so not too good for painting.
Still it was fun to see the figure come to live with a bit of paint (a local painter did the paint).
Last edited: