


galactiboy
OT Preferist
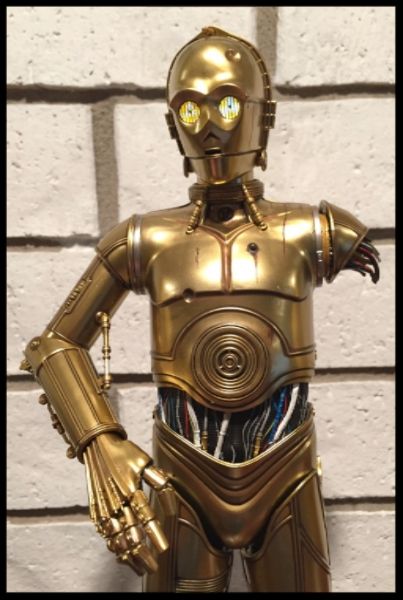
Here's a thread with some tips and tricks to get the most out of your Sideshow Collectibles C-3PO.
If you have some additional suggestions please post them here and I can add them to the first post for ease of access.
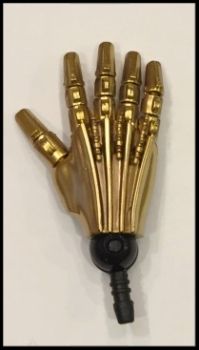
Thumb Modification
As many collectors have noted the thumbs on the Stock figure are at an odd angle and look either like a 5th finger or a claw. Sadly it's not really possible to rotate the thumb due to the design of the hand, but with a bit of work you can modify the thumb into a ball joint and correct this issue.
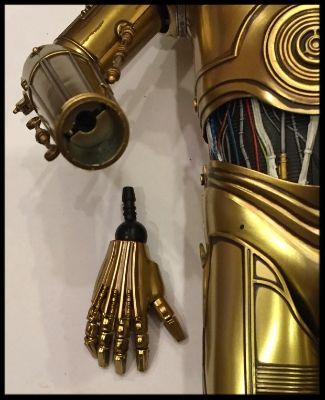
Step 1: Remove the Hand
Grip the hand by holding onto the palms (avoiding any pressure on the fingers) and pull straight out. You will get some resistance, but the wrist peg will come out.
*Do not try to pull the wrist peg out of the hand, it is not removable at this step!
Step 2: Open the Hand
Take a thin and rigid knife (or similar tool) and work it into the sides of the palm where the gold and black pieces are joined. Work the tool in carefully and when you are able to get enough leverage use the tool to pop the halves apart. This is the scary part, but if you are careful you should be able to break the hand apart w/o marring the gold paint or damaging the plastic.
Once the hand is open you'll discover the problem with the thumb, it's a T-joint that prevents any rotation. And since the T-joint is oriented in a way that keeps the ridges of thumb in line with the rest of the fingers it looks off.
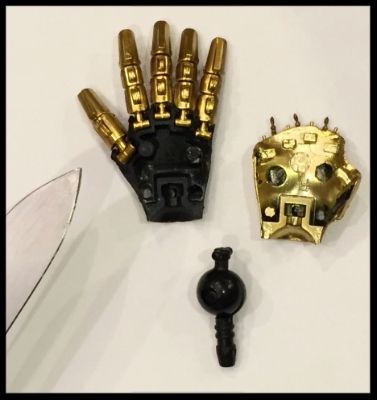
Step 3: Dremmel the T-Joint
Take a dremmel with a pointed sanding tool and carefully round out the T-joint until it is ball shaped and able to fit in the original housing and rotate freely. If you place the hand back together and the thumb doesn't rotate; remove a bit more. If it's too loose put a tiny bit of electrical tape on the ball to get a tighter fit.
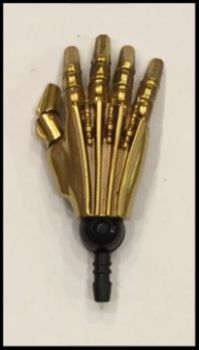
Step 4: Reassemble 7 Enjoy!
Use a bit of glue on the male and female parts of the inside of the palm and reassemble. It's a bit of a trick to hold the wrist joint and thumb in place while reassembling, but just be patient and take your time.
"Chocolate Milk" Removal
The weathering on C-3PO is okay... but a bit heavy handed. Probably the biggest issue is that it looks like he's been covered in chocolate milk (credit to Wor-Gar for that one). Removal is easy, but time consuming
Step 1: Select an area you would like to work on (in this case a smudge of brown on C-3PO's stomach).
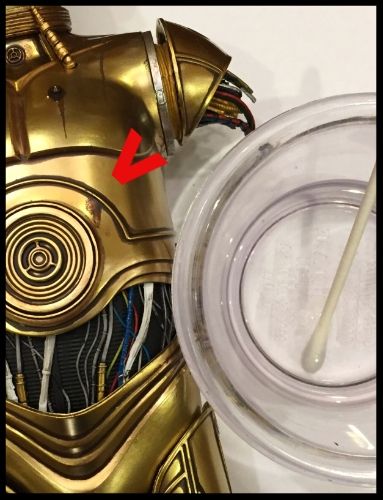
Step 2:
Take some rubbing alcohol (I use 90%), load up a Q-Tip and work the Q-tip back and forth until the brown is removed. Wipe the area off afterward with a damp cloth to on the off chance the rubbing alcohol could damage the finish, but so far it seems like the underlying metallic paint job is very resilient.
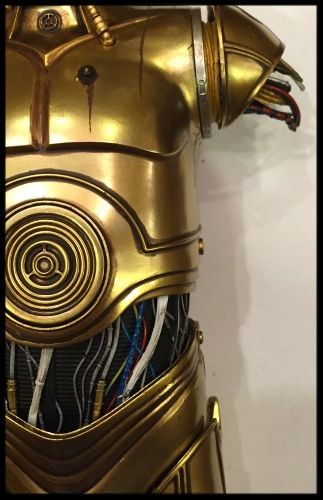
That's it for now... I'll eventually reapply some new weathering; but first I have to remove more of what's there
If you have some additional suggestions please post them here and I can add them to the first post for ease of access.
Thumb Modification
As many collectors have noted the thumbs on the Stock figure are at an odd angle and look either like a 5th finger or a claw. Sadly it's not really possible to rotate the thumb due to the design of the hand, but with a bit of work you can modify the thumb into a ball joint and correct this issue.
Step 1: Remove the Hand
Grip the hand by holding onto the palms (avoiding any pressure on the fingers) and pull straight out. You will get some resistance, but the wrist peg will come out.
*Do not try to pull the wrist peg out of the hand, it is not removable at this step!
Step 2: Open the Hand
Take a thin and rigid knife (or similar tool) and work it into the sides of the palm where the gold and black pieces are joined. Work the tool in carefully and when you are able to get enough leverage use the tool to pop the halves apart. This is the scary part, but if you are careful you should be able to break the hand apart w/o marring the gold paint or damaging the plastic.
Once the hand is open you'll discover the problem with the thumb, it's a T-joint that prevents any rotation. And since the T-joint is oriented in a way that keeps the ridges of thumb in line with the rest of the fingers it looks off.
Step 3: Dremmel the T-Joint
Take a dremmel with a pointed sanding tool and carefully round out the T-joint until it is ball shaped and able to fit in the original housing and rotate freely. If you place the hand back together and the thumb doesn't rotate; remove a bit more. If it's too loose put a tiny bit of electrical tape on the ball to get a tighter fit.
Stock regular finger T-joint next to a dremmeled thumb T-joint

Step 4: Reassemble 7 Enjoy!
Use a bit of glue on the male and female parts of the inside of the palm and reassemble. It's a bit of a trick to hold the wrist joint and thumb in place while reassembling, but just be patient and take your time.
Then reinsert the hand into C-3PO and you're done. Now the finger can rotate and move up and down allowing for a better articulation and appearance.
"Chocolate Milk" Removal
The weathering on C-3PO is okay... but a bit heavy handed. Probably the biggest issue is that it looks like he's been covered in chocolate milk (credit to Wor-Gar for that one). Removal is easy, but time consuming
Step 1: Select an area you would like to work on (in this case a smudge of brown on C-3PO's stomach).
Step 2:
Take some rubbing alcohol (I use 90%), load up a Q-Tip and work the Q-tip back and forth until the brown is removed. Wipe the area off afterward with a damp cloth to on the off chance the rubbing alcohol could damage the finish, but so far it seems like the underlying metallic paint job is very resilient.
That's it for now... I'll eventually reapply some new weathering; but first I have to remove more of what's there
Last edited:


")


