Modification/Customization for the DX12 Batman Figure

Collector Freaks Forum

Help Support Collector Freaks Forum:

This site may earn a commission from merchant affiliate links, including eBay, Amazon, and others.
1) I don't believe you can't see the diffence. Not calling you a liar. Maybe denial of some kind?

2) you good at modding stuff. Better than me.

Denial? Really? :lol why would I be in denial about that neck but not about everything else I've done to this figure?

Maglor said:
The sonar neck? Now I know you're lying. :lol
So you are calling me a liar?? :lol
I'll never understand how someone could say either of the necks on the DX02 were okay though...

Just like the DX12 neck, if I found something wrong with the length of those necks, I would've tried to do something about it just as I've been working on the DX12, but I didn't simple as that :dunno
 
I've done what I believe to be the last mod for this figure. I dared the squint mod and spent forever trying to sculpt it the best I could. Didn't realize how tough it would be lol but I like the final result enough to where I'm happy with it minus just a little touch up on the eyelids later. Thanks to everyone on here for their advice and sharing their amazing mods so that we can have the best Batman for our collections!

BB9E07F2-8E4A-4A5E-A5B5-17B8B7335E97-739-00000026ED2E9878.jpg


B4D1960E-25E1-4CBE-A308-F7B34CE5040A-739-00000026F3D3C8C3.jpg


16880C21-D14E-451A-AA37-F682A4E18C37-739-00000026FADC7241.jpg


TheDarkKnightRises_zps558c9c1d.jpg
 
Last edited:
Denial? Really? :lol why would I be in denial about that neck but not about everything else I've done to this figure?


So you are calling me a liar?? :lol


Just like the DX12 neck, if I found something wrong with the length of those necks, I would've tried to do something about it just as I've been working on the DX12, but I didn't simple as that :dunno

Not gonna argue. I believe you can see the difference between the stock DX12 and the shoulder shimming mod (without me having to post pictures annotated with lines and arrows). If you don't like the way it looks moded, the don't mod it. It's not going to offend me. :1-1:


Regarding the DX02... I won't repost my ET pic...

So you really are calling me a liar. Wow....

It's not about not liking the mod it's about simply not caring to try to fix something I don't see needing to be fixed. Why can't you just accept that. Look at some of the ppl in the DX12 thread that like the figure stock and don't see anything wrong with the way it is besides maybe the cape? :huh: they see something totally different than me and you and every other person. Same reason I haven't done the ankle mod either, don't see a need to.
 
just for fun, wanted to do this custom shoulder pad since DX02 came out, now we got the DX12, going all out on both :yess:

*Note, I test this custom on the DX02 first, since our DX02 has the sleeves mod way before HT releases theirs..... then will do the same on the DX12 after.

First, cut the underneath should pad out
DSC09418_zpsec37c701.jpg


Then re-make the shoulder pad from scratch with plastic sheet
DSC09419_zps9775526e.jpg


Mold the pad in desire shape with heat

DSC09420_zpse3853cff.jpg


Once satisfy with the shape, spray painted with matt black color

DSC09423_zps7004a047.jpg


Now we add our custom cape onto the suit, the fabric on the cape surround the edge of the shoulder pad real well.
DSC09426_zpsea03f331.jpg


Just need to readjust a few parts on the armor over all, it'll be good to go :yess:

DSC09427_zps1cdf8ec5.jpg


DSC09430_zpsbb3c9a0b.jpg


DSC09432_zps7ad9c6f5.jpg
 
looks great tony.
i didnt realize the dx02 shoulder pads were smaller than the dx12. might have to hunt a pair down.
 
Custom neck mod, we made a new neck sleeve to go over the original neck piece on both our DX02 and DX12. Now it has the real mesh in it :) Will be thicken it a bit more, these are still prototype...

DKRNeck1220124_zps95ff0067.jpg
 
Last edited:
Some pics of Robbie's faceplate:

Flash:
3_zps0233d2aa.jpg


No Flash:

4_zpsf94e5506.jpg

2_zps8a124a71.jpg

1_zps99cfb7f6.jpg


I think this might be my favorite look so far out of the stock plates, DX02, and the face portion of the Medi.
 
That faceplate looks great! Thanks for the photos. Excited for mine to arrive.

And TonyMeis, I'm glad someone is tackling a fabric neck for this figure. More pics of the finished piece on the figure, please. :clap

@Maglor: I will get the Kevlar connectors post up later today. sorry, work and holiday obligations have taken up a lot of my time recently and I only just now finished an overhaul of the collar area.
 
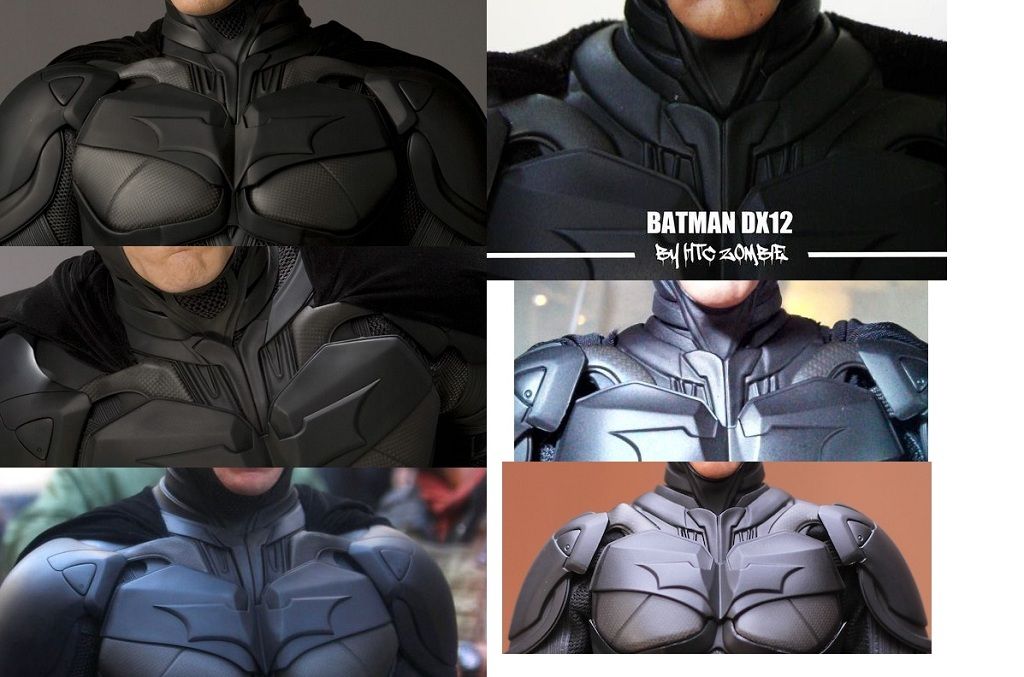
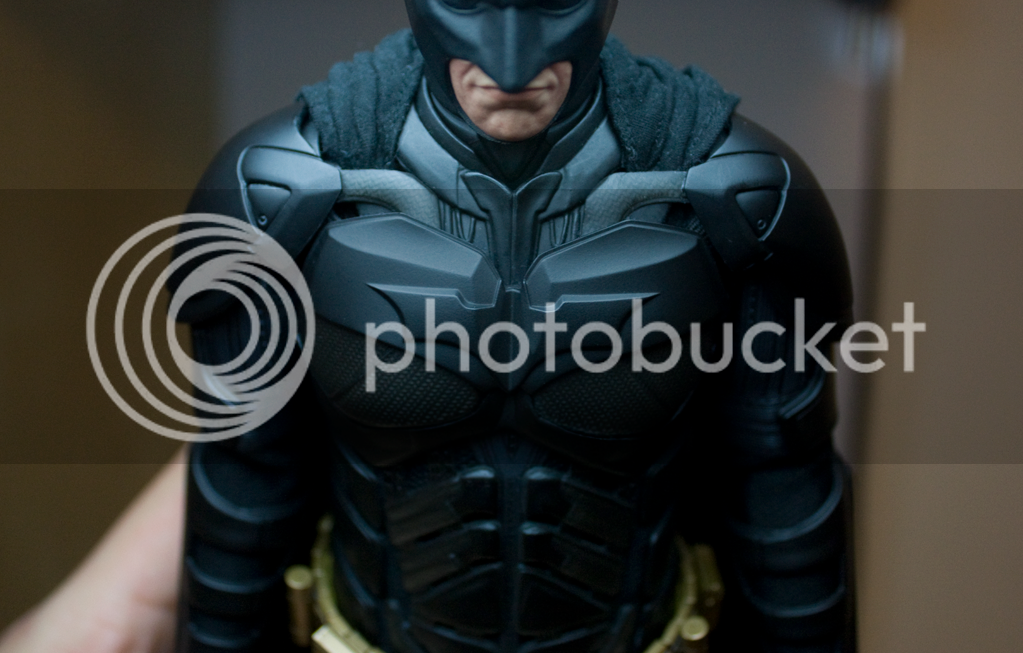
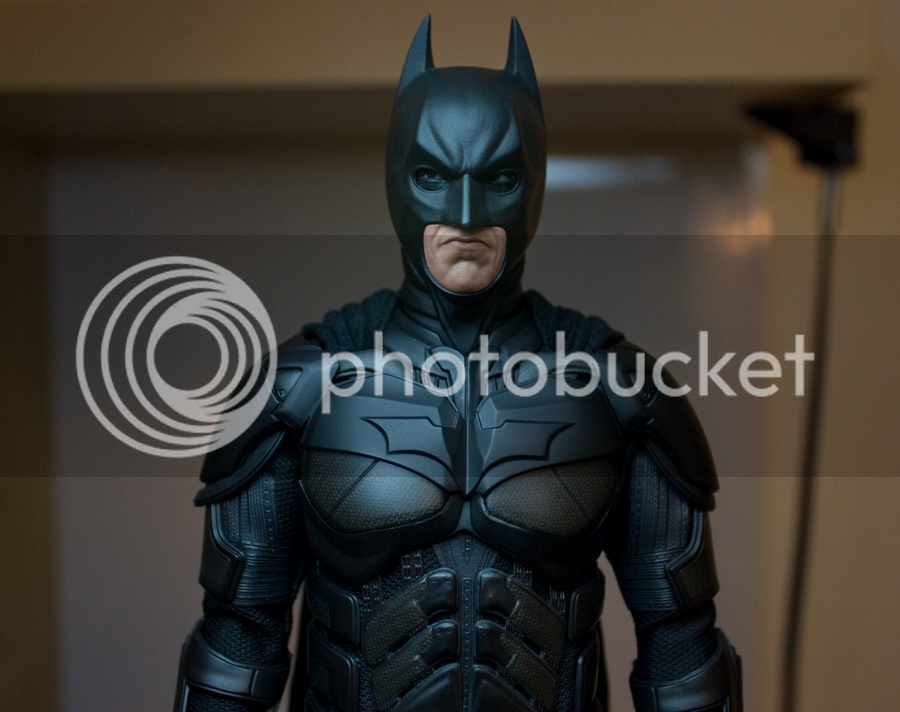
A few observant folks here on the boards noticed that the kevlar connectors on the DX12's collar were wildly innaccurate, which is bizarre considering that past HT releases of this suit had gotten the general shape and curve of these connectors right, for the most part. Sort of. The DX12's connectors by comparison lack angular features and have too round a curve at its apex. Examples can be found below.

At least one person here chose to hotswap the DX02's shoulders and connectors onto the DX12, and it looks very nice.

For those (like me) who do not have a DX02 figure to take parts from, we had to either live with the innaccuracy on the DX12 or do something about it. It's a minor detail that I'm sure only the most compulsively detail-oriented will even notice in any given situation, but for the rest of us, it means another mod. :lol I don't what it is about this figure that brings out my OCD.

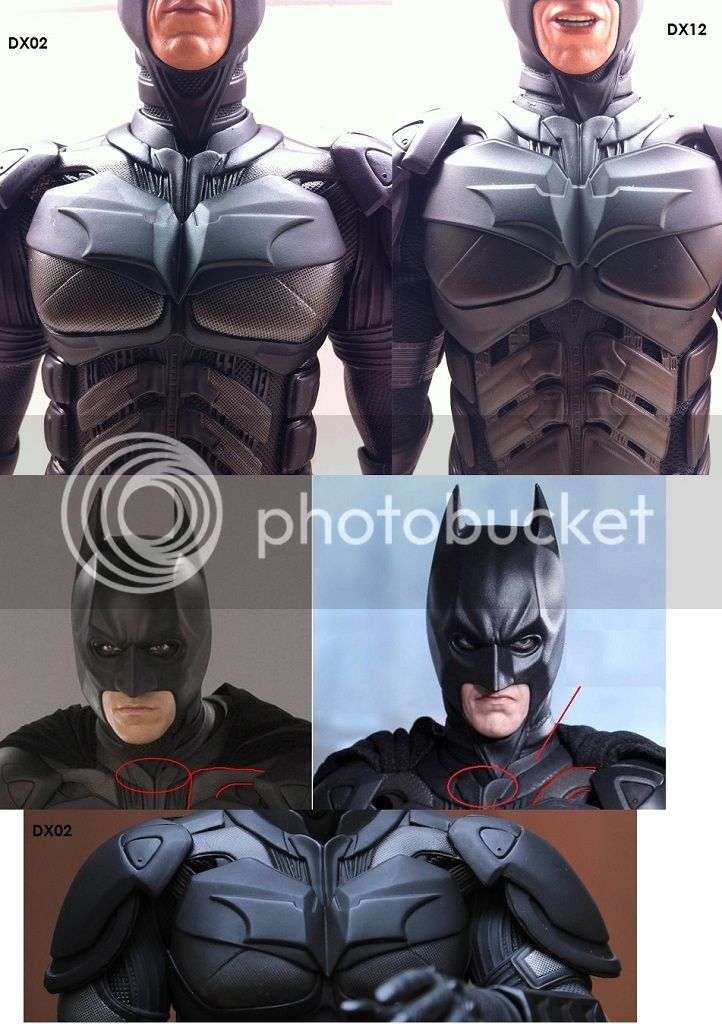
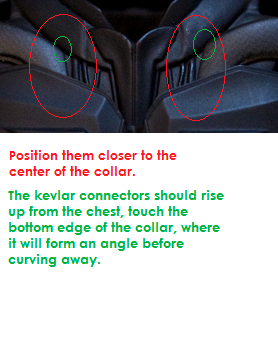
Okay, here's a comparison between the DX12 kevlar connectors, the actual suit's connectors, and the DX02's connectors on the DX12.

You'll notice that on the actual suit and on the DX02, the connectors rise up from the chest very close the the vertical lines near the center of the area between the base of the neck and the top of the chest. They then touch the collar befor they start curving to the shoulder pads.

Batmanstudio12_zps8ebb78d7.jpg


The DX12 is very incorrect in this regard. The DX02 had better connectors, by comparison
001721exa8aoevfo995fop_zpsdbe4083f.jpg


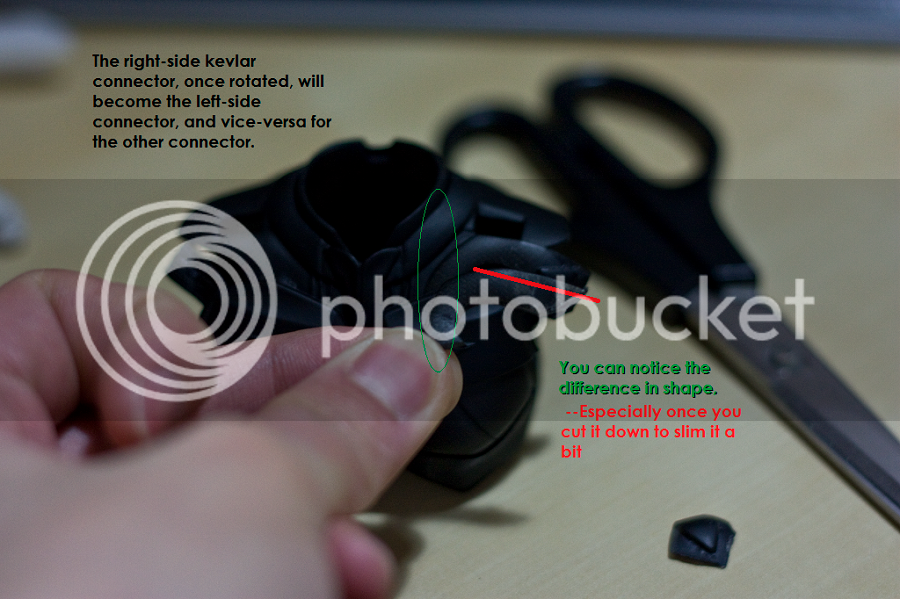
I've altered the kevlar connectors on mine. Maglor asked me to post about it, so I will. You may have seen the result in some photos I posted in the past week, but I went back to it recently and further modified them. What we are essentially doing is taking the connector from one side, rotating it, and then switching it with the connector on the other side.

It is a very extensive and involved mod, and the risk for damage is high. It requires a lot of cutting and regluing.

You might ask: Wouldn't it be easier to just heat them up and re-adjust? There's only so much you can do that way. Because they are so tightly connected to the shoulder pads and chest, there's not much wiggle room to adjust the connectors.

Steps:

1. Remove the chest armor (refer to Maglor's chest armor guides on the first page for this process).

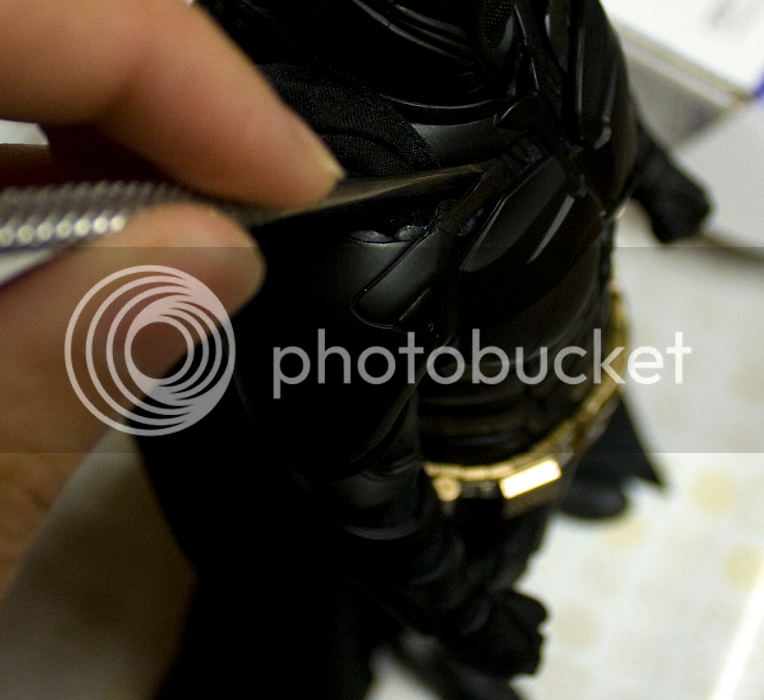
2. The chest armor is comprised of two layers glued together. The kevlar connectors are glued down to the lower layer. You will need to carfully, using a flat head screwdriver or a blade, pry and peel the kevlar connectors off of the chest armor. There's very little gapping between the top layer of the chest armor and the lower layer, so this will be difficult if you don't peel the two layers apart first (not necessary, however).

IMG_6968ss_zpsda686b1e.png

IMG_6565_zpsed92e5f9.png


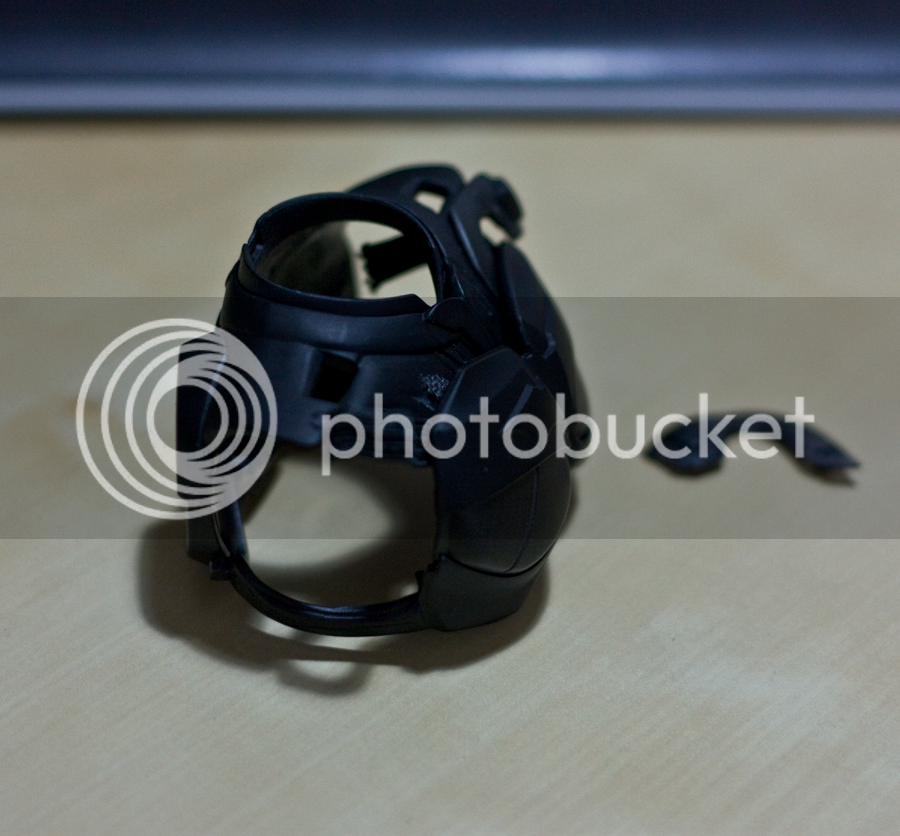
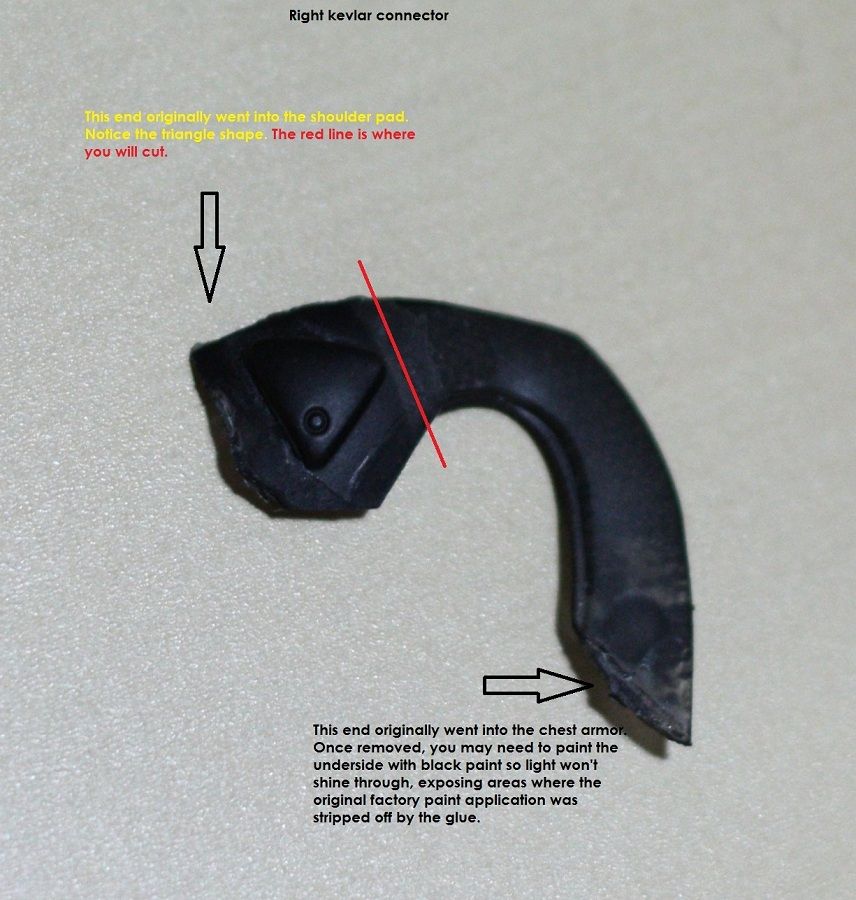
3. The opposite ends of each kevlar connector is glued directly underneath the shoulder pads. That's where the complication comes in. Notice the triangle shapes embedded in each shoulder pad? Those are actually connected to each kevlar connector.

When you peel the ends of each connector from the shoulder pads, you will get this:

IMG_6564A_zps074c48cd.jpg


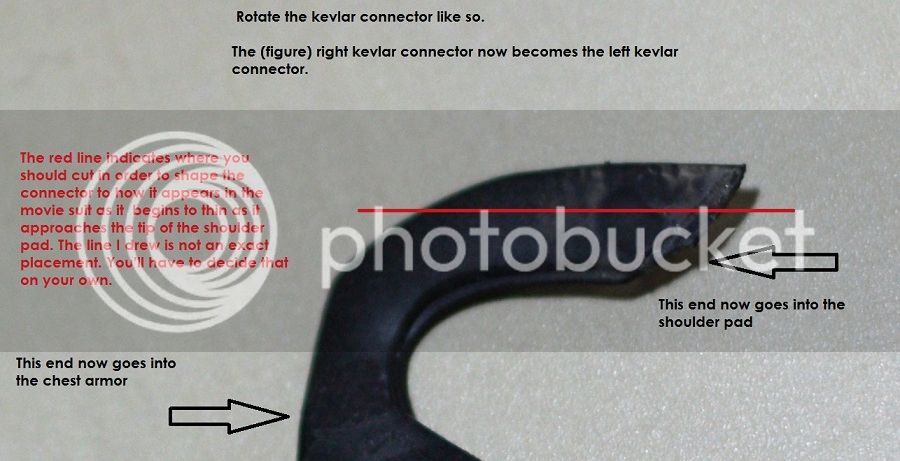
4. What we're essentially doing is switching a kevlar connector on one side to the other, and switching the ends that connect to each point of connection on the chest armor and on the shoulder pads. The image will illustrate more clearly:

IMG_6564B_zpsb89033d2.jpg


We are turning the kevlar connector so that the end that originally went into the chest armor now goes into the shoulder pad.

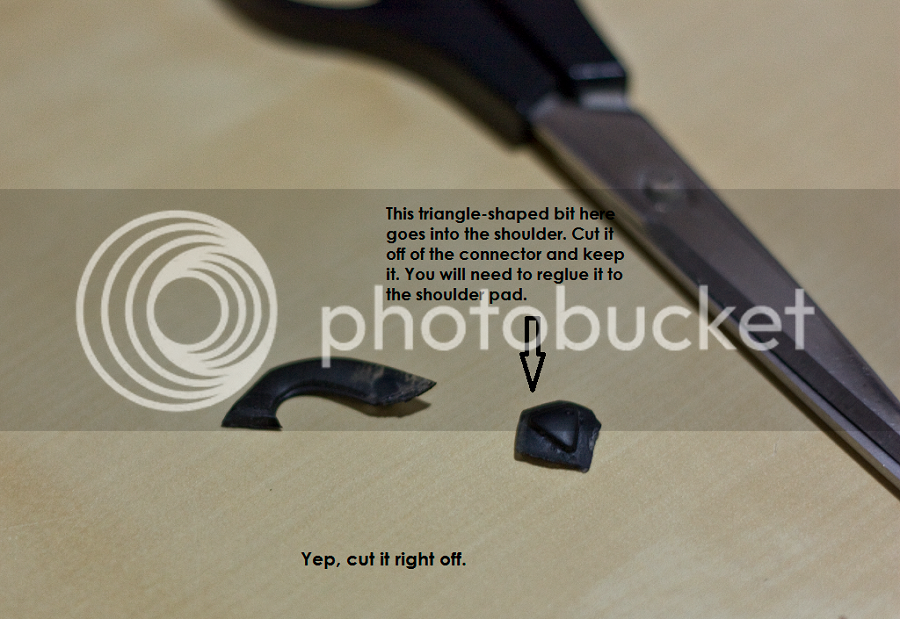
5. But what about the triangle bits on the end of each connector, you ask? You cut them off. Yes, cut them off, but keep them. We will soon reglue those bits back onto the shoulder pads.

IMG_6566_zpsfea619c4.png


6. In the comparison pic, you'll notice that the kevlar connectors tend to get thinner as they approach the shoulder pads. We will now replicate that by cutting each of our DX12 connectors into shape.

The line indicates where I cut, in a photo above and one photo directly below:

Note that the red line indicates a general angle you MIGHT want to cut. It is not an exact placement. You will have to judge on your own using reference images of the actual suit.
IMG_6569_zps12349038.png


7. We're approaching the final step. If peeling the connectors away from the suit the first time stripped some paint off, use some flat black acrylic paint and coat the underside of each connector. Give it time to dry. Once dried, hold the connector up to a light to see if any light peeks through.

8. Now that the kevlar connectors are reshaped, we will reglue them to the chest armor first. Get it as close to the center of the collar as possible. Like Maglor recommended, use a glue that dries slowly, allowing you time to position them as you please. Glue them down to the lower layer of the chest armor.

IMG_6579sss_zps6437bc0c.png


9. Last step requires you to reglue them to the shoulder pads. This step is pretty simple. Just refer to pics of the actual suit to guide you to where the connectors should be attached to the shoulder pads. They should go directly underneath the "tips" of each pad. You may need to shorten the ends of each connector to hide the dried glue damage underneath the shoulder pad.
 
Last edited:
Finished mod (will take better quality pictures later. I don't have much time right now):
IMG_6974edit_zps491e8649.png

IMG_6956_zps04711129.png


There you have it, more accurate kevlar connectors, in my opinion. I don't recommend doing this unless it's a detail that really bothers you. It's a lot of careful work. Hopefully someone will come up with an easier solution that doesn't involve either this much effort or DX02 parts.

There's still one more optional step to do, and it involves the gap that might exist now between the cape holes and the kevlar connectors. I'll get to this a bit later.
 
Last edited:
Holy Hell that is an intense mode! cool thing to figure out though man! really great work.

this has nothing to do with the mod, but what did you do to get your stock cape so flat on the shoulders? just lots of futzing or water treatment too?
 
Mags, how far down does your 'V" go on batman's back when using the short rayon?

Just wondering, cause I got my cape today but it seems pretty damn short, I haven't got my DX12 yet so was wondering what it looks like.
 
Back
Top