You are using an out of date browser. It may not display this or other websites correctly.
You should upgrade or use an alternative browser.
You should upgrade or use an alternative browser.
Modification/Customization for the DX12 Batman Figure
- Thread starter Maglor
- Start date


Help Support Collector Freaks Forum:
This site may earn a commission from merchant affiliate
links, including eBay, Amazon, and others.
plasmid303
Super Freak
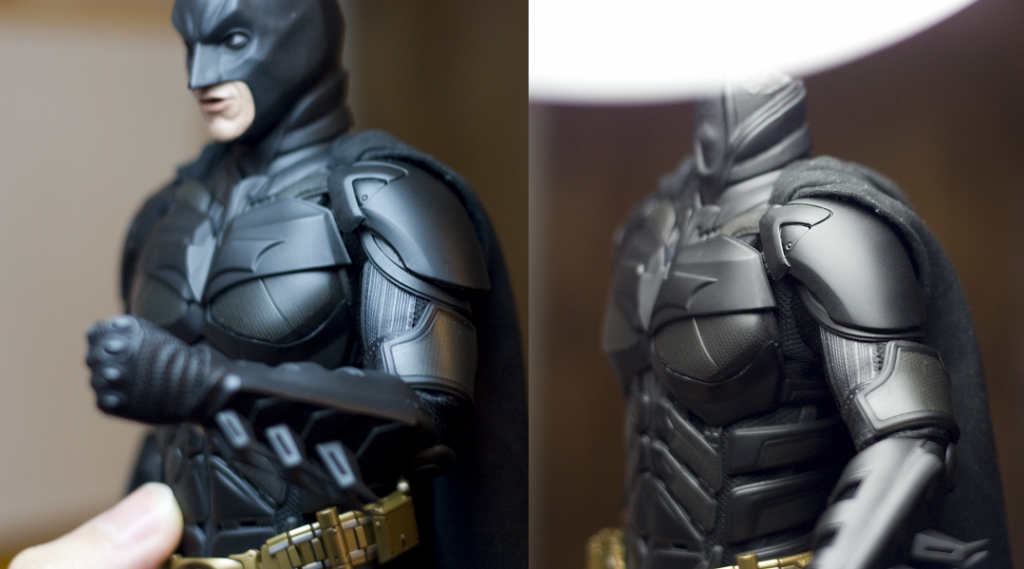
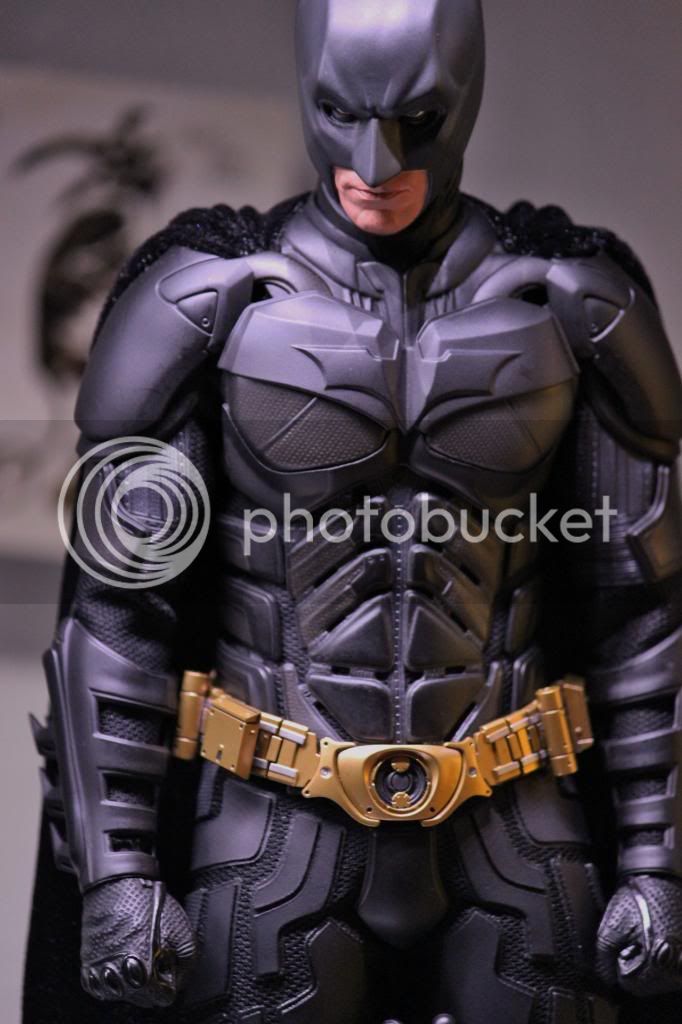
Here's a brief breakdown of how I separated each of the shoulder pads into two layered pieces. It's fairly straightforward.
The HT shoulder pads have stayed mostly the same since the original TDK suit MMS release from a few years ago, and frankly I'm tired of them reusing the same stuff over and over again, especially when it never looks like separately layered pads. The 1/4 scale TDKR figure has dual-layered shoulder plates, why can't the 1/6 DX12? So I did something about it myself.
What we're trying to achieve:
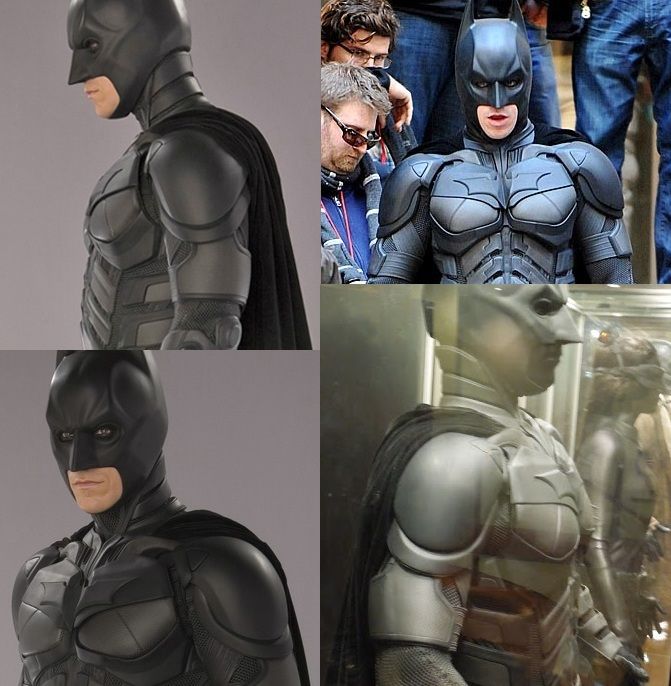
Essentially, what you're doing is cutting the shoulder pad along the lower edge of the top shoulder plate. I recommend removing the chest armor from the figure, as this makes the process a lot easier. (refer to Maglor's chest armor guides for that purpose)
I didn't take any photos prior to cutting, so I'll have to use these photos by milk mag to illustrate:
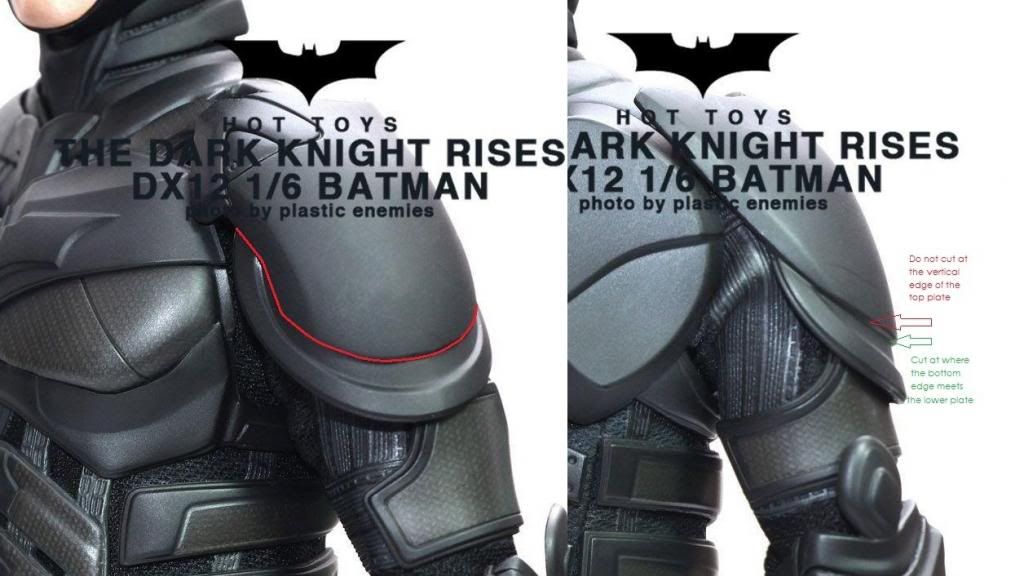
Use a sharp blade (like an Exacto Knife) and carefully cut along the edge. Warming up the shoulder pad first makes the process easier, as the knife will go through it like butter.
After you're done cutting, you have a lower shoulder plate. If you removed the chest armor from the figure, now is the time to place it back on.
Heat the lower plate with hot water or a blow dryer so that it becomes maleable.
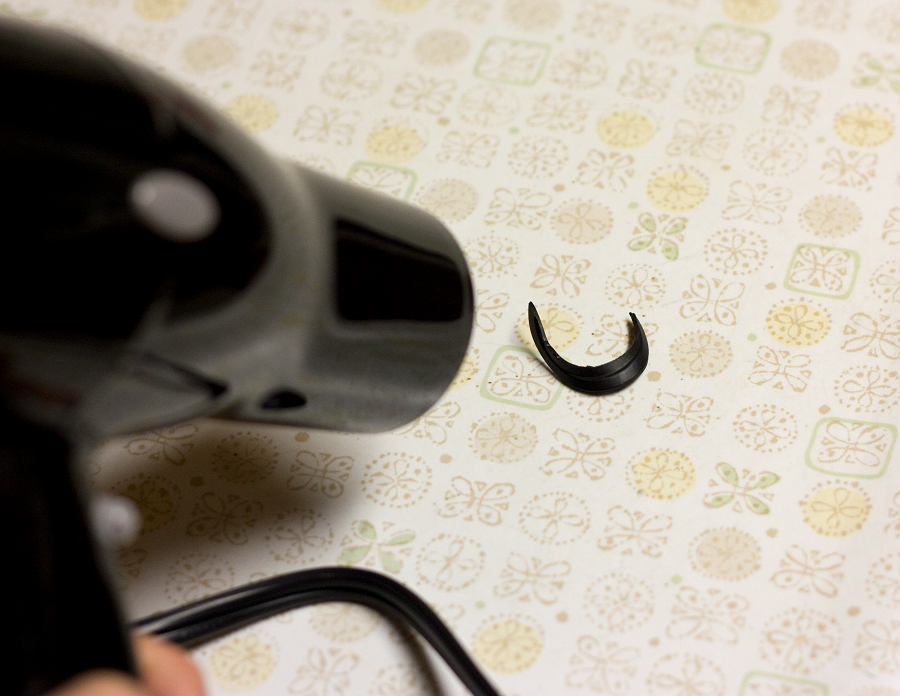
Then wrap it around the figure's bicep, right under the top shoulder plate and squeeze it so that it takes its shape. Keep holding that position with your fingers until the plate hardens at room temperature, at which time you can quickly remove it from the arm and transfer it to the freezer to finish hardening.
You should take the opportunity to repeat this process with the top shoulder plate, squeezing it to wrap around deltoid and upper arms more closely. Place the whole figure in the freezer. It only takes a couple minutes for the shoulder pads to harden, so no worries about frost damage to the figure or anything lol.

If you have some excess roughness on the edge of the top shoulder plate after cutting, you can sand it down.

After a couple minutes in the freezer, the lower shoulder plates can be returned to the figure's arms, where you can position it to your liking.
The final step involves sticking the lower shoulder plates onto the bicep. You can glue it into place, but I used a less permanent solution: double sided tape.
Benefits:
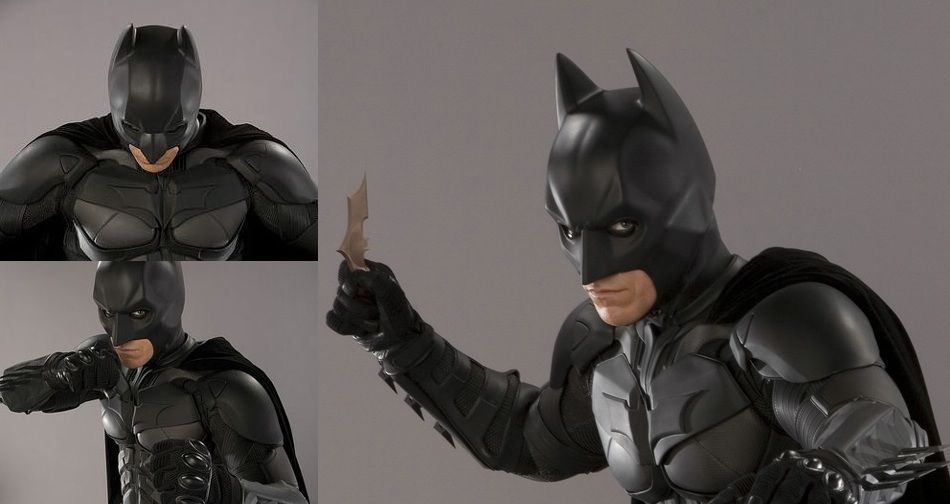
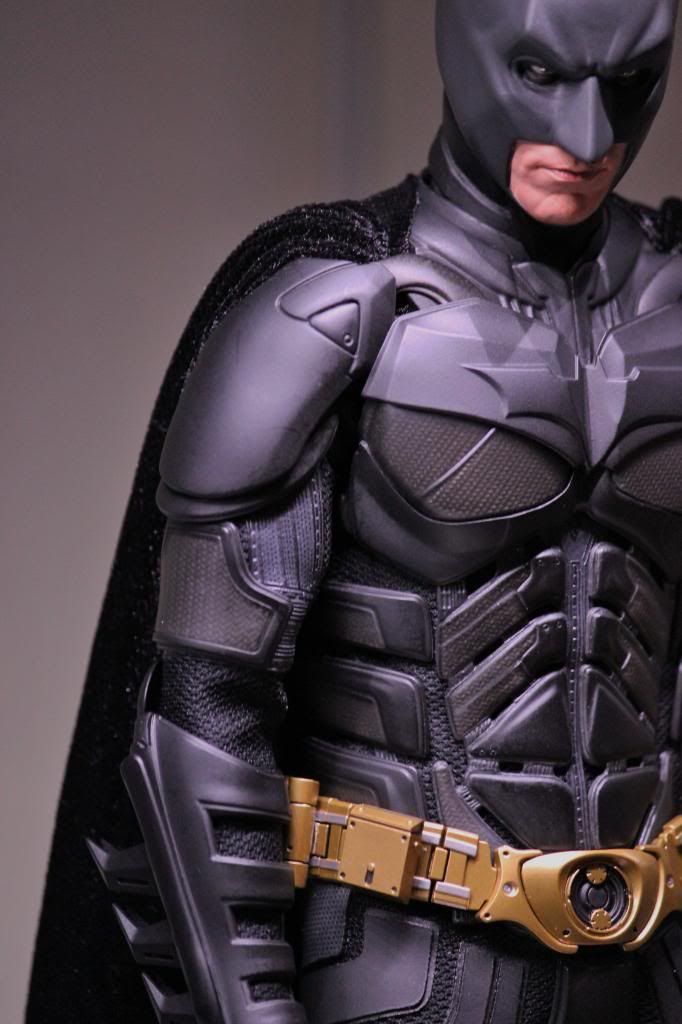
Once finished, the shoulders will look much more like the movie suit.
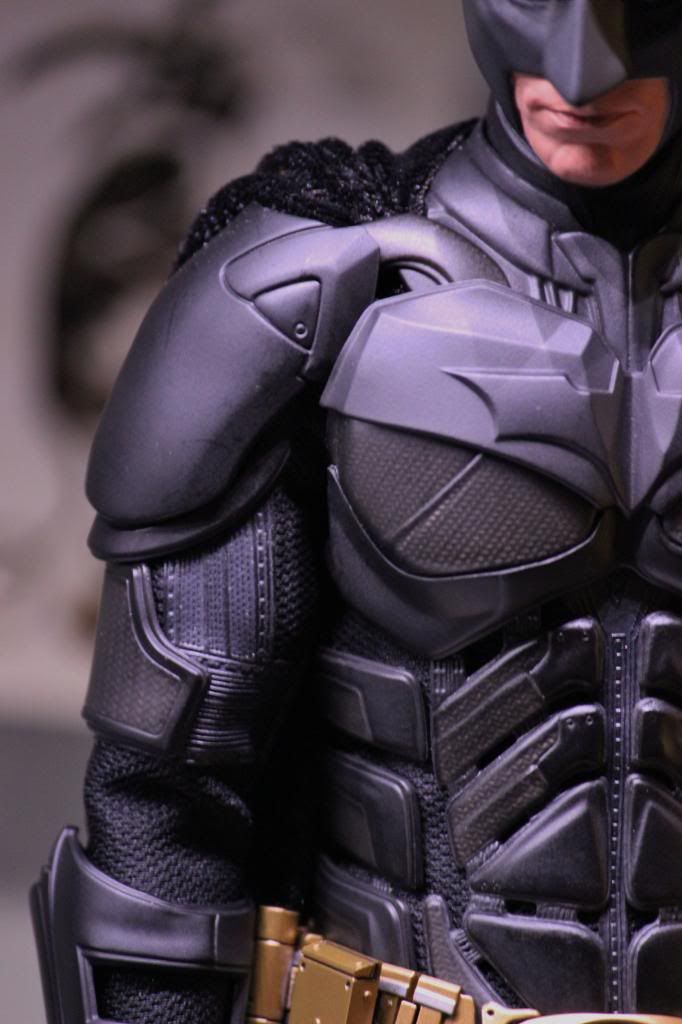
Not only will they be dual-layered, but they conform a lot better to the figure's shoulders, making the shoulder pads look less bulky.
(modded left, actual suit middle, stock DX12 right)
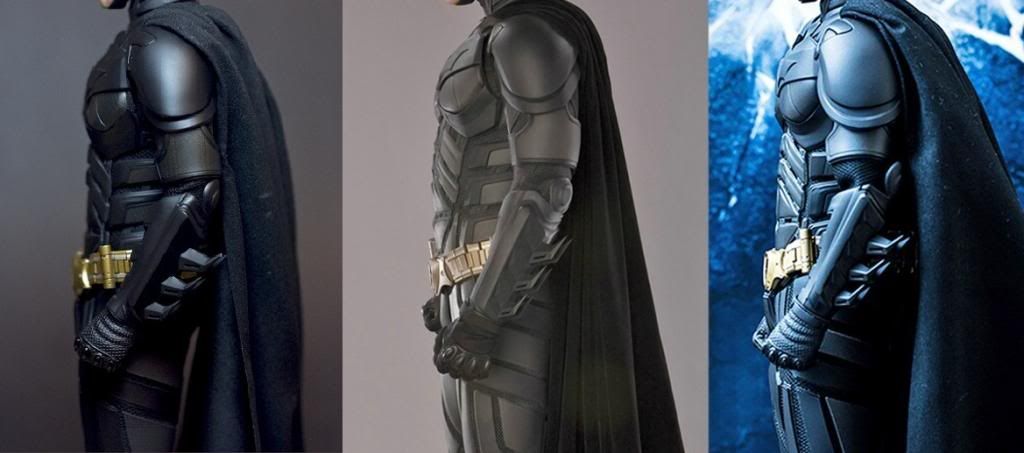
Also, when you raise the arms upward or forward, the lower plates will shift accordingly, unlike on the stock shoulder pads that would stick up as a single piece.
The HT shoulder pads have stayed mostly the same since the original TDK suit MMS release from a few years ago, and frankly I'm tired of them reusing the same stuff over and over again, especially when it never looks like separately layered pads. The 1/4 scale TDKR figure has dual-layered shoulder plates, why can't the 1/6 DX12? So I did something about it myself.
What we're trying to achieve:
Essentially, what you're doing is cutting the shoulder pad along the lower edge of the top shoulder plate. I recommend removing the chest armor from the figure, as this makes the process a lot easier. (refer to Maglor's chest armor guides for that purpose)
I didn't take any photos prior to cutting, so I'll have to use these photos by milk mag to illustrate:
Use a sharp blade (like an Exacto Knife) and carefully cut along the edge. Warming up the shoulder pad first makes the process easier, as the knife will go through it like butter.
After you're done cutting, you have a lower shoulder plate. If you removed the chest armor from the figure, now is the time to place it back on.
Heat the lower plate with hot water or a blow dryer so that it becomes maleable.
Then wrap it around the figure's bicep, right under the top shoulder plate and squeeze it so that it takes its shape. Keep holding that position with your fingers until the plate hardens at room temperature, at which time you can quickly remove it from the arm and transfer it to the freezer to finish hardening.
You should take the opportunity to repeat this process with the top shoulder plate, squeezing it to wrap around deltoid and upper arms more closely. Place the whole figure in the freezer. It only takes a couple minutes for the shoulder pads to harden, so no worries about frost damage to the figure or anything lol.
If you have some excess roughness on the edge of the top shoulder plate after cutting, you can sand it down.
After a couple minutes in the freezer, the lower shoulder plates can be returned to the figure's arms, where you can position it to your liking.
The final step involves sticking the lower shoulder plates onto the bicep. You can glue it into place, but I used a less permanent solution: double sided tape.
Benefits:
Once finished, the shoulders will look much more like the movie suit.
Not only will they be dual-layered, but they conform a lot better to the figure's shoulders, making the shoulder pads look less bulky.
(modded left, actual suit middle, stock DX12 right)
Also, when you raise the arms upward or forward, the lower plates will shift accordingly, unlike on the stock shoulder pads that would stick up as a single piece.
ebor
Super Freak
NICE mod and explaination Plasmid 
ZsaszSays
Super Freak
Looks great man. 
r5150s
Super Freak
great mod plasmid ! definitely doing it once I get home in two weeks or so...
Outstanding work Plasmid! 
Will try to find a spot for that on page 1!
Good question. I don't think there is an answer.
I don't think heat will do anything to super glue.
Will try to find a spot for that on page 1!
Anybody have a good tip for removing superglue without damaging the figure. I was realigning the cheat plate, and some excess glue is on the left pec
Good question. I don't think there is an answer.
Try this to remove the glue put a light weight hankerchief over the glue, heat the area up with a hair dryer till it gets hot. Then remove the hankerchief and it shud pull the glue of with it
I don't think heat will do anything to super glue.
- Joined
- Apr 26, 2008
- Messages
- 9,623
- Reaction score
- 214
Anybody have a good tip for removing superglue without damaging the figure. I was realigning the cheat plate, and some excess glue is on the left pec
had the same thing happen to me, my resolution was to use a super fine grit sanding stick, and lightly rub it down, take your time and dont go gung ho. (mine is barely visible unless I stare at it, and i still have to scan over the chest to pinpoint it) make sure its a super fine grit and try to work only the are with the glue (dont rub a large surface area with it)
ps. the hankerchief and heating thing wont work...
CTO15
Super Freak
had the same thing happen to me, my resolution was to use a super fine grit sanding stick, and lightly rub it down, take your time and dont go gung ho. (mine is barely visible unless I stare at it, and i still have to scan over the chest to pinpoint it) make sure its a super fine grit and try to work only the are with the glue (dont rub a large surface area with it)
ps. the hankerchief and heating thing wont work...
Thanks for the tip lipsmack
Yeah, I didn't think the heat and towel trick would work.
the only solutoon I read online was using acetone, but I know that's pretty dangerous cause it could damage the plastic
Frazer9497
Freaked Out
Plan to do a fair few of these mods when I get this guy.Im still debating whether to remove the panel on the PERS so I can move them individually. Im going to go into Games Workshop so they can paint the eye lids for me, looking at how thin the eye lids are on Jack Sparrow I'll never be able to do that myself.
plasmid303
Super Freak
Anybody have a good tip for removing superglue without damaging the figure. I was realigning the cheat plate, and some excess glue is on the left pec
If it's a shallow bit of glue, then Windex might work. Won't damage the armor either.
NICE mod and explaination Plasmid
Looks great man.
great mod plasmid ! definitely doing it once I get home in two weeks or so...
Outstanding work Plasmid!
Will try to find a spot for that on page 1!
Thanks, guys! And a special thanks to everybody who contributed a modification that I used on this figure. There's still one more thing I want to do on it.
Maglor, I know you asked earlier about the kevlar connectors. I'm going to write up the steps I took. Will post it a bit later tonight, hopefully. It's not as simple as heating and reshaping. Just doing that wasn't enough, in my experience.
- Joined
- Apr 26, 2008
- Messages
- 9,623
- Reaction score
- 214
Plan to do a fair few of these mods when I get this guy.Im still debating whether to remove the panel on the PERS so I can move them individually. Im going to go into Games Workshop so they can paint the eye lids for me, looking at how thin the eye lids are on Jack Sparrow I'll never be able to do that myself.
I think it's gamesworkshop policy not to paint anything for customers due to liability of screw ups
Maglor, I know you asked earlier about the kevlar connectors. I'm going to write up the steps I took. Will post it a bit later tonight, hopefully. It's not as simple as heating and reshaping. Just doing that wasn't enough, in my experience.
Yeah, I couldn't get heat method to hold well on them.
I'm guessing you re-glued them at the shoulder plates.
- Joined
- Apr 6, 2009
- Messages
- 7,249
- Reaction score
- 10
Here's a brief breakdown of how I separated each of the shoulder pads into two layered pieces. It's fairly straightforward.
The HT shoulder pads have stayed mostly the same since the original TDK suit MMS release from a few years ago, and frankly I'm tired of them reusing the same stuff over and over again, especially when it never looks like separately layered pads. The 1/4 scale TDKR figure has dual-layered shoulder plates, why can't the 1/6 DX12? So I did something about it myself.
What we're trying to achieve:
Essentially, what you're doing is cutting the shoulder pad along the lower edge of the top shoulder plate. I recommend removing the chest armor from the figure, as this makes the process a lot easier. (refer to Maglor's chest armor guides for that purpose)
I didn't take any photos prior to cutting, so I'll have to use these photos by milk mag to illustrate:
Use a sharp blade (like an Exacto Knife) and carefully cut along the edge. Warming up the shoulder pad first makes the process easier, as the knife will go through it like butter.
After you're done cutting, you have a lower shoulder plate. If you removed the chest armor from the figure, now is the time to place it back on.
Heat the lower plate with hot water or a blow dryer so that it becomes maleable.
Then wrap it around the figure's bicep, right under the top shoulder plate and squeeze it so that it takes its shape. Keep holding that position with your fingers until the plate hardens at room temperature, at which time you can quickly remove it from the arm and transfer it to the freezer to finish hardening.
You should take the opportunity to repeat this process with the top shoulder plate, squeezing it to wrap around deltoid and upper arms more closely. Place the whole figure in the freezer. It only takes a couple minutes for the shoulder pads to harden, so no worries about frost damage to the figure or anything lol.
If you have some excess roughness on the edge of the top shoulder plate after cutting, you can sand it down.
After a couple minutes in the freezer, the lower shoulder plates can be returned to the figure's arms, where you can position it to your liking.
The final step involves sticking the lower shoulder plates onto the bicep. You can glue it into place, but I used a less permanent solution: double sided tape.
Benefits:
Once finished, the shoulders will look much more like the movie suit.
Not only will they be dual-layered, but they conform a lot better to the figure's shoulders, making the shoulder pads look less bulky.
(modded left, actual suit middle, stock DX12 right)
Also, when you raise the arms upward or forward, the lower plates will shift accordingly, unlike on the stock shoulder pads that would stick up as a single piece.
Holy **** Plasmid! Talk about paying close attention to detail!
I MIGHT just actually try this mod. Just looks so much cleaner to me. Thanks so much for the tutorial......and for opening my eyes.

plasmid303
Super Freak
Yeah, I couldn't get heat method to hold well on them.
I'm guessing you re-glued them at the shoulder plates.
Sort of. Now that I think about it, the whole process is more complicated than I thought when I first did it, so it'll take me a bit longer to formulate an explanation.
Holy **** Plasmid! Talk about paying close attention to detail!
I MIGHT just actually try this mod. Just looks so much cleaner to me. Thanks so much for the tutorial......and for opening my eyes.
 Thanks, and I hope to see yours if you do it.
- Joined
- Apr 6, 2009
- Messages
- 7,249
- Reaction score
- 10
Sure.

Thanks again!
plasmid303
Super Freak
Whoa! That was quick!
Great job, and that Medi head...man, it really makes the whole thing work just that much better. I'm so envious.
Great job, and that Medi head...man, it really makes the whole thing work just that much better. I'm so envious.
- Joined
- Apr 26, 2008
- Messages
- 9,623
- Reaction score
- 214
HT is looking at this thread and planning a 3.0
Most of these mods are soo great, I did the most recent of maglors last night (wedging rubber under the shoulders and carving the neck piece a bit) though I didnt need to dremmel the front as maglor did, I just carved a bit of the bottom off with a hobby knife,
Most of these mods are soo great, I did the most recent of maglors last night (wedging rubber under the shoulders and carving the neck piece a bit) though I didnt need to dremmel the front as maglor did, I just carved a bit of the bottom off with a hobby knife,
liuskusuma
Super Freak
- Joined
- Aug 22, 2012
- Messages
- 925
- Reaction score
- 1
Wow, what an awesome thread. Thanks for all the info guys. I'll be doing these mods once I get my hand on mine .
.Frazer9497
Freaked Out
I think it's gamesworkshop policy not to paint anything for customers due to liability of screw ups
 I'll go in anyway and ask them, hopefully they do. If they dont then I guess my eyelids are staying unpainted.. unless I pluck up the courage to remove the eyes, which isnt likely
Thats an awesome mod, Hector I think I will do that one mod as well!
I think I will do that one mod as well!Similar threads
- Replies
- 510
- Views
- 39K
- Replies
- 9
- Views
- 3K
- Replies
- 0
- Views
- 556
- Replies
- 15
- Views
- 4K