Procrastinator's log of too many projects, not enough time.

Collector Freaks Forum

Help Support Collector Freaks Forum:

This site may earn a commission from merchant affiliate links, including eBay, Amazon, and others.

TheProcrastinator

Super Freak
Joined
Dec 18, 2011
Messages
563
Reaction score
2
Location
Somewhere in Europe
Without any unnecessary introductions, this will be the place where I'll be posting wips of my current 1/6 projects. Hopefully with some semblance of regularity.

Also, bear with me in regards to any typos or syntax errors, as english is not my first language.


First up, my custom Medicom Batman headsculpt. In addition to full repaint it was also widened for better accuracy, per the popular mod. I've achieved a sublte motting effect on the skin, of which I was quite proud of, though it's subtle enought that it doesn't show very well on the photos.

SG9kkTM.jpg

lI6h9DM.jpg

8KHjElw.jpg

hIbb3bB.jpg

8mkSOph.jpg

RHh3klV.jpg

vDafKb1.jpg

l1FQGgd.jpg


Also a little preview of my upcoming mod - The Cathedral Battle Batman. Now that HT released my ultimate grail when it comes to Batman collectibles (the Returns Keaton), I decided I can experiment a bit with my 89 Keaton. Still early in the works. So far I've painted on custom blood effects and dirt on the "neutral mouth piece" (as I prefer it to the open mouth. Plus the factory blood effects were really crappy and inacurrate) and done some modifications to the ears (more on that later). Further modifications to come include damage to the suit and cowl, dust effects, repainting some of the accesories and making a custom display base meant to represent the cathedral floor from the end of the film.

zJTrSC5.jpg

YaN5J3r.jpg
 
f3DVriJ.jpg

k1H9OTp.jpg

WPGqYoo.jpg

3oAvN2h.jpg

NH2RYsn.jpg

396VX7A.jpg

cdEdvPk.jpg

7VVt0um.jpg

AMxmsQD.jpg

QpMGcQh.jpg

4zLixwn.jpg

usMvAHg.jpg


Ok, finally had some time to return to my Cathedral Battle custom and finish it.

The figure is now available for sale, PM me if You're interested.

With customs like this there will always be an element of improvisation when it comes to accuracy, due to poor documentation of the movie. I searched the net looking for high quality pictures of the suit used in that scene, since stills from the movie proved little help due to poor lighting and camera focusing mostly on the cowl and not the rest of the body. Fortunately I found some high res photos of the suit, taken at some Hollywood prop auction. Even that wasn't 100% helpful, since with 20 year-old rubber custumes like this, it's sometimes hard to tell what is intentional "movie damage" and what is just natural degradation of the suit due to time. But I think it did help to better my placement of the damage on the suit. It's not 100% accurate, some of the burn marks on the cowl are a little bit too heavy, but I think the overall feel of the scene was captured.

The damage on the suit was done by doing exactly what it was meant to represent. So I burned the rubber and texturised it with hot tools. Btw. the rubber used by HT in this figure is really solid. A far cry from their previous rubber suits which were infamous for quick selfdegradation. In addition to burning, cutting and scratching, I also made sure that there was a glossy, smooth sheen visible on some of the damage, which was meant to represent the glass-smooth surface of burned rubber. You can clearly see such glossy patches showing through the patina of dust on the original costume.

The effects of dust and dirt (which I think look a bit better in hand than they do on the photos) were done using modelling pigments, which were later affixed using matt spray varnish. The matte varnish not only helped seal the pigments in place, but also contributed to the dusty, dirty look of the figure, by flatting the surface of the suit, making it a bit greyer, dustier, as it appeard in the movie. However, since modelling pigments never really look 100% dry when covered with varnish, I also applied a second layer of pigments with no protection. Though there was risk that pigments could removed by too much handling, I knew that reapplying them as needed, would be super easy and only take minutes, so it didn't worry me.

Like I mentioned in the previous post, I also painted my own blood effects. Firstly, becouse I wanted this figure to sport the neutral face plate, instead of the open one. And secondly - becouse HT factory painted blood looked really poor and inaccurate.

I also added some fine scratch marks to the belt. Though looking at the pictures now, I think the belt could still use some additional black dust.

The cape was de-lined to make it just a bit more flexible and less stiff. It does drape around Bat's shoulders a little bit better now. Unfortunately, de-lining it uncovered it's inner surface which is grey and made from a different material than the black, faux-leather exterior. You can see it clearly here: https://i.imgur.com/0jPxZ50.jpg
Fortunately, when the figure is posed in a simple, standing position (which is where he looks best after all), it's not really visible.

In my previous post I mentioned some modifications done to the ears. When DX09 was first showcased, people went crazy for the fantastic sculpt of Keaton and the cowl. My only small gripe with the sculpt is that it's so good, it's almost a little bit too good. What I mean by that is that HT has done an idealised version of the cowl. The original movie costume was very crude. It was a simple, low-tech ruber cast with lot's of imperfections, bumps and asymetrical lines. The HT sculpt on the other hand was perfectly symmetrical. One of those asymmetries in the movie costume was a certain subtle but noticable curvature to the ears that Hot Toys sculpt lacks. It's especially visible in the cathedral scene. Here's the curvature that I am talking about, compared to HT's perfectly smooth lines:

MpnqXex.jpg


lfPifOV.jpg


I am not sure if the reason this curve was especially noticable during the catheral scene, is that they've used a different suit for that particular sequence (those low-tech, rubber casts always sported some small differences between them, even if made from the same mold). Or was it part of the weathering that the prop department put the suit through for that scene. Either way I decided to replicate that effect, by sculpting subtle curves on the sides of both ears and then give it some texture so that it matched the surface of the rest of the cowl. The important thing here was subtlety. This kind of effect can be easily overdone, so I tried to keep it sublte enough that most collectors wouldn't even notice it if wasn't directly pointed out. But I do think it slightly betters the accuracy of the suit and adds some of that assymetry visible in the original costume. Here's the final effect:

M4Usn9g.jpg


And lastly I've modified the base so that it represented the old, moldy, dusty planks of the Cathedral floor, riddled bit cracked bits of dark brown masonry.

Anyway, I hope you'll like it.

Again, if anyone is interested, the figure is for sale. PM me for more details (please make sure to include your adress, so I can give you the exact shipping quote).
 
Beautiful custom. Best Keaton Bats custom I've ever seen in fact. You took an exceptionally realistic looking figure and made it look like it stepped off the screen. :rock

Just a word of caution, make sure you get yourself signed up for a Premium membership before you try to sell here on the Freaks board otherwise you'll run the risk of getting your thread shut down and/or banned. It's against forum rules to offer items for sale without one. :duff
 
Sa2Deiu.jpg


BRh9aEB.jpg


lkPrlKK.jpg


tpk3X2R.jpg


4OU975M.jpg


UnY72O8.jpg


ymNCF7g.jpg


hjCoRgl.jpg


AlzABG5.jpg


My latest quick project - repaint of a Hobbiton Smial.

The idea was to generally up the realism of the piece. I gave everything more definition, more detail, as well as took care to recreate some realistic materials, like the texture of the wood, or the brickwork which on the production piece was just made up of a single coat of red. I also took insight from various photos of real life Hobbiton. That's where I got the idea to show some scratched and faded paint on the blue wooden door (you can see it on the real Smial 26), and to paint an imitation of teal and yellow fungi/moss that can be found dotted all over various wooden elements in Hobbiton. I also included some grey stonework in the wall of the Smial, which exists in the real building, but was painted red like the bricks, on Weta's production piece.

The only thing I am not tottally happy with is vegetation, which I rushed a little bit and which looks sloppier than I wanted it to, thought it's still better defined than on the production piece.

Also, if anyone of you would like their own Smials (or any other Weta piece) repainted like this, I am available for commission.


For comparison, here's how the production piece looked like:

Cj8sHid.jpg

xoUsxNJ.jpg

C2jW0GL.jpg
 
hi , i really admire your custom batman 89 and you convice me to do the same with mine. (you have pull it to very superior level and accuracy i think) Can you please discribe more precisely the tools you used for the rubber suit , and discribe the method and the paint you used for the blood effect around the mouth. is it acrilyc paint ? did you used a sclapel? many thanks. would like to have some advices...
 
hi , i really admire your custom batman 89 and you convice me to do the same with mine. (you have pull it to very superior level and accuracy i think) Can you please discribe more precisely the tools you used for the rubber suit , and discribe the method and the paint you used for the blood effect around the mouth. is it acrilyc paint ? did you used a sclapel? many thanks. would like to have some advices...

Hi,

Sorry for the late reply.


For the damage I simply heated up a metal tool like a modeling knife, over my gas stove, and then while the blade was hot I prodded at the suit in various motions. The blade would get cold quicly, so over the flame it went again, rinse and repeat. You can also use any kind of heatable metal utensil of various shapes, to get different results. The shape doesnt really matter, anything to get a random texture with a dabbing/stabbing/scratching motion. Occasionaly, in some places I slightly sanded the damaged area with some rough sand paper, to make those patches of dry, rough texture.

As for the blood. It was first painted using a dark red acrylic paint (blood red with just a touch of black mixed in). After that it was covered with a layer of blood effects, in this case Blood For The Blood Good from Games Workshop range, to be specific.
 
That batman is stunning!

Love the base!! How did you do that? A similar base would really work well with the Ben Affleck batman figure
 
The planks were made from trimmed Algida sticks (perfect excuse to stuff one's face full of icecream), which were painted first with a basecoat of a light, wooden colour (I couldn't use the natural colour of the sticks, as they had the Algida logo burnt into them, which had to be covered), and then later darkened and dirtied up with oil washes and covered with modelling pigments.

The cracked pieces of masonry and stone were made out of small pieces of plaster which were painted and covered with modelling pigments.

There are also pieces of hay laying around here and there, those were made of singluar "strands" of wood, torn from the algida sticks and glued to the base.
 
Have to agree, really nice work on that weathered Batman! I've always loved that final action scene in the tower, and you've captured what he looked like perfectly.

And the dirtied up cape looks awesome. I might have to track down a second one for mine just so I can unlined thinner version like that.
 
Brilliant weathering job on Batman, impressive base as well! Thanks for sharing the pics.
 
6WZbbuG.jpg


Newest project - 1/6 Boba Fett Mythos Custom.


I wanted to sell my old Sideshow Boba Fett, but since there's been quite a few better Fett figures released lately, I decided to make it stand out from the crowd by customising it, with Sideshow's Mythos statue as inspiration.

It's not going to be an exact recreation of the Mythos design, rather a figure made with the same idea behind it. That of a Boba Fett shown during some undescribed mission from the character's past. With slightly different gear from his movie loadout, and armour shown with a different stage of weathering.

First up is the helmet. The visor needs some cleaning and glossing up, but other than that it's pretty much finished. Not having to be a slave to the exact pattern of scratches and damage seen on the movie armour, I could really go to town with weathering for a realistic finish. And though the Dentedhelmet.com purists will instantly notice a "non-canon" mosaic of patterns, the overall look and feel still fits very well with movie Boba. And it makes total sense, since it's unreasonable to think Fett's armour would look exactly the same during all of his deployments.

I plan to repaint all of his gear and armour (with some bits having complete colour scheme changes), give him more weapons and additional fabric elements to his costume.

Note: bear in mind that the following photos have their colour filtering slightly too much on the red side, so it's not 100% representative of the colours in hand.

jGVZarn.jpg

BP2uHwL.jpg

V4jNyHf.jpg

CvVKqZm.jpg

XobpQDM.jpg

wmW7hDm.jpg

asN5f3l.jpg

xusOCG9.jpg

Lx6ctjQ.jpg

ZzgXmxm.jpg


The original helm for comparison:
CtC0SME.jpg
 
0fl4fAb.jpg

R2lnESz.jpg


- Come with me if you want a butterscotch candy

- You kids these days with your smartphones and your hashtags and your polymimetic alloys

- Cyberdyne Corporation warranty, no longer applies


FWihg82.jpg


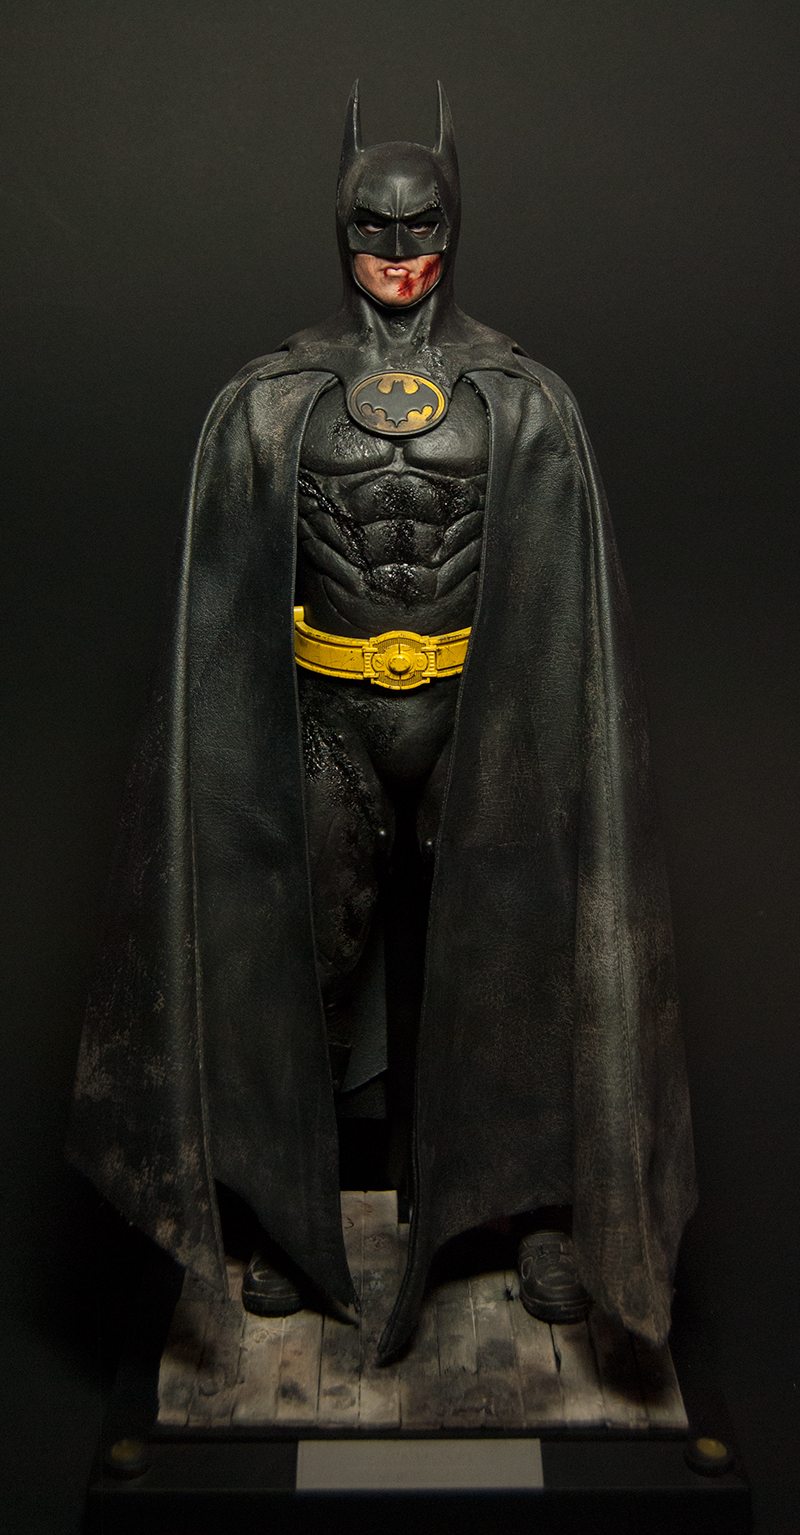
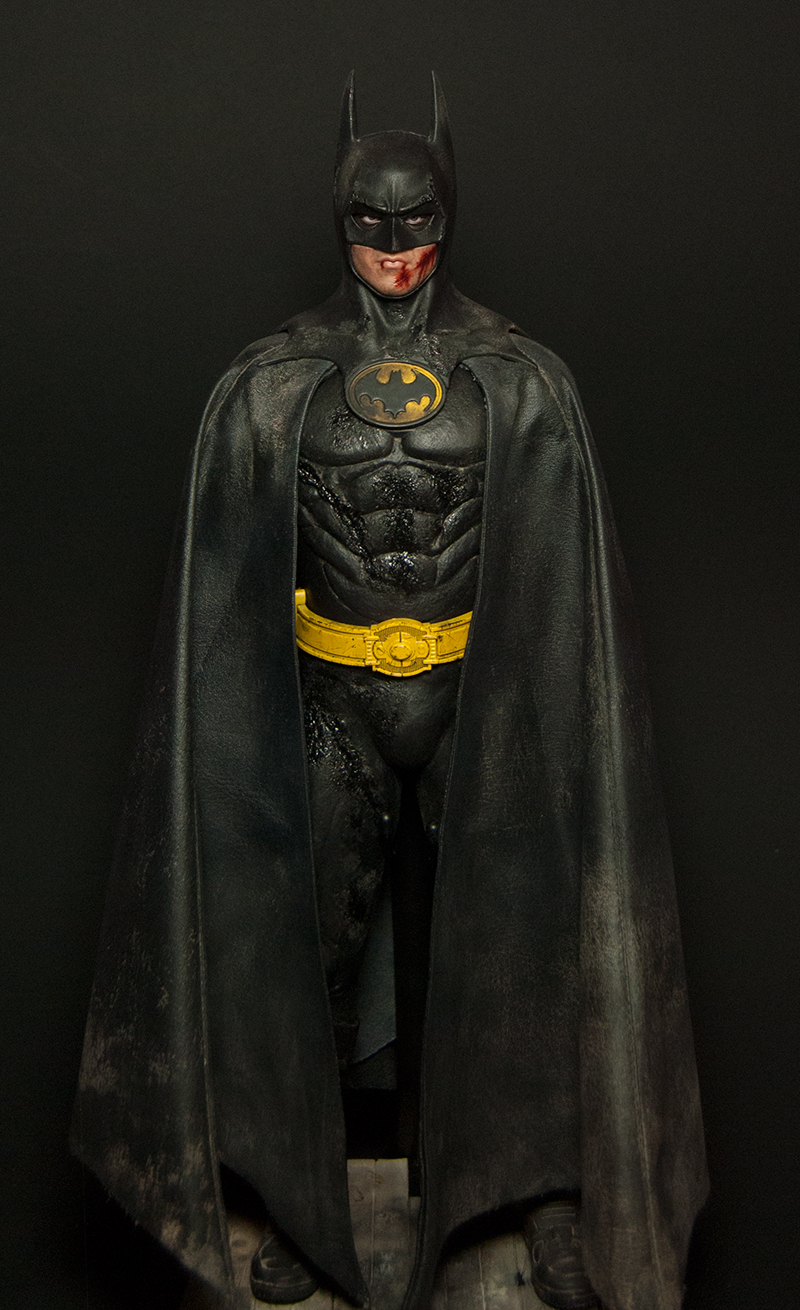
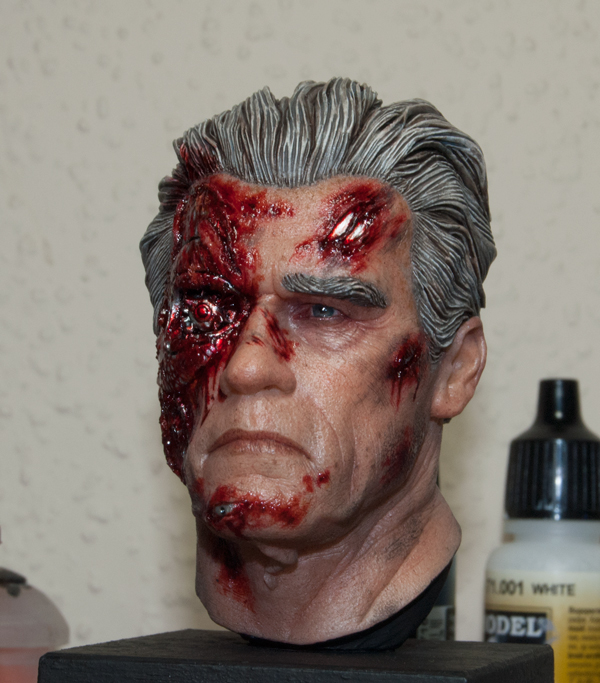
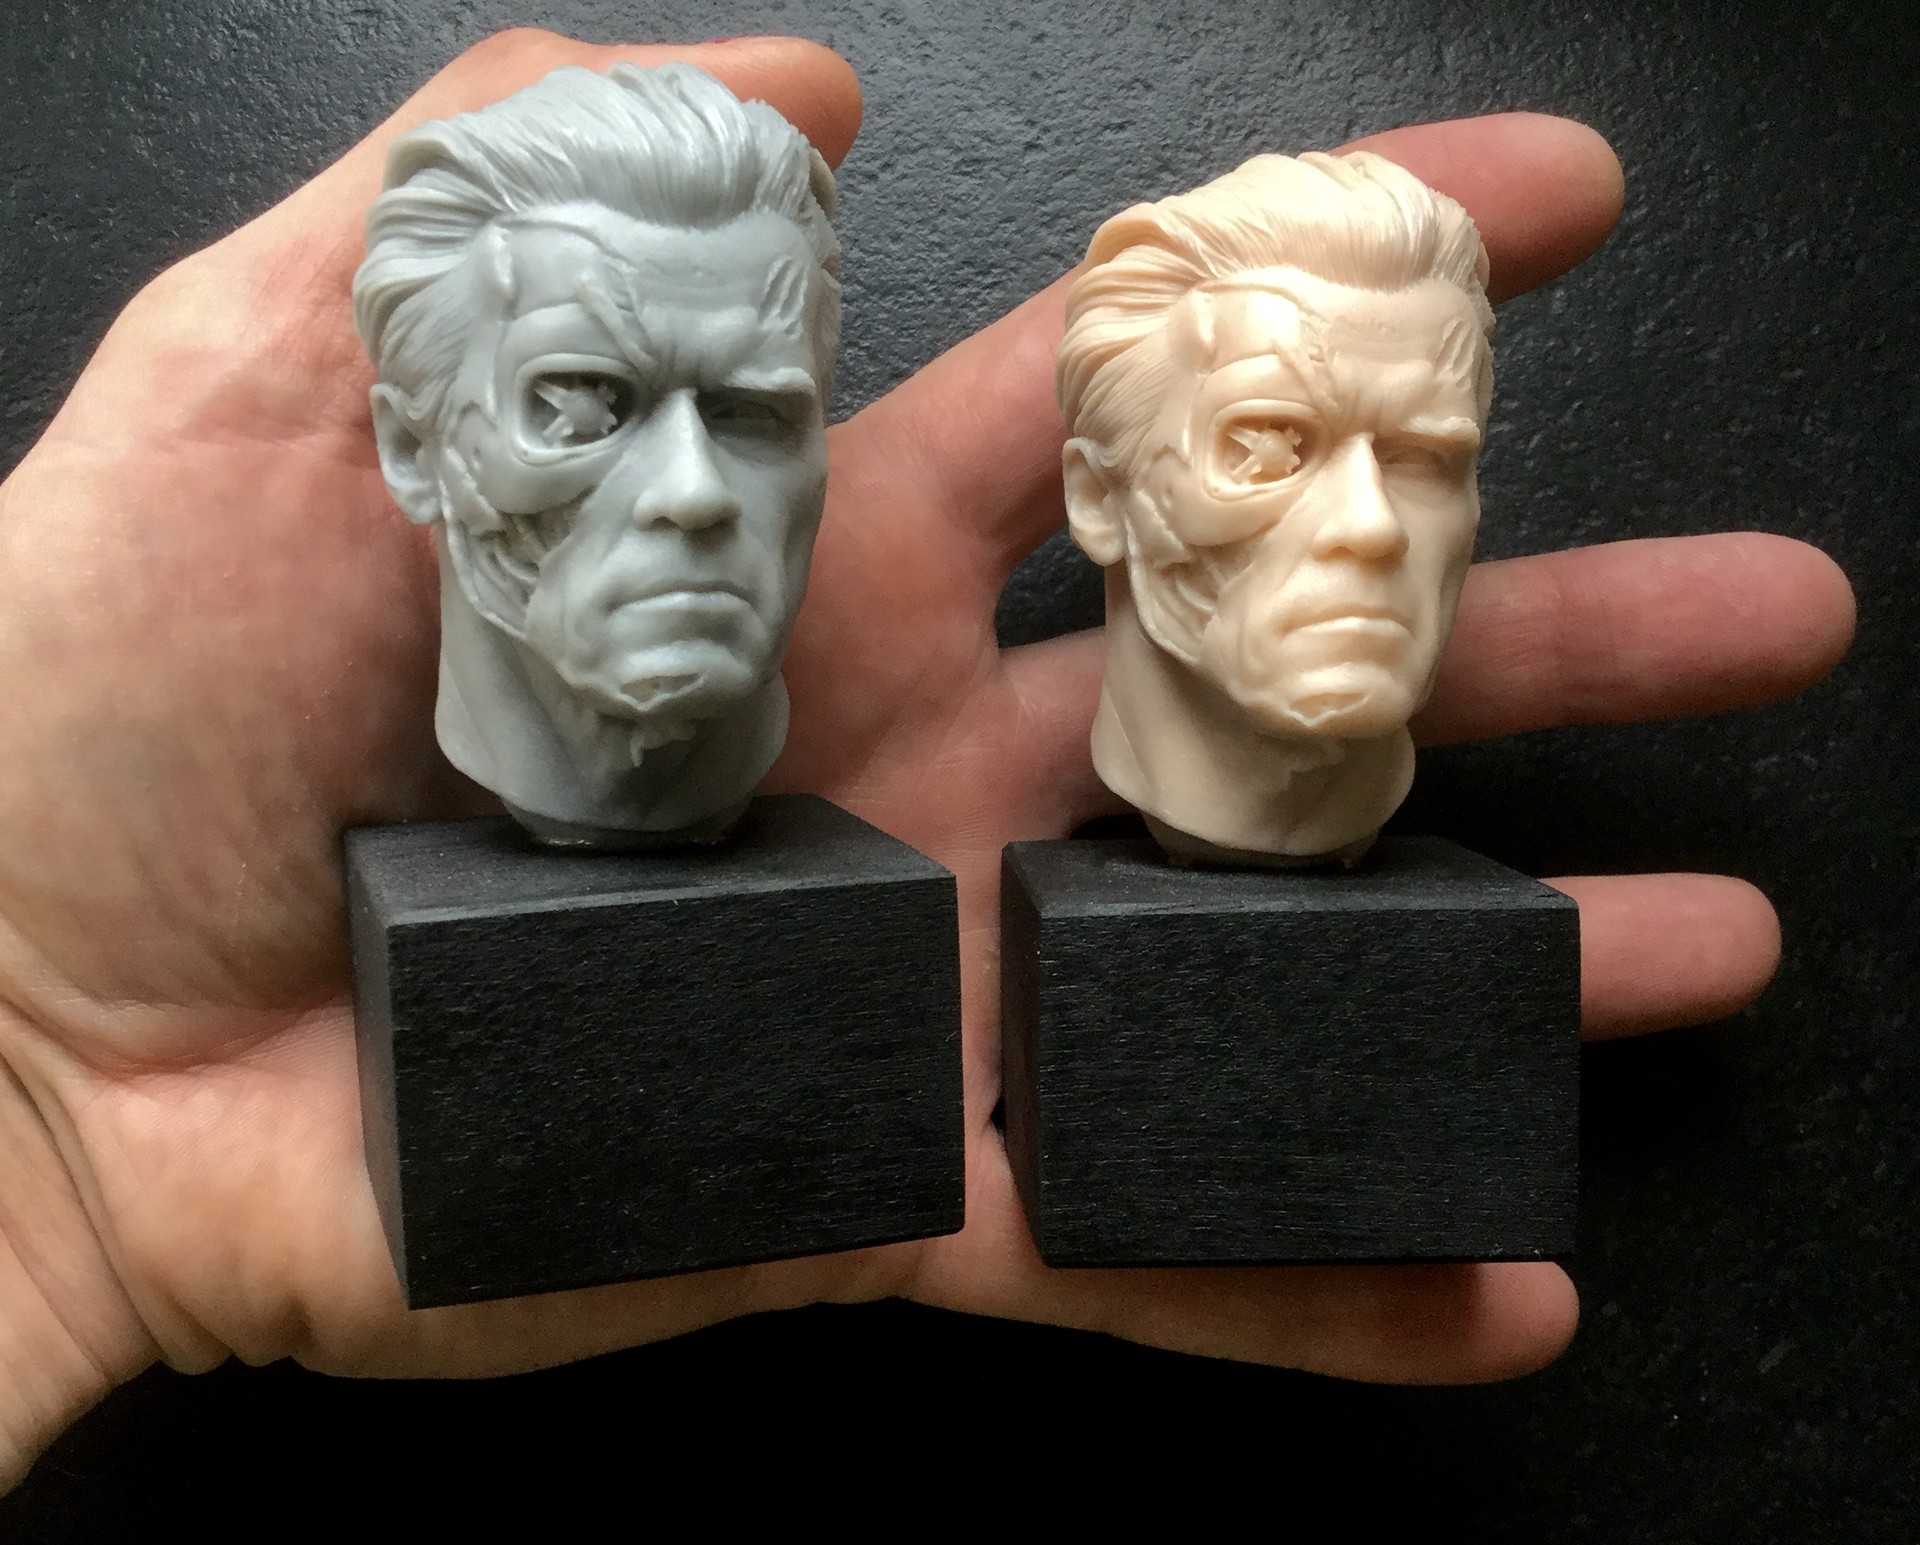
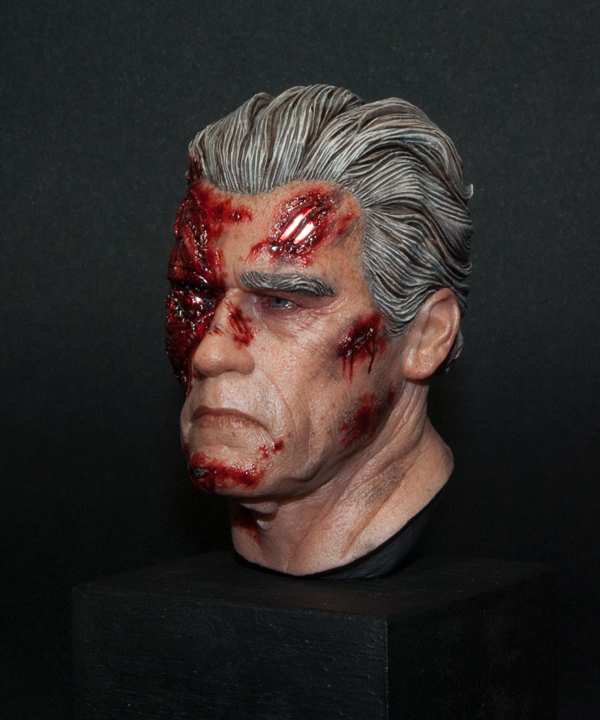
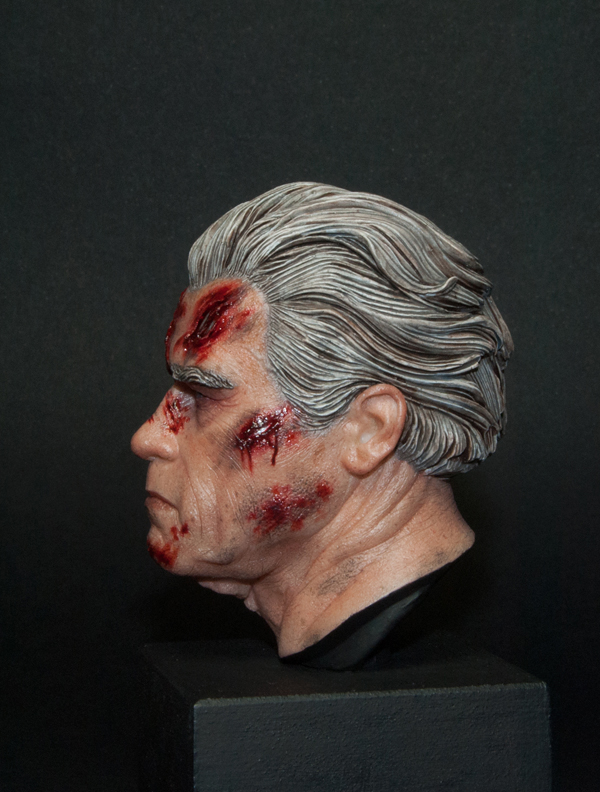
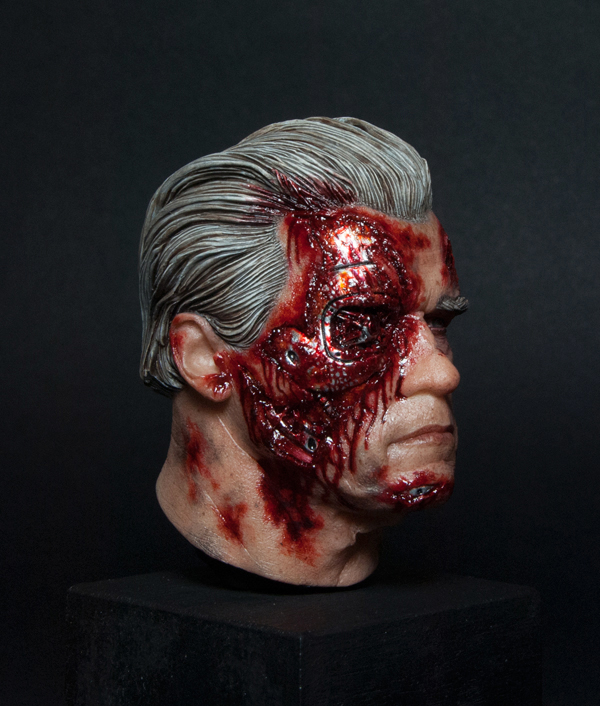
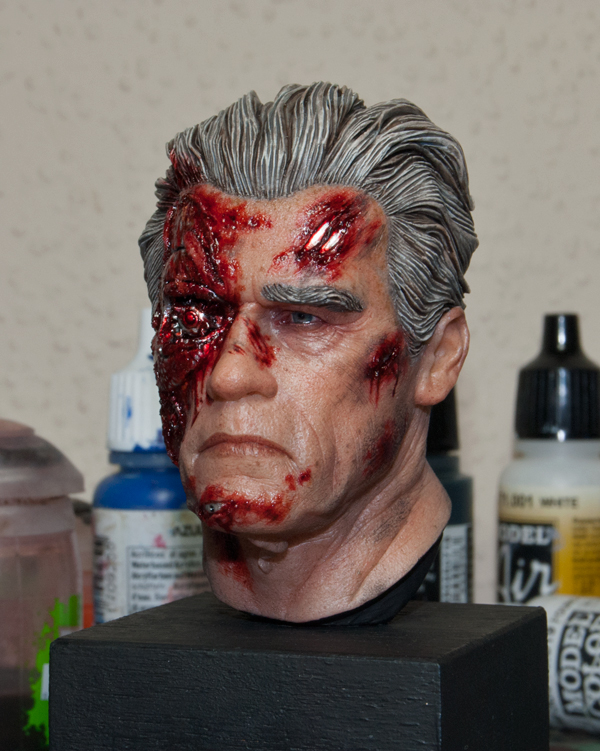
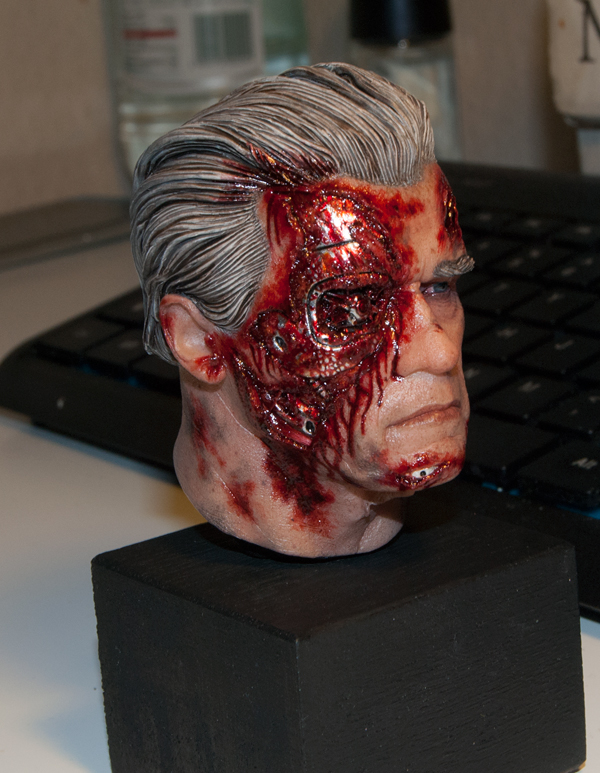
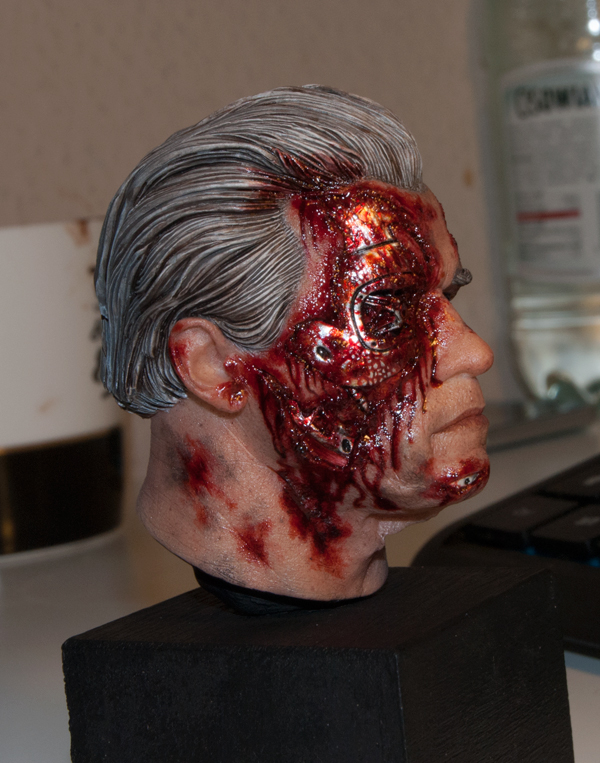
Here's something a little bit different. My painting of an Arnold Schwarzenegger bust circa TERMINATOR GENISYS, sculpted by Tomasz Radziewicz - Polish sculptor known for some of his Witcher 3 statues that were used by CDProjekt Red for the promotion of THE WILD HUNT.
The bust was casted in resin and measures around 4,5 cm (without counting the wooden plinth).

Kv5OQ6Q.jpg

8qWaREQ.jpg


The main goal with the painting was realism of surfaces. Fleshtones that looked lifelike and real. Gore and wounds that looked convincing.

I did however, allow myself two major departures from his on-screen look in GENISYS

a7JqVXw.jpg


The first change was done in regards to his fleshtone. Originally I wanted his skin to be as close to Arnold's look in the movie as I could come. So I armed myself with a whole folder of high-res movie stills and reference photos of Arnold. For a while my desktop looked like some creepy altar to the glory of the "Black Ploughman".

However, after comparing various photos of Arnold showing him both on and off the set, it became clear that despite playing an older Terminator, Schwarzenegger still went through a standard, Holywood procedure of make-up, where they covered up most of the blemishes, discolorations and signs of age on his skin, making his complection much more uniform.

As a result, Arnold's skin in the movie appeard smoother than off the set. Arnold walking around in his daily life definitely looks more his age, which is only appropriate and right for a man who's 70 years old regardless of how many Mr. Olympia titles he once held.

9FwchWB.jpg

iKlGiKv.jpg


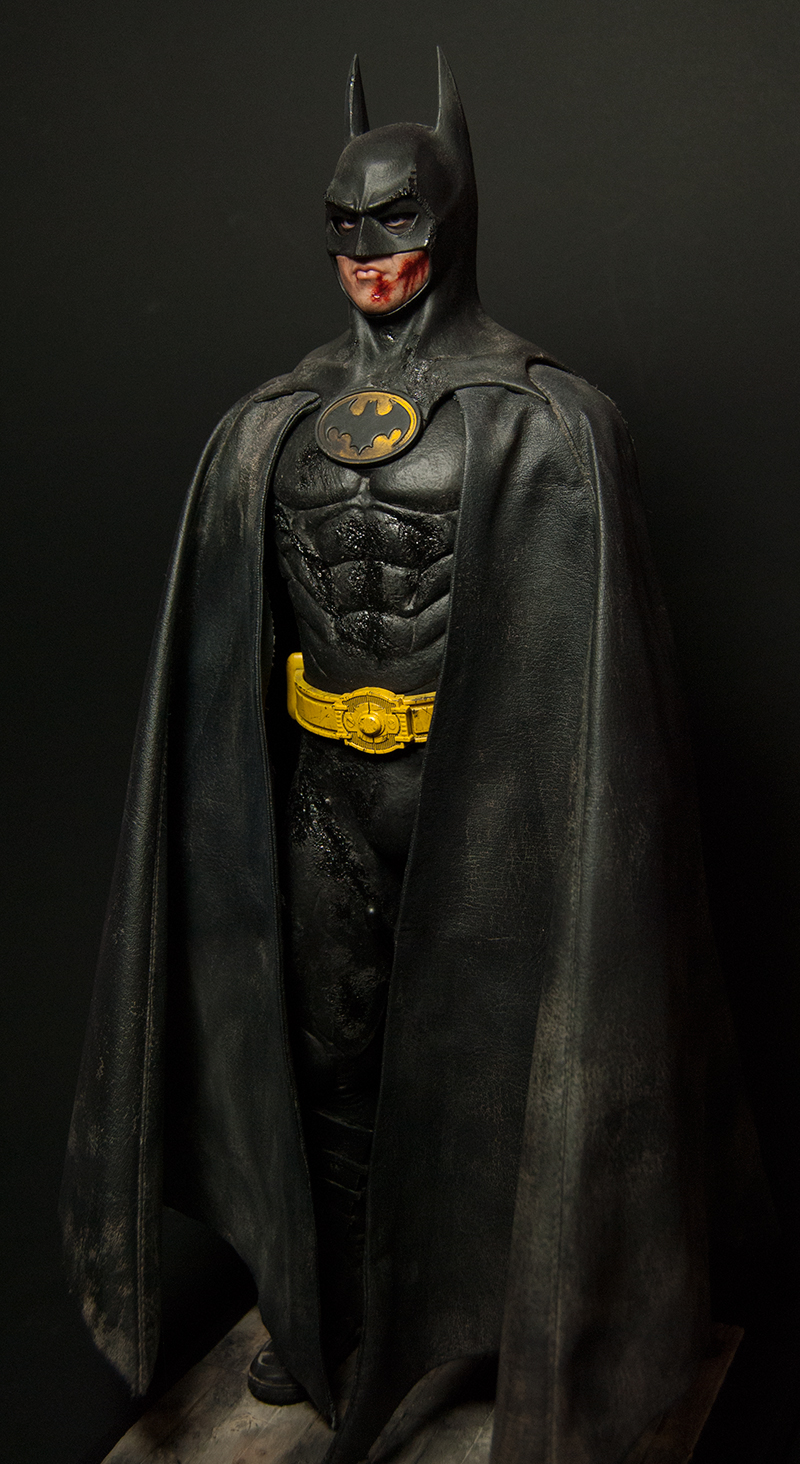
I thought that cleaner movie look wasn't quite right for what this bust was supposed to depict, so as a reference I decided to base the look of an aging Terminator on how Arnold truly aged in real life, instead of the way he was powdered up in the film.

So I've painted a lot of moles and liver spots around his hairline, basing their overall placement on pictures of Arnold I've found around the internet. Unfortunately the end result isn't that much visible in the photos, as much of the skin blemishes ended up covered by blood and dirt. Plus it was quite subtle to begin with (you want him to look old, not decrepit).
WVsAcfD.jpg


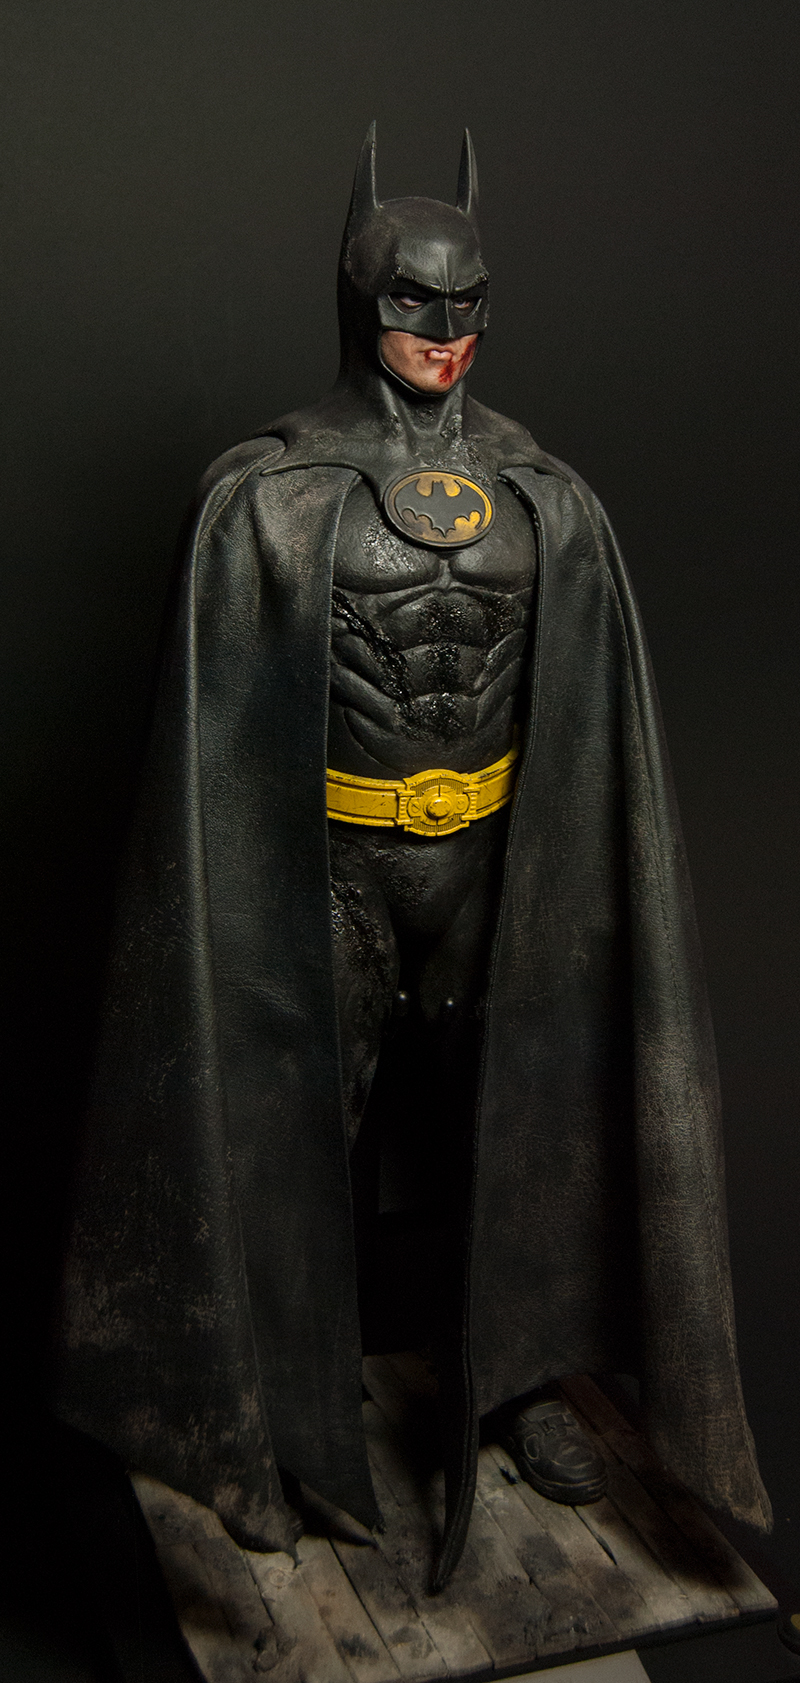
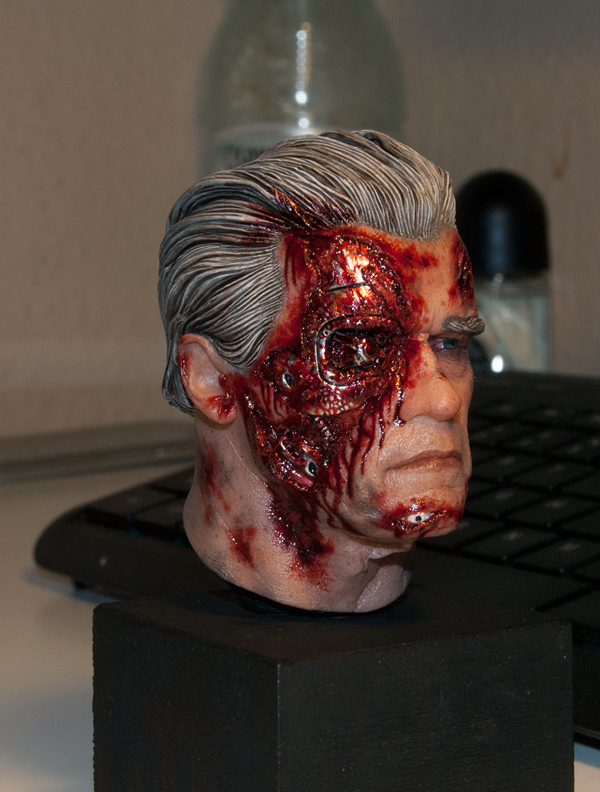
The second, bigger change was done in regards to his facial damage.

TERMINATOR GENISYS was a movie made with PG-13 category in mind so it's depiction of violence was largely bloodless and toothless. The facial damaged done to T-800's face during the movie final battle looked relatively sterile. Which is silly considering it's a depiction of someone with half his head ripped off.

So I decided that I would base my painting more on his look from the final battles of Terminator 1,2 and 3, which looked appropriately more gruesome.

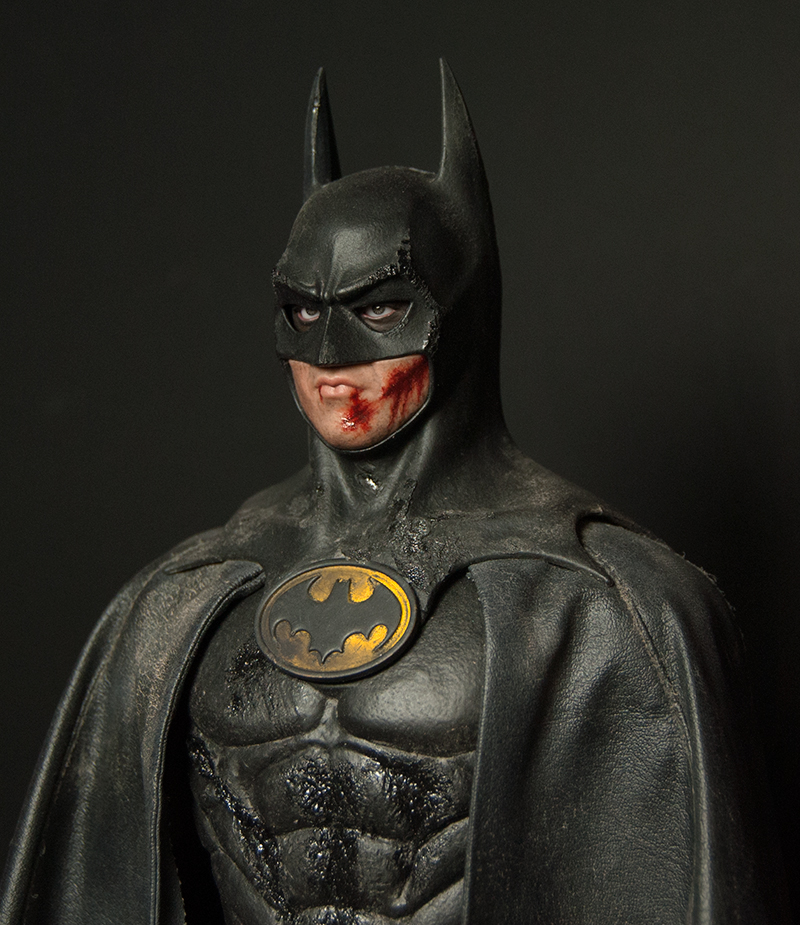
Initially I wanted it to look like his face in T1, which was the bloodiest of the three, but after consulting various reference photos of different hollywood prosthetic appliances as well as some rather gruesome real-life facial wounds, I came to the conclusion that even his look in T1 was realistically too clean and subtle for what it was meant to represent.

We are talking about a guy with half his face missing. It would bleed. A LOT. It should look like a mangled car crash. So that's what I set out to do. I wanted there to be a lot of individual details but only visible if you handled the bust up close, as the overall, initial impression of the wound was to be that of a mangled, bloody, chaotic mess.

I've expanded the sculpt a little bit by adding small patches of torn meat on his skull that were done using a fast drying acrylic resin. In the movie his face is ripped off by a punch from "Nano-Connor". I've figured that realistically even if Connor managed to rip his face in one punch, it definitely wouldn't be clean and it would surely leave some bits and pieces still attached to his skull, especially in the crevices of his eye socket.

There are also other details such as the yellow'ish deposits of fat, little rope'y strings of meat streching from point to point on his face wound that I made using acrylic resin or the visible texture of his lower jaw muscle. Unfortunaltely it's all very hard to see in the pictures as any combination of metallic and high-gloss, slimy surfaces is notoriously hard to photograph.

I also decided that his metallic skull should be mostly covered in gore, unlike the films which show a largely clean, metallic surface with just some red bits and pieces here and there. For reasons both of realism and pure looks. I though it would look much, much creepier if there was just a faint, messy suggestion of a metallic skull glinting from underneath all the gore. In some places on the skull I've painted the blood in a web-like pattern, similar to how water and paint looks like when applied on an oily surface, to show how the blood spreads around the clean metal.

uT3Wcdf.jpg

GojncMO.jpg


In the end, the project turned out to be less about depicting Arnold Schwarzenegger exactly as he looked in a specific moment in the film, and more about making a realistic take on a general subject of what an old T-800 with an aging bio-layer would look like if he'd gotten himself in a heavy scrap.
 
That’s beautiful paint work! I’m particularly impressed by the ‘webbing’ effect of the blood on the endo skull. Attention to detail is spot on.
 
Back
Top