Hemble's Customs 1/6 indy vignette 25/05/08

Collector Freaks Forum

Help Support Collector Freaks Forum:

This site may earn a commission from merchant affiliate links, including eBay, Amazon, and others.
Hi All

Ryan1982 - Thanks mate and you are correct it is a easy custom to do especially with all the gear you can get out there. Look forward to seeing your version.

PS - sorry for some pictures that are showing the dreaded red x the server I go thru is having tech problems at the moment, hopefully it will be all fixed up by tonight.

Ron
 
Hi All

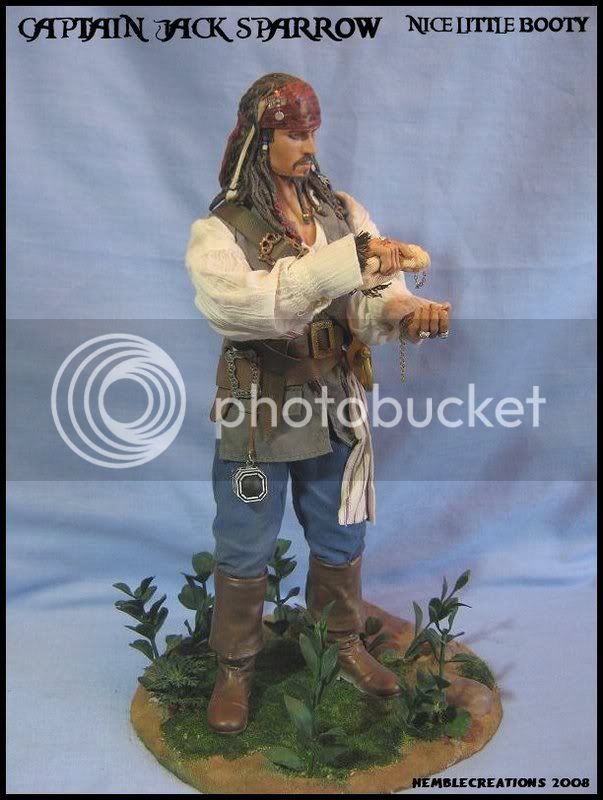
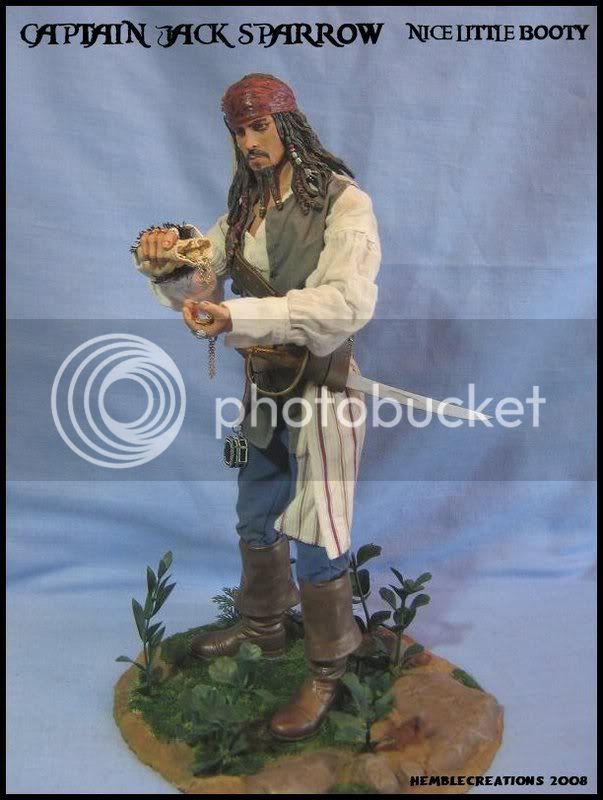
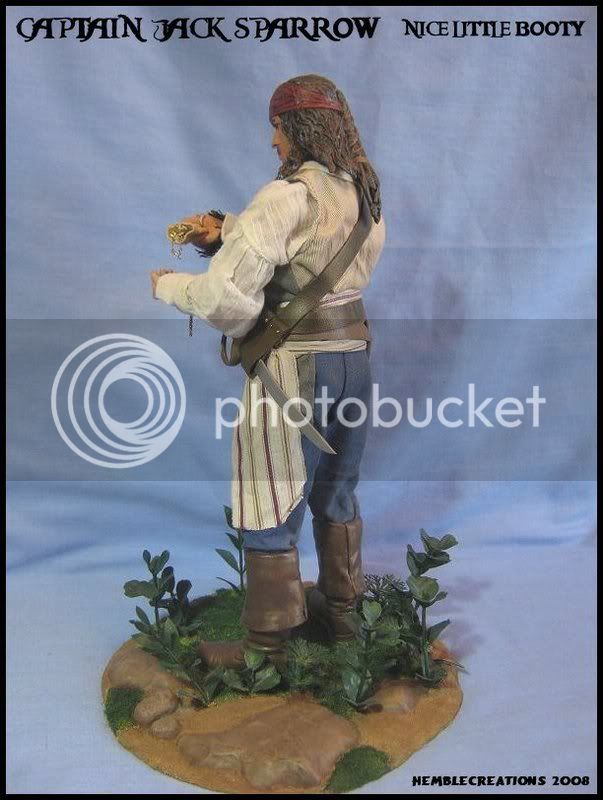
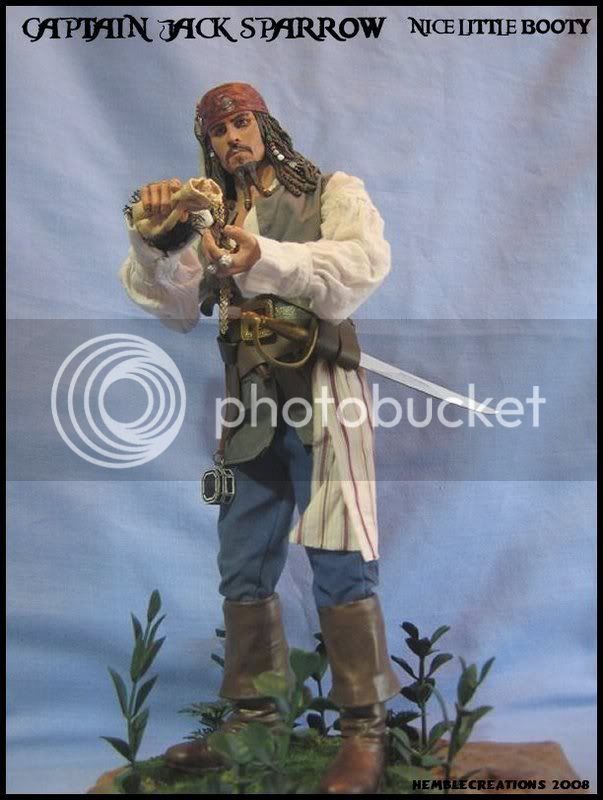
I've always wanted to Sparrow ever since I saw POTC but could never find a good sculpt of him, then I saw a POTC Sparrow produced by a company called Zizzle. The figure was very cheap as it was a mass produced figure the clothing and head sculpt needed work but nothing to hard to fix up. Once the figure and base were completed they were painted using Vallejo, Reaper and GW paints.

RECIPE

1: Body, head & hands - The body is from Dragon, the head is from Zizzle and the hands are from BBI, The head was stripped of the old paint and repainted as were the hands. The rings on the fingers are from the old Zizzle hands I cut them off and put them on the BBI hands.

2: Uniform and euipment - Are all from Zizzle except the pants which are Dragon, the clothing as been boiled in fabric softner and a 1/4 teaspoon of bleach and once dry have been altered to fit the smaller Dragon body.

The sword has had it's blade replaced with a blade cut and shaped from plasticard and the pistol had been repainted.

3: Base and Gold - the base is a 7" Disney Indiana Jones base I used sculpty to cover over the stone blocks and made rocks/boulders, it was then covered in model railway static grass and fine sand and the plants are plastic fish tank plants. The whole base was painted using Vallejo Paints.

The Loot is some old chain I had in the bits box and the coins are WW2 1/6 scale buttons sanded down and then painted to look like tarnished gold, the bag has been made using a old 1/6 pair of pants cut and sewn together.

js1.jpg

js2.jpg

js3.jpg

js5.jpg

js6.jpg


Ron
 
excellent as ever Ron, you have a real eye for the detail as well as placing the figure in an enironment that compliments it.......very good :chew
 
that Captain Jack is AWESOME. Great work as always. I have been really tempted to get that Zizzle Jack and revamp it myself as the Hot Toys ones are way out of my price range.

After seeing this I really am going to have to get it.

Great stuff.

Dean :D
 
Hi All

tigerfeet - Thanks mate and appreciate the comments, I'm not big on moving figures around in different positions so putting them on dioramas was the way to go for me especially doing military models for years.

DarkAngelDTB - Cheers Dean and Thanks heaps, I'm the same some figure lines cost way to much for me to get. So opting for the cheaper versions is the way to go and to be honest the sculpts and clothing aren't bad at all.
Going for the Hasbro Indy's next and see what I can do with them.

Ron
 
Hi All

While on an expedition in the South American Jungle Indaina Jones discover a cavern with ancient ruins inside, He quickly grabs a rope and starts the DESCENT down to discover what treasures and mysteries can be found.

This was a really fun dio to make as it didn't have to do with anything from the movies so I could make what I wanted. Once the dio and figure were built and puttied they were painted using Vallejo, Repaer and Games Workshop paints.

I wanted to give this diorama a feeling that Indy is climbing down the rope but I also wanted to add depth by adding different levels such as the columns and stones being different levels, and making the rope hang in mid air as if it's tied to something and amking it longer then the column.

To simulate Indy decsending down the rope while in mid air I drilled a hole in the column and in Indy's leg and cut some coat hanger wire and inserted it both into both.

RECIPE

1: The figure and base - The figure/base are from Disney's 7" line the figures joints have been superglued and then sculpty clay used to fill in the gaps. It was the repainted and hand from a 7" Star Trek figure were replaced with the original hands.

The base has had an extra column added by cutting of the top and then gluing another one on top, the part that was cut off was added to the base. The stone blocks have been put into place then an axtra smal stone block was added and placed on top of one if the buried stone blocks.

The plants are a combination of plastic fish tank plants which have been drybrushed, lichen moss which a got from a craft store and model railway shrubs from woodland scenics. The dirt is fine sand reapainted and dry brushed, The bones are from some dinosaurs kits I had in my bits box.

il1.jpg

il2.jpg

il3.jpg

il4.jpg

il5.jpg

il6.jpg


Ron
 
man your work is so unbeleivable!!! You are very taleneted and i love all your dios!
How did you do to weather the relic hunter jacket!
seb
 
Hi All

I have to say a big sorry for not posting to everyone's replies, I got over excited doing customs before I headed off over seas with my unit. i got back xmas eve which was great so I have 5 weeks off to catch up on everyones customs and and to start more myself.

uscmhicks - Cheers mate always glad to hear your input.

Grange Wallis - Mate while I was overseas my wife got me 3 SS indy's so you will be seeing some custom work very soon, the first of whhich will be a vignette of indy in the map room.

elvis1976 - Appreciate the feedback mate and thank you, as for the jacket I use fine sand paper and rub all over the jacket, then I drybrush it using matt black, GW snakebite leather and GW scorched brown and keep drybrushing till I get the desired affect.

Yodee - Thanks mate and more on the way.

Ron
 
Hi All

Well this was the last lot of figures that I have done enjoy and comments more then welcome. There are 12" and 3-3/4" figures/vehicles.

Escaping the Temple (ROTLA) 12 inch

After retrieving the Golden idol from it's pedestal Indy turn's with relief, Now all he has to do is get out of the Chachapoyan temple and he's home scott free. But before he even takes a step he hears a rumbling sound and then the walls and ceiling start to collapse.

Indy leaps from the steps forgetting the pressure pads and the darts that will surely exit there resting place and try to hit him, ESACPING THE TEMPLE is Indy's only concern.

Once I got the desired pose on the figure I used Vallejo and Games Workshop paints to repaint and drybrush the figure and base.

RECIPE

1: Head & Fedora - Are both both from The frontline custom heads this is the new head and fedora.

2: Body & Hands - The body is from Dragon and the hands are from Sideshow toys.

3: Shirt, Pants & Bag - Are from the Relic Hunter figure.

4: Boots, Holster Belt - Are from Dragon

5: Whip, Holster - These are all hand made using left over pieces of leather.

6: Jacket - The jacket is from a Dragon WW2 German fighter pilot, it has has it's insignia taken off and then pockets and side pull straps added.

7: Base - The base I got from a craft shop, the stone floor has been scribed using a model knife and sribing tool. The stone pressure pads are pieces of cardboard cut out and glued on the base, Then plaster of paris was used and dabbed on to simulate stone. The fine sand and foliage are from woodland scenics.

e1.jpg

e2.jpg

e3.jpg

e4.jpg

e5.jpg
 
Indiana Jones 12 inch

While exploring the Jungles of Mexico (1938) for acient ruins and buried treasure Indy comes across some unruly characters, so before they can get the drop on him Indy pulls not only his trusted whip but also his Colt M1917 revolver which he uses sometimes instead of his webley.

RECIPE

1: Head & Fedora - Are both both from The frontline custom heads this is the new head and fedora

2: Body, Pants & Hands - The pants & body are from Dragon and the hands are from Sideshow toys.

3: Shirt, Bag - Are from the Relic Hunter figure.

4: Boots, Holster, Holster Belt, Whip & Jacket - Are all from the Hasbro talking Indy figure, the all but the Jacket were just repainted as they have some great detail to them. The jacket has had some minor work such as weathering and the pull straps added to the jacket.

5: Base - The base is the 7" Disney's Indiana Jones with fine sand added and plastic fish tank plants added to give the jungle feel to it.

jj1.jpg

jj2.jpg

jj3.jpg

jj4.jpg

jj6.jpg
 
X-WING PILOT 12 inch

I've decide to make this figure after I found all the pieces I needed in my bits box's. This small vignette depicts an X-wing pilot waiting for his fighter to be prepped so he can climb aboard so he can go on patrol. Once I got the figure into the pose I liked the head and all the equipment were painted using Vallejo, Reaper and Games Workshop paints.

RECIPE

Body, Head - Are from Dragon Models

Boots, Gloves - Are from Dragon Models, the boots are WW2 German officer boots and the gloves are from a modern day soldier.

Helmet, flight suit and life support reader - Are from Hasbro, the flight suit has been altered to give a snug fit and the helmet has had transfer added from Games Workshop. The life support reader has had the old flexible straps taken off and new ones added.

Helmet linning - Is from Dragon Models it has been altered and a microphone has been added using pieces from the bits box.

Holster, belt,and Pistol - Holster and belt are from Dragon Models an which have been altered from other belts etc, and the Pistol is from the old AMT Han Solo kit.

Base - The base has been cut from foamcore and has had balsa wood added to the bottom for strength. the small power units are old ink cartridges and the hoses are from an old printer cord cut to size. The base was painted to resemble a flight deck with dirt and oil stains added for realism.

xw1.jpg

xw2.jpg

xw3.jpg

xw4.jpg

xw5.jpg
 
REBEL SNIPER (ENDOR MOON) 12 inch

After the ordeal with the Ewoks Solo and Skywalker organise a plan to take down the shield that protects the second Death Star. For this plan to work they rely on Rebel Sniper ( Ronjul Rerdon) to take up a position that will allow him to take out key personal.

On recieving his task Rerdon positions himself 200 metre's east of the shield bunker behind a fallen tree stump, here he can take out any Imperial that he sees fit without Compromising his position.

RECIPE

Body, Hands and Head - Are all from a Dragon Models 12" figure, I replaced it with the Sideshow body as I like the Dragon bodies better for Diorama purposes.

Clothing and Equipment - Are all from Sideshows Rebel Commando figure, except the belt and holster which is from a modern soldier figure, the mesh around the neck and sniper rifle are from a WW2 Aussie Digger figure, and the gaiters are from a WW2 German soldier.

Sniper Rifle - Is from the Rebel commando figure it has been modified by adding a longer barrel using plastic tubing, the scope has been lengthened by adding another scope from a Dragon Model rifle.

Base - The base is foam core with thick cardboard added for strength, the ground work is a mixer of plaster of Paris, kitty litter, fine sand and static railway grass. The mixer was watered down and placed and spread over the base. The fallen tree stump I picked up out of the back yard, the shrubs are from woodland scenic's and the taller plants are plastic fish tank plants.

rs1.jpg

rs2.jpg

rs3.jpg

rs4.jpg

rs5.jpg
 
Indiana Jones & The Raiders of the Lost Ark (German Cargo Truck) 3-3/4"

When Hasbro released the Cargo Truck I knew straight away that I wanted to do a diorama with it, but due to time and heading overseas I've decided that I will finish the diorama when I get back. So until then enjoy what I've done it so far and enjoy.

RECIPE

You can see the conversion technics here
C:\Documents and Settings\User\Desktop\WEB PAGE\indy 4inch.htm

tr1.jpg

tr2.jpg

tr3.jpg

tr4.jpg
 
Indiana Jones & The Last Crusade (Fleeing the Coronado) 3-3/4"

I watched The Last Crusade the other night and when the scene came on when Indy swings off the Coronado and ends up in the drink I new that I had to give this scene a go. The scene isn't 100% accurate but I was extremely happy with the way it turned out especially never doing an ocean diorama before.

RECIPE

1: Figure, Cross of Coronado & Life saver - The indy figure is from Hasbro it's the ROTLA series 1 figure the one with the huge holster. I cut him off at the waist and put him in the pose I wanted and then puttied him up using Games Workshops Greenstuff.

The life preserver is from a babies rattle I cut off the end of the rattle and cut out the inner section and then glued the two ends together. I then added string around the edges using thin string, the writing is from some transfers which you rub on with a pencil. The Cross of Coronado is from Hasbro's Young Indy, I just cut it off and placed in Indy's hand and added a small chain from the bits box. The white hat is from a Indy figure which I just cut out a small section on the front left hand side and then painted it white.

2: The CORONADO - is made from cardboard cut to the desired shaped and glued togther using superglue, the holes in the Stern section were traced drawn on then cut out. I decided to give the stern a few holes made by explosions I did this by just cutting a cross into the cardboard and pulling the cardboard forward.

The flames are from an old Human Torch figure which I've had lying around and the smoke is some fake Halloween spiderwebs, I sprayed them slightly and then pulled them apart and glued inplace using PVA glue. The writing was done by writing on the hull with a pencil then using the pencil as a guide painted over that.

3: Water - The water is made from plaster of paris, I let it dry a little and then used a large hard bristle brush to simulate the bubbling affect around the hull. I then used a spoon to simulate waves, I did this by putting the teaspoon into water then pushing into the drying plaster and gave it a slight push to get the affect I wanted.

I then painted the water using a dark green and let it dry then using a watered down two part mix of dark green and light green gave the whole base a wash of this mixture. Once the paint dried I used Matt white and dry brushed the bubbling area's and the waves.

co1.jpg

co2.jpg

co3.jpg

co4.jpg

co8.jpg

co10.jpg
 
waouw my friend pretty amazing custom you got there! Did you see my snake custom! I used the relic hunter jacket and weather it a lot!
cheers buddy
 
My man, your stuff is brilliant!
Love the X-Wing pilot. He looks gritty and real! The weathering is excellent!
The base on the sniper is tops! Much better than the figs just standing around, like on my shelves. I must try to do the same!
Brilliant!!!!
 
Back
Top