My experience has been that I receive a shipping notice with tracking information. It won't update until it hits the states (L.A. customs), then the USPS tracking kicks in.
You are using an out of date browser. It may not display this or other websites correctly.
You should upgrade or use an alternative browser.
You should upgrade or use an alternative browser.
Asmus Toys: Boromir
- Thread starter Asmus
- Start date


Help Support Collector Freaks Forum:
This site may earn a commission from merchant affiliate
links, including eBay, Amazon, and others.
asgardianboy
Super Freak
- Joined
- Jan 16, 2016
- Messages
- 1,625
- Reaction score
- 107
A masterpiece this is..... I am speechless.
I had already eyed and bought the Commonwealth headsculpt (bought it from Blackops during last Black season), and wanted to do, one day, some day, what you just did. I knew that, if properly done, it would beat the crap off Asmus's head (even if they retry now).
The same applies to Gandalf: there is some figure going around that sports a flawless Mckellen sculpt. Take that, root it well, and you can forget about any other Gandalf headsculpt, present or future.
Back to your masterpiece: you shaved the guy perfectly. Mandibles are flat and even after beard removal. Also the neck. No seams after paint application. I'd say those areas present pores too. Flawless.
Did you first remove the previous paintjob? If affirmative, was it after or before shaving?
Have you actually recreated skin detail on shaved areas or is it just a trick of the light (and the paintjob)?
Redid the eyes and eyebrows? Those blue eyes are very intense (unless Photoshop involved).
I just can't tell the difference on the cheeks.
What was the reason of resculpting them? They seem very similiar now...
Regarding the hair: you kept the sculpted hairline. Seen it done in several rooted figs (HT and others). Clever, but not perfect yet somehow...... Much better than not keeping it, that's for sure!!
If you used product for styling, it seems not to be glossy, or hurt the hair's appearance at all... amazing.
HOW
DID
YOU
DO
IT!!???!?!?")
Only (slight) problem with the Commonwealth head: expression. Not enough gravitas.
Thanks!
m.
I had already eyed and bought the Commonwealth headsculpt (bought it from Blackops during last Black season), and wanted to do, one day, some day, what you just did. I knew that, if properly done, it would beat the crap off Asmus's head (even if they retry now).
The same applies to Gandalf: there is some figure going around that sports a flawless Mckellen sculpt. Take that, root it well, and you can forget about any other Gandalf headsculpt, present or future.
Back to your masterpiece: you shaved the guy perfectly. Mandibles are flat and even after beard removal. Also the neck. No seams after paint application. I'd say those areas present pores too. Flawless.
Did you first remove the previous paintjob? If affirmative, was it after or before shaving?
Have you actually recreated skin detail on shaved areas or is it just a trick of the light (and the paintjob)?
Redid the eyes and eyebrows? Those blue eyes are very intense (unless Photoshop involved).
I just can't tell the difference on the cheeks.
What was the reason of resculpting them? They seem very similiar now...
Regarding the hair: you kept the sculpted hairline. Seen it done in several rooted figs (HT and others). Clever, but not perfect yet somehow...... Much better than not keeping it, that's for sure!!
If you used product for styling, it seems not to be glossy, or hurt the hair's appearance at all... amazing.
HOW
DID
YOU
DO
IT!!???!?!?
Only (slight) problem with the Commonwealth head: expression. Not enough gravitas.
Thanks!
m.
The sides of the beard was also shaved down and the cheeks resculpted.
Asguardianboy, first off...
Thank you for the kind words but more than that Thank you for the amazing questions it really touches me because I can see you’ve thought about this head before and therefore cult undseratand the complexity that goes along with what I fandangled here is not lost on you and for that I appreciate it greatly.
Once again it was Rob who turned me into this and spotted the diamond in the rough. He deserves a lot of credit.
You’re correct the full head and the eyes were totally stripped and repainted and I did concentrate on the vibrancy of the blue and position of the puples.
The beard was so so hard. I sanded the sides of his cheeks down by hand and the I retextured it wirh a needle. It took hours and hours.
Repainting it blended it all in.
You’re also correct in that I left just a slight slight bit of the hairline enough so that it blended in with the sight slight hairline i always paint in otherwise usually using a mm or less of a very thin brush.
The product is a mix of revlon hair gel and future floor polish heavily watered down and hours of selecting the right parts with the right wave and consistency from a giant piece of yak hair Hyde dyed three times over to get that correct shade of his hair.
I have to say this is not even the most radical way I transformed this sculpt. I changed it to another Sean bean character from much later in his life over the last weekend and took even more drastic measures to transform it ! I’ll share that soon.
mr flibble
Super Freak
So your gonna sell the other head then Raymond hint hint 
asgardianboy
Super Freak
- Joined
- Jan 16, 2016
- Messages
- 1,625
- Reaction score
- 107
Buddy,
more than kind, my words were due. You made my vision come true, much sooner than I ever could and much better than I had imagined it should be done (pores with a needle? resculpted cheeks? no way!!).
The customs you guys pull here are jewels that deserve lots of cheering, especially if this kind of artistry you guys practice is not your main mean of income and you do this in the surely very little spare time work leaves you, and after (or instead of!!!) home/love/family/friends. And all out of sheer love to beauty and to Tolkien's work. Not bad!
And yeah: I know what you sent through. It is not lost. And I am keeping the pics and any comments you have made thus far on how you pulled it.
I had eyed the Commonwealth head loooong ago, along with that other McKellen head and the Elijah Wood head I'd like to do for Frodo. All of them are great renditions of the actors' faces, if not appropiate for the subject matter at hand, and hence need oceans of work to get them where I want them. But I had to grab them before they vanished, to give my future self a chance at them (I don't think Asmus is ever going to do their heads that well). I got Magneto and Elijah first because they began to be rare (first one was always rare), but took me ages to get to the point where I could buy Sean. Lots of other items were more important that a head I don't need and I know I'll never get to customize (because to do so I'll first have to go through a hell of a training phase and I don't see that happening anytime soon...).
And then... there was you man!
When I first saw your pics I was so glad I was not alone in this!
I have stored them, along with any of your technical comments thus far, and.... well.... let's see if next year.... but I don't know.... :-(
Who's Rob btw?
---------
OK, for the record (and as reference for my future customizing self), let me get this straight, because I have spent a big deal of time scheming this one out, even before buying the head. Were these the steps you took?:
0) You don't strip the paintjob until the end. Might be useful as a reference to perform the initial tasks.
1) You decide where you should start shaving around the goatee: carefully finding and marking (with, say, an exacto) the points where you will start scratching afterwards (also with the exacto) a sort of frontier between the goatee and the excess hair. Those points must form a line that should look natural, flowing along naturally with the sculpted strands or flocks of hair and not just cutting them harshly, so that scratching the frontier will leave a goatee with a slightly irregular, organic, natural looking outline. If some flock/strand couln't be kept from looking "cut", some refining with the exacto and sandpaper will be needed to terminate them in a natural-looking way (just like Sweeney Todd would do it).
2) Once a sort of natural looking frontier is clearly traced, and the goatee already has a life of its own, you carefully sand the areas of excess hair on mandible and neck, with special care put on the frontier not to hurt the goatee. The challenge here would be smoothing the whole thing off in a natural-looking way while keeping face morphology intact.
3) Replicate complex, Zbrush-generated detailing: replicate the pattern of pores. OMG............ You really have to practice with some dummy head made of the same plastic to really get the effect OK before attacking Boromir. What kind of needle did you use, man??
4) Removing hair: you have to leave a very smooth surface for the rooted hair to be applied on, while keeping the hairline and the head's own morphology (how difficult!!!!). Dremmel first, exacto second, sandpaper(s) third, right? Did you keep ALL THE HAIRLINE, even in unseen areas, if only for nonsensical perfection? ;-p
5) Ears: are those actually the original ears? Look bigger on your piece... Was it needed to make sure hair could be tucked behind them?
6) Cheek resculpting?? Why?? What was wrong with the original ones? What did you achive? How do you re-sculpt a head sculpt???
7) Paintjob removal (no paint on paint damn it!!!!) and paint applications with emphasis being put in covering hard transitions/screwups while keeping the small details (pores).---> I am clueless here. How do you do non-crossed, vibrant eyes with realistically vascularized white areas? And eyebrows/eyelashes? How many washes, of what colours, on the beard and hairline? How do you do that realistic skin texture? I mean, you choose a base skin colour that sets how dark the guy will be (how do you determine that?) then maybe some whases, and then some flecking/speckling? Then how do you pull the latter? And then you also have to decide on hair color for the goatee/eyebrows, which then you'll have to match with that of the rooted hair, as you did so perfectly...!
8) Hair rooting.--->Even more clueless. You get that Tibetan Yak hair that is white(?) in the beginning and then you dye it "the right color" (oh man, that must involve so many tries... how do you decide on colour?). And well... then you do whatever it is that you do!! (I know nothing about rooting hair).
9) Styling: noted! Thanks for the tips!
All this correct? Am I forgetting any step? Any tips on replicating the pores?
I can easily imagine this whole process being not only difficult, but also stressing: you screw ANYTHING, you just ruined a $30 headsculpt and got nothing.
----------
Now, and even if it is already too late, some suggestions concerning your rooted hair:
1) What color have you painted the area behing the hairline? Shouldn't it be the same color as the rest of the skin, so that some natural whitening will be seen at the middle line? (the line where each half of the hair "helmet" begins)
Is this base scalp colour affected by the rooting process? How?
2) Shouldn't you have shaved the widow's peek and made the hairline flat at that point? Believe it or not: the original has no widow's peek, and if done properly, the ensuing slightly enlarged front would be even accurate! Check it out yourself!
3) In the skin area VERY near to the sculpted hairline, would it be better to slightly darken the skin? I think I have seen it done on some rooted figs... can't remember which ones right now though...
4) Rooted hair should totally cover the area behind the sculpted hairline, especially at the widow's peak. It is not like that right now.
5) The sculpted hairline itself should be barely visible, highly integrated with the densely rooted hair (at least in that crucial area).
What do you think of these points Raymond?
--------
Finally, and since you seamlessly resculpted the cheeks and seem to know a lot about resculpting, I'd like to ask you whether you think that some more resculpting could get this head to look more stern, or improve its accuracy. I do think that there are some clear accuracy problems left. I am comparing with these pics:
https://vignette.wikia.nocookie.net...boromir.jpg/revision/latest?cb=20110327195115
https://vignette.wikia.nocookie.net...sion/latest?cb=20121023114949&format=original
Problems would be as follows:
- The lower lip is not the way it should (too thick at the center, too thin at the edges). Would it be very difficult to fix?
- Ears are way too big (looks like an elf), even if it might be needed for being able to tuck the hair behind them. Maybe transplanting them from some other headsculpt might help, but that would definitely be a hard one to pull right?
- Moustache and eyebrows to thick / dense. More shaving needed there.
- Chin has too much volume to it. Very hard to fix: redoing the hair texture... OMGs...
- Nose too thick. Very difficult to fix too?
- Are Bean's eyes actually blue...?
As to how make the guy more stern...... no friggin' idea..............
LMK!!!
Thanks,
m.
Asguardianboy, first off...
Thank you for the kind words but more than that Thank you for the amazing questions it really touches me because I can see you’ve thought about this head before and therefore cult undseratand the complexity that goes along with what I fandangled here is not lost on you and for that I appreciate it greatly.
Once again it was Rob who turned me into this and spotted the diamond in the rough. He deserves a lot of credit.
You’re correct the full head and the eyes were totally stripped and repainted and I did concentrate on the vibrancy of the blue and position of the puples.
The beard was so so hard. I sanded the sides of his cheeks down by hand and the I retextured it wirh a needle. It took hours and hours.
Repainting it blended it all in.
You’re also correct in that I left just a slight slight bit of the hairline enough so that it blended in with the sight slight hairline i always paint in otherwise usually using a mm or less of a very thin brush.
The product is a mix of revlon hair gel and future floor polish heavily watered down and hours of selecting the right parts with the right wave and consistency from a giant piece of yak hair Hyde dyed three times over to get that correct shade of his hair.
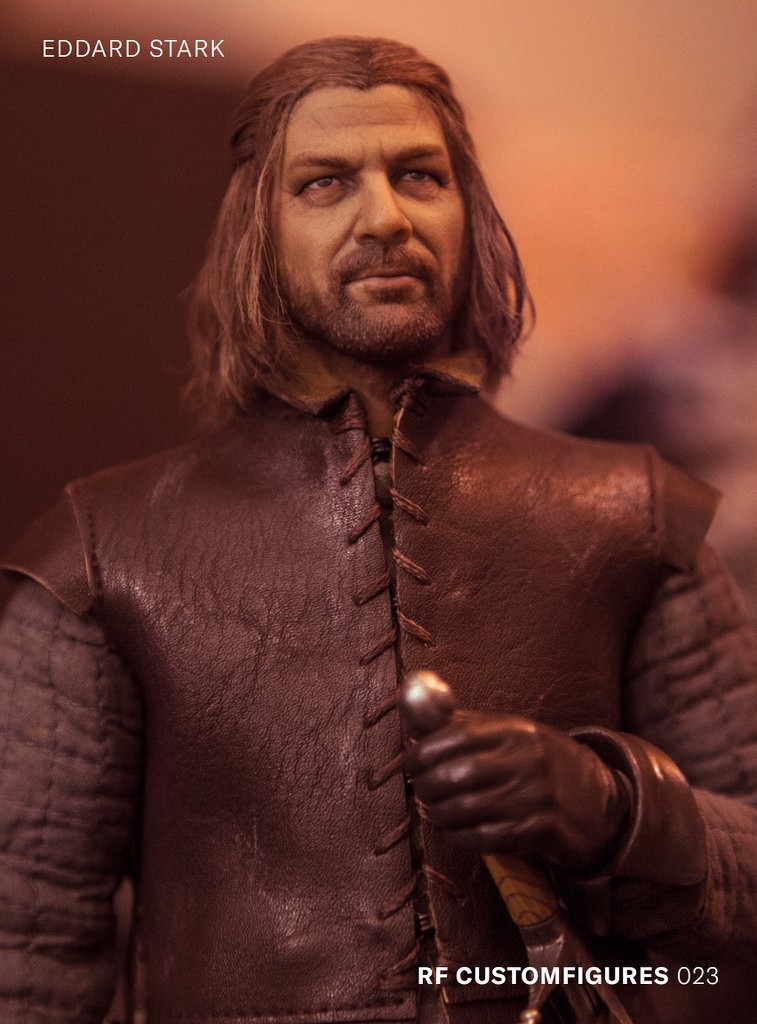
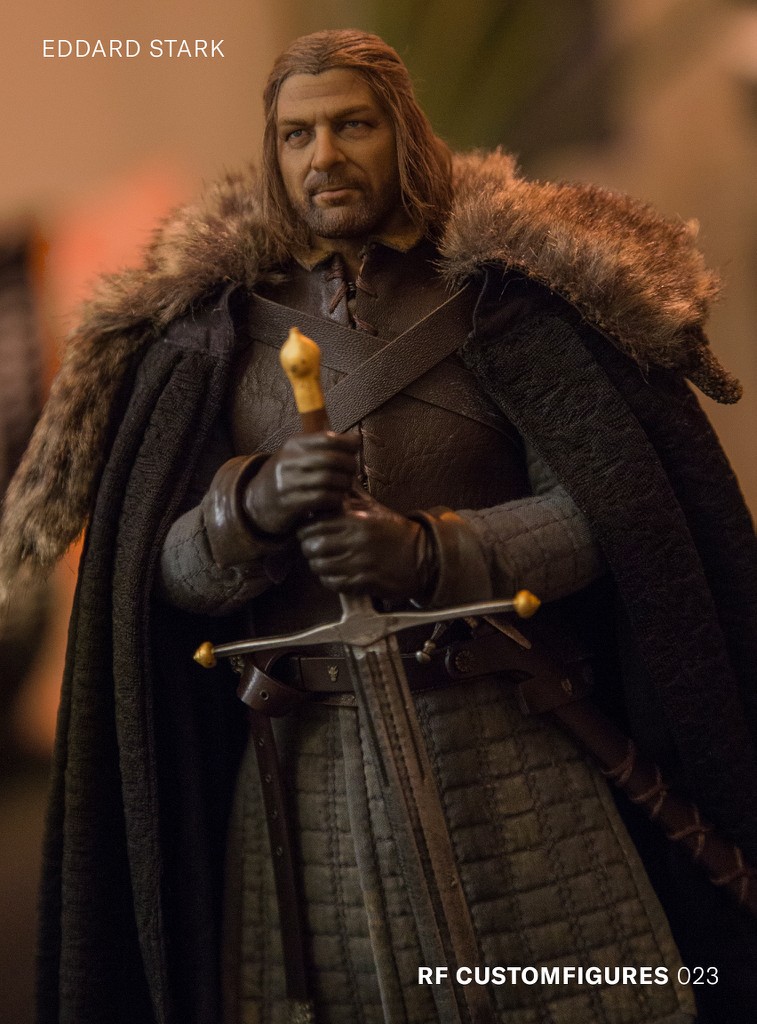
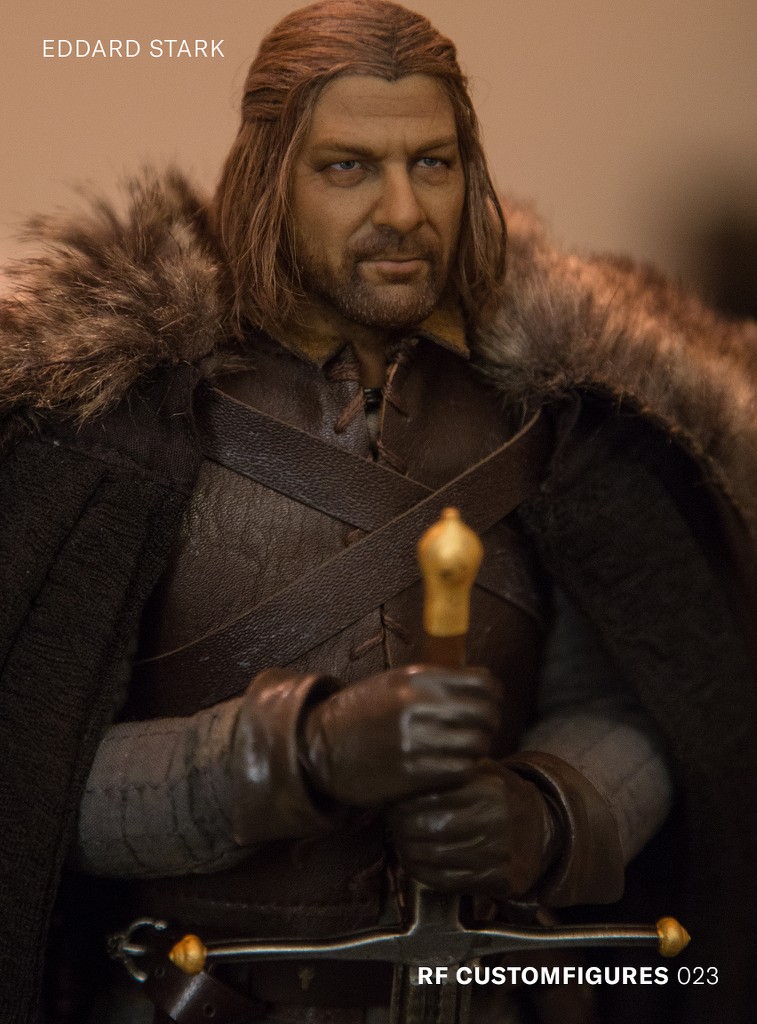
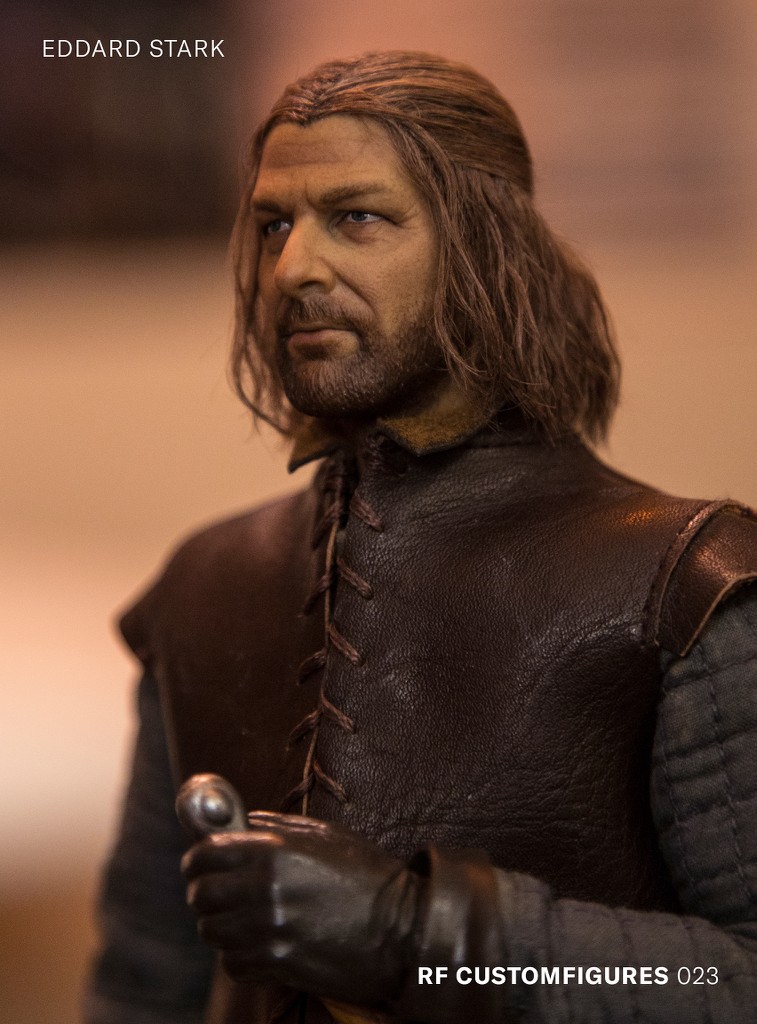
I have to say this is not even the most radical way I transformed this sculpt. I changed it to another Sean bean character from much later in his life over the last weekend and took even more drastic measures to transform it ! I’ll share that soon.
I have to say this is not even the most radical way I transformed this sculpt. I changed it to another Sean bean character from much later in his life over the last weekend and took even more drastic measures to transform it ! I’ll share that soon.
006!!!!
Sadly not i think as Goldeneye came before FotR. My guess is Eddard Stark. But i do need a Trevelyan figure ... hmm006!!!!
Buddy,
more than kind, my words were due. You made my vision come true, much sooner than I ever could and much better than I had imagined it should be done (pores with a needle? resculpted cheeks? no way!!).
...
... Thanks,
m.
Once again I can't thank you enough for the kind words and I love the passion you have for these kinds of projects and love that there are others in the community who strive for this kind of art or perfection in their collection!
I am always more than happy to give as much insight and advice as I can as I love it when people are inspired to pick up some tools and customize! I love sharing advice and tips and have had the advantage of doing that with many in the community. Guys like Jake Rahmier and Shane Poole gave me a few new tools for the toolbox recently and I need to give them props.
Those guys make a living off of commissions and they gave me a few tips in confidence that I'd never divulge out of respect for them since I only do my work for myself (and I've given a few tips back to them
. But I will happily always share what I've developed from my own fooling around!I also want to plug my buddy Jake who has just started a brilliant idea, a Patreon where you can contribute to get various levels of his teaching on how to do these very specific things! I have no doubt that with Jake you will get the most comprehensive advice out there.
Instagram : jrahmier
and the link is in his bio
Here's some responses
1) It depends on your comfort level, for me I've gotten pretty comfortable painting so I went ahead and stripped the paint job fully. I had wanted to be able to make sure that when I sanded down those cheeks that the paint that was left over was not distorting my POV on if the cheeks were smooth enough
2) Yup exactly
3) Funnily enough I just used a big ol regular sewing needle and a toothpick (which I pressed hard for and broke a million) I've worked with all kinds of plastics and resins in this crazy little obsession of mine so I could tell this plastic would be malleable to leave some imprints with those devices. I just textured until it felt natural to me. hundreds of pores!
4) yup thats exactly it. at this stage I looked at a **** ton of references to make sure his cranium would look right, this takes a bit of imagining how the character would look like bald and a general sense of anatomy. best approach to hair is to make them totally bald with the exception of a very faint natural sculpted hairline which is generally more realistic to blend in. but it can work without it too (totally bald) it's a bit trickier
5) yup original ears. I definitely carved out some extra space above them and behind them so the hair could tuck behind them though.
6) I must have wrote that wrong! Sorry to mislead. the cheeks were sanded and texture added But I didn't actually resculpt them.
7) Such good questions! For stripping the paint I'll see how far a thinner can get me before I go to something industrial like Goof Off. This needed Goof off but I knew the elastic was soft so it takes dozens of really light wipes with something soft like a Q tip to get it all off. I don't like primers, they goop things up and take away from realism so if the plastic is the right color I paint right on it, there are tricks to change the complexion after the paint job is done if it's slightly off. If I'm working with a resin I try and dye it the right base shade with synthetic RIT Dyemore Dyes. I usually paint in wrinkles or crevices with light washes, then add in skin detailing with a lot of light stippling. This takes hours and hours. then I'll go in Wirth some washes for color, a bit more rosy in the cheeks and nose, darker in the recesses of the face and the eye sockets or ears etc. then I go and paint the eyebrows and lips or facial hairs, finally the eyes and lastly the eyelashes. I do everything by hand. Don't know how the hell to use an airbrush. I use light washes of testers acrylics and dry brush on regular chalk pastels in places if I need to warm or cool a complexion. Doing the fine details takes tiny ass brush, magnifying glasses, a steady eye, practice, good judgement and the most patience in the world.
8) the yak hair I started with was blonde (as a rule you can go darker not lighter but the base color will determine the shade of the result, like deep yellow blonde hair will be warmer in tone than starting off light brown) and I went to CVS and got the color closest to Boromir's and dyed with with a Loreal product. I did this twice to get it as close to the box as I could. then when I started to work with it I realized in such little quantity it had too be a shade darker to look correct (when hairs are in bulk they appear darker) so I dyed it darker with synthetic brown to shade the whole thing a bit darker. I start with selecting the right spot and I use the hair gel to get it looking right, I cut it and glue it around the back of the head working my way up to the very top. if you're half way done your guy should look like Hulk Hogan lol. Not sure how else I could describe it haha
Good thoughts and suggestions also!
1) I do find going darker with a light wash of paint to disguise the parts and not leaving the white line of the scalp makes for a more realistic blending in of the glue (and almost all roots appear darker closer to the skull) I've seen some guys go like hair by hair to get those parts and hairlines as natural as possible not sure how they do it! I don't think my skill level is there yet. not sure who I feel is the best at hair out there to be honest. I've seen some guys totally nail some stuff and others looked a bit off. Same goes for my work, I think its just because this is probably the hardest thing to do in this hobby. specific short hair styles are the absolute worst.
2) Good eye and good point about the widows peak it does appear to have a slight widows peak in my final result
3) Yes and this trick is a good one when painting hair too, it makes the hairline less apparent. I think I just didn't consider it for this but it might indeed help a bit.
4) it actually is like that but my photos are not ultra sharp so its hard to tell, they glue down right to the edge of the hairline and I made sure so the part was as flat as possible to be as natural. I'd say parts and hairlines are the hardest part about all this. Some guys do it better than others. I'm not sure its possible to get it completely realistic but I'm hoping to be proven wrong one day!
5) a lot of guys like to go without a sculpted hairline at all for those reasons, some feel that the sculpted hairline actually looks more natural and some prefer it to be completely bald. . I've seen both that can look good, I think it depends on your skill level. Working on parts and hairlines is the area I'm most keen to get better at I think this is my best attempt yet but lots of room for growth!
- Joined
- Sep 30, 2015
- Messages
- 817
- Reaction score
- 142
Raymond and asgardianboy, thanks so much for that interaction of yours, with so much to learn from it. I really appreciate all your tips and thoughts about all the processes involved to create such a beautiful sculpt. I hope I'll have a little time in the next days to give a try to my first customized headsculpt, and all this info is really helpful. Cheers!
Sadly not i think as Goldeneye came before FotR. My guess is Eddard Stark. But i do need a Trevelyan figure ... hmm
You sir guessed right
- Joined
- Sep 30, 2015
- Messages
- 817
- Reaction score
- 142
Awesome, Raymond!!! 
Dresky
Super Freak
- Joined
- Oct 5, 2015
- Messages
- 622
- Reaction score
- 12
So i wanted to redo my Boromir with real hair, etc, but then i noticed the Asmus figure's face was just glued there.
I said screw this, i'm lazy and my talent is limited, let's go with the face transplant instead.
So far, so good lol. Just need to rework the beard/goatie and i'll be happy with it LOL.


I said screw this, i'm lazy and my talent is limited, let's go with the face transplant instead.
So far, so good lol. Just need to rework the beard/goatie and i'll be happy with it LOL.


DarthBakura
Super Freak
They do it like that because it’s easier to construct I guess?
Dresky
Super Freak
- Joined
- Oct 5, 2015
- Messages
- 622
- Reaction score
- 12
They do it like that because it’s easier to construct I guess?
Never noticed before. Apparently Aragorn's head is built like that too. They could sell swapable faceplates instead of full heads.
DarthBakura
Super Freak
That’d be pretty awesome actually. I’m not sure when they started doing that though? And some heads would be better off replaced entirely, such as Legolas, due to him having sculpted hair.
great job on Boromir Ray! Dresky that looks great too . something i wouldve done lol 
BBTS has the rooted hair version for 20% off. Pretty good deal.
https://www.bigbadtoystore.com/Product/VariationDetails/56021
The pics on their site may not be the greatest, but I actually think this is one of the better figures in this line. The costume is terrific and the likeness is solid. Especially after a bit of minor hair futzing.
https://www.bigbadtoystore.com/Product/VariationDetails/56021
The pics on their site may not be the greatest, but I actually think this is one of the better figures in this line. The costume is terrific and the likeness is solid. Especially after a bit of minor hair futzing.
matmurdock
Super Freak
- Joined
- Apr 2, 2016
- Messages
- 475
- Reaction score
- 395

 I finally grabbed Boromir. I haven't really had too much time to futz with him yet. I could not resist the BBTS sale on him.
Similar threads
- Replies
- 1
- Views
- 153
- Replies
- 5
- Views
- 353
- Replies
- 18
- Views
- 2K
- Replies
- 1
- Views
- 240
- Replies
- 0
- Views
- 152