


"Click on images for a larger view, all ratings out of 5 stars"
Over the years, there are some TV shows that just keep going a little longer then they should and some that you wonder why they ever got made at all. Then there are those that ended way too soon. Created by Joss Whedon, the man behind Buffy, Firefly was one such show that ended way before it’s time. A mixture of an old style western, with rebel characters trying to eek out a living, while staying one step ahead of the law, all set in space, some 500 years in the future.
In typical Whedon style, it drew you in through very real characterisations as you followed the lives of the crew of a Firefly class transport named Serenity. Unlike many other ‘space dramas’, not only do the crew seem very real, but the ship is also completely thought out as if it was a real space craft that a group of people had to work and live in.
From the film, “Serenity”, which set out to at least bring some type of closure to the short lived TV series, the collectible company Quantum Mechanix also set out to make real, what was basically a CGI model, and bring the most detailed replica of the ship to life. After a few years of development work, it is now possible to purchase your very own, film quality miniature replica of Serenity.
Packaging – 4 and a half stars
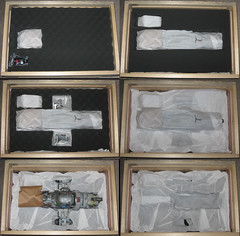
Just like most collectibles today, Serenity arrives in the usual brown cardboard box. However, once you open that, the similarities basically end. You know you have something a bit different, when instead of using a sharp knife to get to your latest purchase, you need a screwdriver!
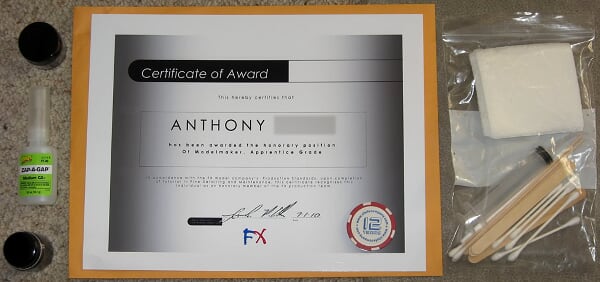
For inside the cardboard box, you’ll find a wooden shipping crate, with a long screw in each corner holding the lid in place. Once you have that off, sitting on top is a general packing list, your signed builders plaque and exclusive art print by Jason Palmer, with matching edition number.
After that, you face what is essentially a layered cake of custom cut black foam. As you life up each layer, more of your Serenity is revealed, from the remote control (for the lighting system), to the reactor flaps and shuttle(s). Then, finally, about half way down, it hits you, the top of Serenity, in all of it’s amazing and breathtaking beauty.
As you continue down, there is also the stand, the power supply and the base.
It is about as well packed as you can get, but even then, it seems the postal system can be brutal. Just like all other photos I’ve seen, mine too arrived with a bent antenna spike on the top of the cockpit. The very first replica’s to go out, had resin spikes and they snapped off. Since then, all have been like mine, metal with extra packing protection covering over them. However, even tho that still wasn’t enough, being metal, I was able to just bend it back. My other minor problem was that the rear Primary Thrusters had come off. It was just a clean pop off at the join spot and was otherwise undamaged. Unfortunate with such a high priced collectible, but also easy to fix, just a drop of glue and you’d never know. At its core the packaging did its job, nothing was actually scratched or chipped or technically broken. Given the ‘throwing around’ packages seem to get, I’m not sure what else QMx could do to protect Serenity any more. Of course the replica is also full insured, so if any real damaged had happened, then that would cover the cost and QMx would fix it up.
Sculpture – 5 stars
The first thing you’ll notice when you take a close look is the shear detail in the model. Then when you look even closer, you’ll notice yet more detail, up to the point where you start to go crossed eyed, just trying to focus on all the minuscule detail.
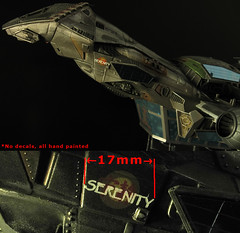
Did I mention that she has amazing detail.... at around 30cm away, you see all the pin head size rivets, yes, that’s right, this ship is actually held together, it looks like it’s been built. Once you get nearer, around 15cm away and assuming your eyesight is good enough, you then see all of the pin prick size rivets. These aren’t just painted, dot’s, they are real sculpted detail in the ship’s hull, all clearly defined and round, even tho the whole replica is covered in layers of paint. Every square centimetre just has the same level of incredible level of detail that helps to make the Serenity replica just look so real. No wonder it took so long to produce the initial 250 parts which makes up each model, there’s just no room for error when it comes to assembly.
Paint Application – 5 stars
As we all know, a good sculpt can be ruined by a bad thick paint job and in the case of Serenity, it wouldn’t even need to be that thick to obliterate much of the fine detail work in the replica. Fortunately the paint work on Serenity is superb, from what must be very thin layers in order to not hide details, to sharp edges, clean lines and weather work that actually looks as if the paint has peeled off, without having actually peeling off paint. All general ‘operation’ type effects are present, like soot around exhaust ports, natural wear on parts, differences in hull plating were Serenity has been repaired, to all numbers, markings and even the logo being painted on.
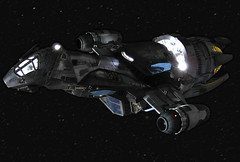
More than anything, what really strikes you, from the very first time you open the packaging, is just how real Serenity looks. The whole paint application reacts to light just as a filming miniature should; making it very easy to believe there’s a crew inside, just flying around the verse.
Extras - 5 stars
This is a section that gets very interesting, especially compared to other companies that offer an exclusive ‘extra’ to the standard version. At first, Serenity was going to have the option of a SFX version (that’s one with a full light-up feature) and a standard version with no lights. However, since everyone wanted lights, that was the only one produced.
Outside of that, and the fact you get an exclusive art print by Jason Palmer and a signature plaque by Nathan Fillion, you also have the option to customise Serenity in a variety of ways. Each shuttle can be either docked, sitting on the launch arms ready for take-off or in flight, you can have the reactor flaps open or closed, the main side engines can be straight back or vertical or even in different directions (Crazy Ivan). All of this is possible because each one is hand-made for you, I know of one person that has a missing primary buffer panel and I personally got three different builders plaques.
Most of this can all be done just within that standard price, if you want something a bit more special, then you can talk that over with QMx and any additional cost will be agreed on.
Final Word
Since it’s not technically an extra, I didn’t really cover it above, but something must be said about the lighting. In a word, it’s fantastic, you get a little remote control that turns on the main lighting and also has buttons to turn on the rear reactor (which will do a ‘hard burn’ flash soon after being turned on and then continue to flash a little), the grav rotor, which has a circling cycle of lights and finally various flashing strobe running lights around the ship. In a darken room, the whole area gets filled up with white and yellow light, making Serenity look amazing.
One minor downside that should be mentioned, is that the power brick that comes with Serenity is totally American, both its plug and voltage requirements. As such, being in Australia, I had to buy a Stepdown Transformer in order to get it too work at all.
The lighting did also have one other downside, once I got it working, in so much that inside Serenity, all these lights a very bright, meaning that any little gaps or holes show up as very bright white light leaks. For the most part it’s not a big deal, like a thin light line inside the top of the docking bay. However, what I did have which was very noticeable, was 3-4 light holes in the dark concave join area between two main side parts of the ship between the cockpit and shuttle bay. Before I got the lights working, I never knew they were there, the join part is a very dark colour anyway and since inside was all dark, one just couldn’t see it. But as soon as I turned on the lights, it was like I had a few ‘large’ holes in my hull; I could almost hear the crew suffocating LOL.
So I took a photo and sent it off to QMx to see what could be done. I was given a couple of choices, either send it back to the shop for them to fix up or have a go at fixing it myself. Given the already mentioned minor shipping damage, the last thing I wanted to do was risk a two-way postage back and forth. Now I’m no model making or even any sort of painter, but these were only a couple of very small holes (like 1-2mm) in an area that required no real painting skills or anything, it wasn’t like it was an area on top of some well painted hull plating, it was a join spot, mostly nothing but black and really only needed a dark little bit of filler or something.
So I figured with the right it of ‘stuff’, I could do it myself. As such and at no expense to myself, I was sent a little repair/patch kit, with instructions, on how to plug my couple of light holes and having Serenity looking as good as new. Now sure, for the price one shouldn’t even have to, but then you shouldn’t get a statue was a so-so paint job either, yet it happens and to be fair, unless you had Serenity’s lights on, was looking at the exact right spot, at the right angle, on the correct side and didn’t have bright studio/lights on, then you could have easily missed it. At first, I did. The more import part was that it was all fixed, as easy as it could be with total support from QMx all the time.
The final thing I will say, on a positive note, the one thing I was hoping for and in fatc expecting, was to have a ‘studio scale’ replica, that looked so real, you could put it on a motion control rig, point a camera at it and think it was real. Even without doing all that, if you can see past the size (ie, it’s a model sitting on one’s desk, not a full size ship in space), then the detail and paint work is so real, that I often find myself, picturing the Firefly crew in an episode moving around inside.
As Jayne says, ‘Let’s go be bad guys’.....
Packaging – 4 and a half stars
Sculpture – 5 stars
Paint Application – 5 stars
Extras – 5 stars
Overall - 5 stars
Name: Serenity Big Damn Replica
Manufacturer: Quantum Mechanix
Edition Size: 1000
Price: $2495 USD
Availability: Made to Order
Distributors: QMx (www.qmxonline.com ), and all good collectible retailers
Over the years, there are some TV shows that just keep going a little longer then they should and some that you wonder why they ever got made at all. Then there are those that ended way too soon. Created by Joss Whedon, the man behind Buffy, Firefly was one such show that ended way before it’s time. A mixture of an old style western, with rebel characters trying to eek out a living, while staying one step ahead of the law, all set in space, some 500 years in the future.
In typical Whedon style, it drew you in through very real characterisations as you followed the lives of the crew of a Firefly class transport named Serenity. Unlike many other ‘space dramas’, not only do the crew seem very real, but the ship is also completely thought out as if it was a real space craft that a group of people had to work and live in.
From the film, “Serenity”, which set out to at least bring some type of closure to the short lived TV series, the collectible company Quantum Mechanix also set out to make real, what was basically a CGI model, and bring the most detailed replica of the ship to life. After a few years of development work, it is now possible to purchase your very own, film quality miniature replica of Serenity.
Packaging – 4 and a half stars
Just like most collectibles today, Serenity arrives in the usual brown cardboard box. However, once you open that, the similarities basically end. You know you have something a bit different, when instead of using a sharp knife to get to your latest purchase, you need a screwdriver!
For inside the cardboard box, you’ll find a wooden shipping crate, with a long screw in each corner holding the lid in place. Once you have that off, sitting on top is a general packing list, your signed builders plaque and exclusive art print by Jason Palmer, with matching edition number.
After that, you face what is essentially a layered cake of custom cut black foam. As you life up each layer, more of your Serenity is revealed, from the remote control (for the lighting system), to the reactor flaps and shuttle(s). Then, finally, about half way down, it hits you, the top of Serenity, in all of it’s amazing and breathtaking beauty.
As you continue down, there is also the stand, the power supply and the base.
It is about as well packed as you can get, but even then, it seems the postal system can be brutal. Just like all other photos I’ve seen, mine too arrived with a bent antenna spike on the top of the cockpit. The very first replica’s to go out, had resin spikes and they snapped off. Since then, all have been like mine, metal with extra packing protection covering over them. However, even tho that still wasn’t enough, being metal, I was able to just bend it back. My other minor problem was that the rear Primary Thrusters had come off. It was just a clean pop off at the join spot and was otherwise undamaged. Unfortunate with such a high priced collectible, but also easy to fix, just a drop of glue and you’d never know. At its core the packaging did its job, nothing was actually scratched or chipped or technically broken. Given the ‘throwing around’ packages seem to get, I’m not sure what else QMx could do to protect Serenity any more. Of course the replica is also full insured, so if any real damaged had happened, then that would cover the cost and QMx would fix it up.
Sculpture – 5 stars
The first thing you’ll notice when you take a close look is the shear detail in the model. Then when you look even closer, you’ll notice yet more detail, up to the point where you start to go crossed eyed, just trying to focus on all the minuscule detail.
Did I mention that she has amazing detail.... at around 30cm away, you see all the pin head size rivets, yes, that’s right, this ship is actually held together, it looks like it’s been built. Once you get nearer, around 15cm away and assuming your eyesight is good enough, you then see all of the pin prick size rivets. These aren’t just painted, dot’s, they are real sculpted detail in the ship’s hull, all clearly defined and round, even tho the whole replica is covered in layers of paint. Every square centimetre just has the same level of incredible level of detail that helps to make the Serenity replica just look so real. No wonder it took so long to produce the initial 250 parts which makes up each model, there’s just no room for error when it comes to assembly.
Paint Application – 5 stars
As we all know, a good sculpt can be ruined by a bad thick paint job and in the case of Serenity, it wouldn’t even need to be that thick to obliterate much of the fine detail work in the replica. Fortunately the paint work on Serenity is superb, from what must be very thin layers in order to not hide details, to sharp edges, clean lines and weather work that actually looks as if the paint has peeled off, without having actually peeling off paint. All general ‘operation’ type effects are present, like soot around exhaust ports, natural wear on parts, differences in hull plating were Serenity has been repaired, to all numbers, markings and even the logo being painted on.
More than anything, what really strikes you, from the very first time you open the packaging, is just how real Serenity looks. The whole paint application reacts to light just as a filming miniature should; making it very easy to believe there’s a crew inside, just flying around the verse.
Extras - 5 stars
This is a section that gets very interesting, especially compared to other companies that offer an exclusive ‘extra’ to the standard version. At first, Serenity was going to have the option of a SFX version (that’s one with a full light-up feature) and a standard version with no lights. However, since everyone wanted lights, that was the only one produced.
Outside of that, and the fact you get an exclusive art print by Jason Palmer and a signature plaque by Nathan Fillion, you also have the option to customise Serenity in a variety of ways. Each shuttle can be either docked, sitting on the launch arms ready for take-off or in flight, you can have the reactor flaps open or closed, the main side engines can be straight back or vertical or even in different directions (Crazy Ivan). All of this is possible because each one is hand-made for you, I know of one person that has a missing primary buffer panel and I personally got three different builders plaques.
Most of this can all be done just within that standard price, if you want something a bit more special, then you can talk that over with QMx and any additional cost will be agreed on.
Final Word
Since it’s not technically an extra, I didn’t really cover it above, but something must be said about the lighting. In a word, it’s fantastic, you get a little remote control that turns on the main lighting and also has buttons to turn on the rear reactor (which will do a ‘hard burn’ flash soon after being turned on and then continue to flash a little), the grav rotor, which has a circling cycle of lights and finally various flashing strobe running lights around the ship. In a darken room, the whole area gets filled up with white and yellow light, making Serenity look amazing.
One minor downside that should be mentioned, is that the power brick that comes with Serenity is totally American, both its plug and voltage requirements. As such, being in Australia, I had to buy a Stepdown Transformer in order to get it too work at all.
The lighting did also have one other downside, once I got it working, in so much that inside Serenity, all these lights a very bright, meaning that any little gaps or holes show up as very bright white light leaks. For the most part it’s not a big deal, like a thin light line inside the top of the docking bay. However, what I did have which was very noticeable, was 3-4 light holes in the dark concave join area between two main side parts of the ship between the cockpit and shuttle bay. Before I got the lights working, I never knew they were there, the join part is a very dark colour anyway and since inside was all dark, one just couldn’t see it. But as soon as I turned on the lights, it was like I had a few ‘large’ holes in my hull; I could almost hear the crew suffocating LOL.
So I took a photo and sent it off to QMx to see what could be done. I was given a couple of choices, either send it back to the shop for them to fix up or have a go at fixing it myself. Given the already mentioned minor shipping damage, the last thing I wanted to do was risk a two-way postage back and forth. Now I’m no model making or even any sort of painter, but these were only a couple of very small holes (like 1-2mm) in an area that required no real painting skills or anything, it wasn’t like it was an area on top of some well painted hull plating, it was a join spot, mostly nothing but black and really only needed a dark little bit of filler or something.
So I figured with the right it of ‘stuff’, I could do it myself. As such and at no expense to myself, I was sent a little repair/patch kit, with instructions, on how to plug my couple of light holes and having Serenity looking as good as new. Now sure, for the price one shouldn’t even have to, but then you shouldn’t get a statue was a so-so paint job either, yet it happens and to be fair, unless you had Serenity’s lights on, was looking at the exact right spot, at the right angle, on the correct side and didn’t have bright studio/lights on, then you could have easily missed it. At first, I did. The more import part was that it was all fixed, as easy as it could be with total support from QMx all the time.

The final thing I will say, on a positive note, the one thing I was hoping for and in fatc expecting, was to have a ‘studio scale’ replica, that looked so real, you could put it on a motion control rig, point a camera at it and think it was real. Even without doing all that, if you can see past the size (ie, it’s a model sitting on one’s desk, not a full size ship in space), then the detail and paint work is so real, that I often find myself, picturing the Firefly crew in an episode moving around inside.
As Jayne says, ‘Let’s go be bad guys’.....
Packaging – 4 and a half stars
Sculpture – 5 stars
Paint Application – 5 stars
Extras – 5 stars
Overall - 5 stars
Name: Serenity Big Damn Replica
Manufacturer: Quantum Mechanix
Edition Size: 1000
Price: $2495 USD
Availability: Made to Order
Distributors: QMx (www.qmxonline.com ), and all good collectible retailers


