I'm slowly building the Eaglemoss Delorean kit and I thought I'd share my experiences building the Delorean for anyone interested. I've tried to document the progress periodically but I admit I've let a few boxes pile up and busting through like 15% of the kit in a weekend. Here's some of the photos:
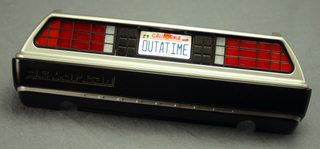
This is what you have after the first delivery. It's made up of several parts that all screw together. The main rear bumper facade is metal with several plastic parts and teeny tiny screws. I thought I saw some flashing on one of the tail-lights at first, but after looking closer it's actually a DMC logo that's actually molded onto the real tail-light lenses.
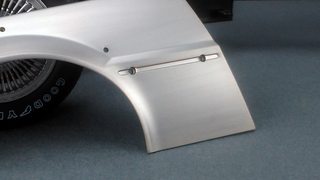
One of the fenders come with the bumper parts as well. It's not used until much later but it's a hefty metal part that looks realistic.
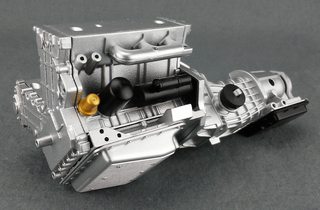
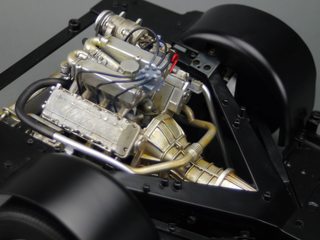
Jumping ahead around issue 15-20 you start getting the parts for the engine. Made up of several individual parts that build-up to a decent looking engine. I got the wrong transmission (automatic) but EM is sending out replacements to NA subscribers now that they have the correct parts in so hopefully it's not a problem going forward.
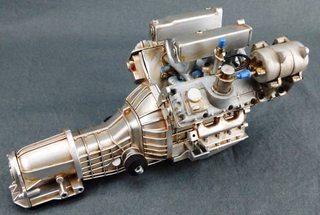
Here's the engine with a little weathering. It really brings it to life! I'm not sure if you guys do much of this kind of stuff to action figures/props but where I come from (model builders) a little weathering can make-or-break a finished kit. The first coat of weathering was kept light so I could gradually add to it as more parts came in.
At this point I've just used a little thinned out oil paint to tone the metal and highlight a few parts.
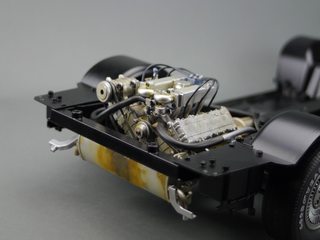
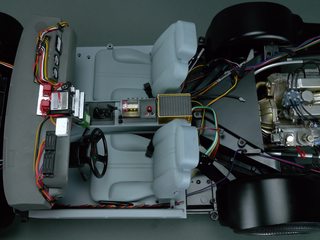
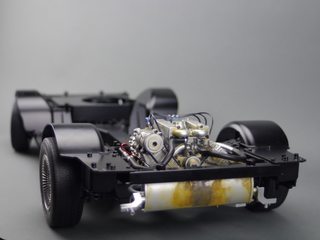
Here it is fitted to the rolling chassis. It does start looking pretty cool at this point since it's now a recognizable thing (automotive chassis)
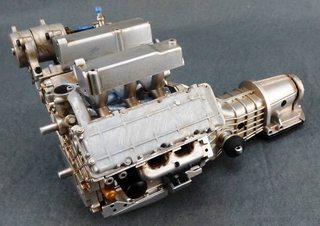
Engine has had the exhaust system attach which has also been given some weathering.
The subsequent weathering was done with tamiya weathering masters powder. It works well and seems to work well on most parts. Some of the colors (you get three in the weathering masters kit) stick great to some surfaces and not-so-great on others. Rust seems to be pretty reliable and helps the undercarriage parts stand-out while looking more realistic.
This was a short time-lapse video I made of the frame and suspension buildup.
If you guys have any questions about specifics feel free to ask!
This is what you have after the first delivery. It's made up of several parts that all screw together. The main rear bumper facade is metal with several plastic parts and teeny tiny screws. I thought I saw some flashing on one of the tail-lights at first, but after looking closer it's actually a DMC logo that's actually molded onto the real tail-light lenses.
One of the fenders come with the bumper parts as well. It's not used until much later but it's a hefty metal part that looks realistic.
Jumping ahead around issue 15-20 you start getting the parts for the engine. Made up of several individual parts that build-up to a decent looking engine. I got the wrong transmission (automatic) but EM is sending out replacements to NA subscribers now that they have the correct parts in so hopefully it's not a problem going forward.
Here's the engine with a little weathering. It really brings it to life! I'm not sure if you guys do much of this kind of stuff to action figures/props but where I come from (model builders) a little weathering can make-or-break a finished kit. The first coat of weathering was kept light so I could gradually add to it as more parts came in.
At this point I've just used a little thinned out oil paint to tone the metal and highlight a few parts.
Here it is fitted to the rolling chassis. It does start looking pretty cool at this point since it's now a recognizable thing (automotive chassis)
Engine has had the exhaust system attach which has also been given some weathering.
The subsequent weathering was done with tamiya weathering masters powder. It works well and seems to work well on most parts. Some of the colors (you get three in the weathering masters kit) stick great to some surfaces and not-so-great on others. Rust seems to be pretty reliable and helps the undercarriage parts stand-out while looking more realistic.
This was a short time-lapse video I made of the frame and suspension buildup.
If you guys have any questions about specifics feel free to ask!